Most articles about automating Instagram posts are about scheduling tools — Buffer, Hootsuite, Later. They assume you already have a video ready to go. This one doesn’t.
This tutorial builds a complete developer pipeline that takes a topic as input and produces a published Instagram Reel as output, with no manual steps in between. A language model writes the script and caption. ElevenLabs turns the script into a voiceover. OpenAI’s image model generates the background. Shotstack assembles and renders the Reel. The Instagram Graph API publishes it.
By the end you’ll have a single Node.js function — createAndPostReel(topic) — that does all of it.
TL;DR
- OpenAI’s Chat API writes the script and caption from a single topic input.
- ElevenLabs generates the voiceover. It returns raw audio bytes, so you upload them to Shotstack Ingest for a public URL.
- A GPT Image model generates the background. It returns base64 image data, hosted the same way.
- Shotstack renders the 1080×1920 MP4 and the Instagram Graph API publishes it as a Reel.
- The key detail that trips up most implementations: neither ElevenLabs nor the current OpenAI image API returns a hosted URL — you need to host the raw data before Shotstack or Instagram can fetch it.
What “automating Instagram posts with AI” means for a developer
For a developer, automating Instagram posts with AI means building a three-stage pipeline:
AI content generation — script, caption, voiceover, visual assets
Video rendering — compositing assets into a finished vertical video
Publishing — posting to Instagram via the Graph API
No-code tools handle only the last stage. This tutorial covers all three. For a broader look at short-form video automation across platforms, see our guide to automating short-form videos. For the TikTok equivalent of this pipeline, see automating TikTok videos with AI.
What we’ll build
A Node.js pipeline that does the following:
Topic
  -> Generate script and caption with OpenAI
  -> Generate voiceover with ElevenLabs
  -> Upload voiceover to Shotstack Ingest
  -> Generate background image with a GPT Image model
  -> Upload image to Shotstack Ingest
  -> Render a 1080x1920 MP4 with Shotstack
  -> Publish the rendered video as an Instagram Reel
The upload step is what most brief descriptions of this pipeline get wrong. ElevenLabs text-to-speech returns audio bytes, not a hosted URL. OpenAI’s GPT Image models return base64-encoded image data, not a URL. Both assets need to be hosted somewhere publicly accessible before Shotstack can reference them in a render.
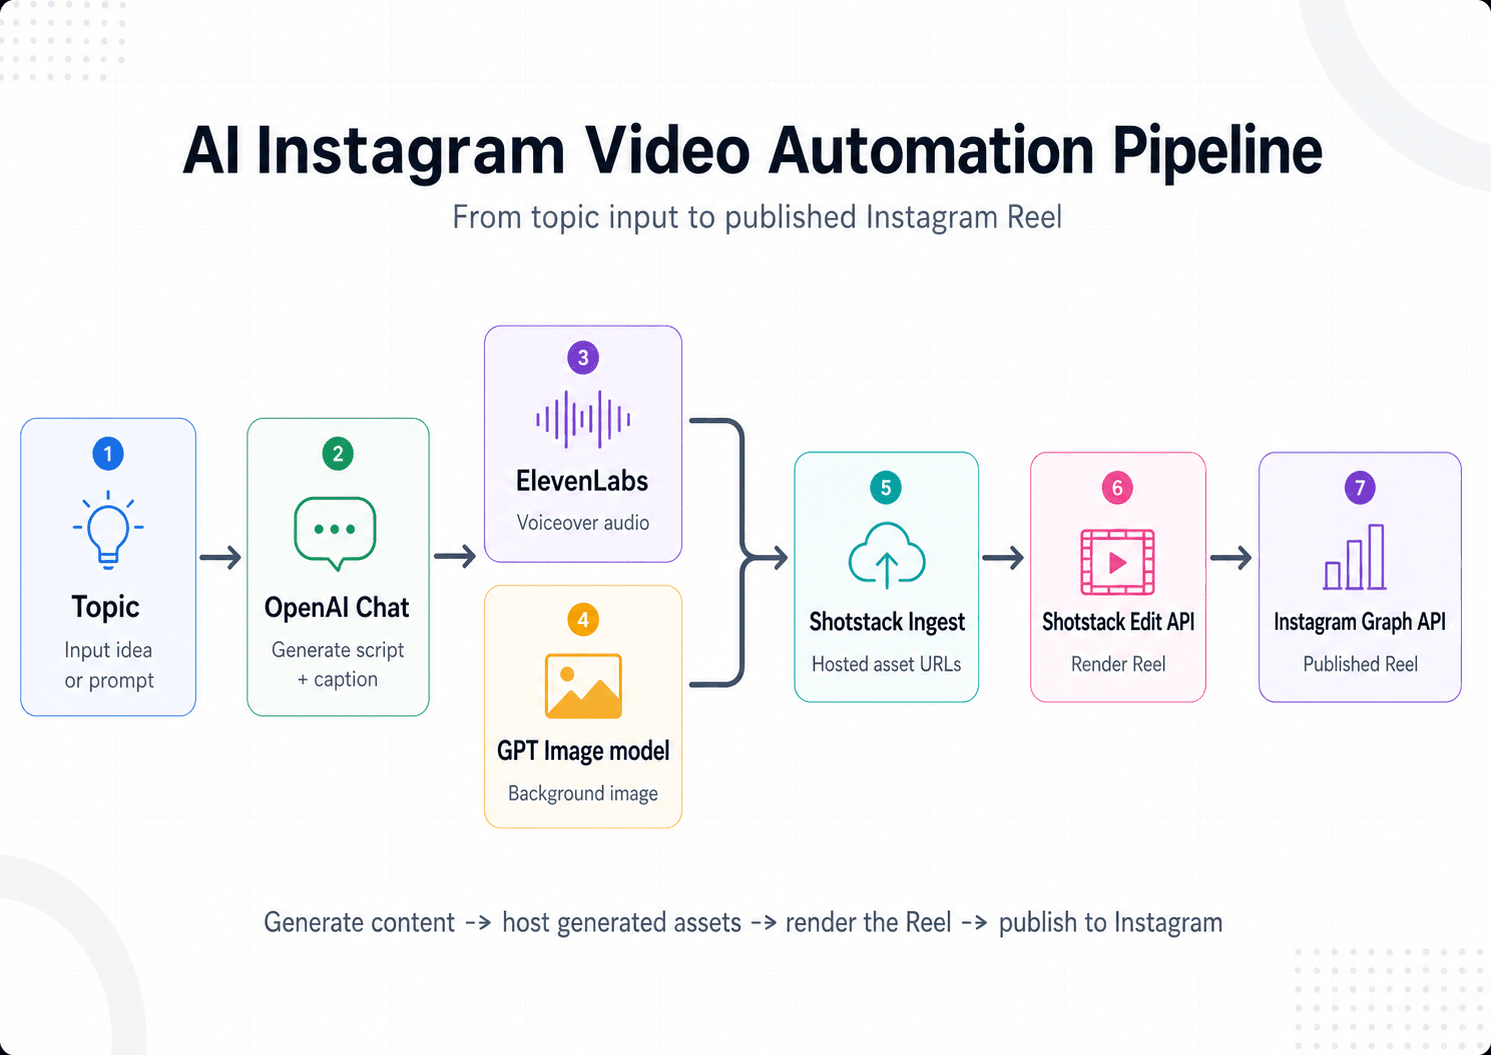
The full AI video automation pipeline: generate content, host generated assets, render the Reel, then publish it through the Instagram Graph API.
What you’ll need
OpenAI API key — for the Chat API (script + caption) and a GPT Image model (background)
ElevenLabs API key — for text-to-speech voiceover generation
Shotstack API key — you’ll need a production key for the final publish step. The Instagram container creation was succeeding, but the upload was failing with error code 2207076 when I tested with a staging key. Sign up at shotstack.io to get one.
Instagram Professional account — Business or Creator, linked to a Facebook Page (required for the Instagram API with Facebook Login used in this tutorial)
Meta Developer App with these permissions:
instagram_basic
instagram_content_publish
pages_read_engagement
pages_show_list
pages_show_list is required by some auth flows to discover the linked Facebook Page.
Node.js 18+
For the Facebook App setup and OAuth flow, follow Meta’s Instagram content publishing guide — the process is out of scope here. What you need going in are a valid long-lived user access token, your Instagram user ID, and the permissions above.
A note on Meta App Review: For testing this tutorial with your own account, you can keep the Meta app in Development mode. Development mode apps can only request permissions from users who have a role on the app — admin, developer, or tester — but that’s all you need to publish to your own Instagram Professional account. App Review is only required when you want external users (outside your app roles) to connect their accounts, or when you’re building a public product.
If you hit a permissions error during token generation, the most common cause isn’t App Review — it’s the Instagram account not being correctly linked to a Facebook Page, or the permission not being enabled at the app level before the token is requested.
Project setup
mkdir instagram-ai-video
cd instagram-ai-video
npm init -y
npm install openai dotenv
Node.js 18+ includes the global fetch API, so no additional HTTP library is needed.
Create a .env file:
OPENAI_API_KEY=your_openai_api_key
ELEVENLABS_API_KEY=your_elevenlabs_api_key
ELEVENLABS_VOICE_ID=your_voice_id
SHOTSTACK_API_KEY=your_shotstack_api_key
IG_USER_ID=your_instagram_user_id
IG_ACCESS_TOKEN=your_long_lived_access_token
OPENAI_IMAGE_MODEL=gpt-image-2
Create index.js and add the following imports at the top. All code in the steps below belongs in this file.
import 'dotenv/config';
import OpenAI from 'openai';

const openai = new OpenAI({ apiKey: process.env.OPENAI_API_KEY });
Add “type”: “module” to your package.json to enable ES module imports.
Step 1: Generate the script and caption with OpenAI
Use the Chat API to generate both the voiceover script and the Instagram caption from a single topic input. Requesting structured JSON output keeps the response reliably parseable.
async function generateContent(topic) {
  const response = await openai.chat.completions.create({
    model: 'gpt-5-nano',
    messages: [
      {
        role: 'system',
        content: `You are a social media content writer. Return JSON only, no markdown.
Schema: { "script": string, "caption": string }
- script: a 15-20 second voiceover narration (~40 words), punchy and direct
- caption: under 75 characters with 2-3 relevant hashtags`,
      },
      {
        role: 'user',
        content: `Write a script and caption for an Instagram Reel about: ${topic}`,
      },
    ],
    response_format: { type: 'json_object' },
  });

  return JSON.parse(response.choices[0].message.content);
}
This returns { script, caption }. The script goes to ElevenLabs next; the caption goes to Instagram at publish time.
This tutorial uses the Chat Completions API with json_object mode, which remains fully supported. For new projects OpenAI now recommends the Responses API and json_schema structured outputs — either works for this step.
Step 2: Generate the voiceover with ElevenLabs
The ElevenLabs text-to-speech endpoint returns raw audio bytes — not a hosted URL. You’ll receive an application/octet-stream response containing MP3 data. The uploadToShotstack helper in the next section takes care of hosting it.
async function generateVoiceover(script) {
  const voiceId = process.env.ELEVENLABS_VOICE_ID;
  const response = await fetch(
    `https://api.elevenlabs.io/v1/text-to-speech/${voiceId}`,
    {
      method: 'POST',
      headers: {
        'xi-api-key': process.env.ELEVENLABS_API_KEY,
        'Content-Type': 'application/json',
      },
      body: JSON.stringify({
        text: script,
        model_id: 'eleven_flash_v2_5',
        voice_settings: { stability: 0.5, similarity_boost: 0.75 },
      }),
    },
  );

  if (!response.ok) throw new Error(`ElevenLabs error: ${response.status}`);
  return Buffer.from(await response.arrayBuffer());
}
Step 3: Generate the background image with OpenAI
Use a GPT Image model for background generation. The recommended model is gpt-image-2, though gpt-image-1 also works — you can set whichever your account supports via an environment variable. Note that OpenAI removed the DALL-E 2 and DALL-E 3 API model snapshots on May 12, 2026, so integrations must use the GPT Image model family instead.
GPT Image models always return base64-encoded image data — there is no URL in the response. The code below decodes it to a buffer, which uploadToShotstack then hosts. Note that GPT Image models may require organization verification on your OpenAI account before first use.
async function generateBackground(topic) {
  const model = process.env.OPENAI_IMAGE_MODEL;
  const result = await openai.images.generate({
    model,
    prompt: `Cinematic vertical background image for an Instagram Reel about: ${topic}.
Bold colors, visually striking, no text, no people. Designed for 9:16 portrait format.`,
    size: '1024x1536',
    quality: 'medium',
  });

  return Buffer.from(result.data[0].b64_json, 'base64');
}
Uploading assets to Shotstack Ingest
Both the voiceover and the background image use the same helper. It requests a signed upload URL from Shotstack’s Ingest API, PUTs the binary data to it, then polls until the asset is ready and returns its hosted URL.
const INGEST_BASE = 'https://api.shotstack.io/ingest/v1';
const INGEST_HEADERS = { 'x-api-key': process.env.SHOTSTACK_API_KEY };

async function uploadToShotstack(buffer, contentType) {
  // 1. Request a signed upload URL
  const uploadRes = await fetch(`${INGEST_BASE}/upload`, {
    method: 'POST',
    headers: { ...INGEST_HEADERS, 'Content-Type': 'application/json' },
    body: JSON.stringify({}),
  });
  if (!uploadRes.ok)
    throw new Error(`Ingest upload init failed: ${uploadRes.status}`);
  const { data } = await uploadRes.json();
  const { id: sourceId, url: signedUrl } = data.attributes;

  // 2. Upload binary data to the signed URL
  const putRes = await fetch(signedUrl, {
    method: 'PUT',
    headers: { 'Content-Type': contentType },
    body: buffer,
  });
  if (!putRes.ok) throw new Error(`Signed URL upload failed: ${putRes.status}`);

  // 3. Poll until ready (usually a few seconds)
  for (let i = 0; i < 20; i++) {
    await new Promise((r) => setTimeout(r, 3000));
    const statusRes = await fetch(`${INGEST_BASE}/sources/${sourceId}`, {
      headers: INGEST_HEADERS,
    });
    const { data: src } = await statusRes.json();
    if (src.attributes.status === 'ready') return src.attributes.source;
    if (src.attributes.status === 'failed')
      throw new Error('Shotstack ingest failed');
  }

  throw new Error('Shotstack ingest timed out');
}
src.attributes.source is a hosted URL that Shotstack can reference in edits and that Instagram can fetch when creating the media container.
Step 4: Render the Reel with Shotstack
With both asset URLs ready, define the edit and submit it to Shotstack’s Edit API. The output is a 1080×1920 MP4 — the recommended format for Instagram Reels, which support MP4/MOV with H.264 or HEVC video and AAC audio.
The edit has three layers: the background image, a text hook overlay showing the script’s opening line, and the voiceover audio as the soundtrack.
const EDIT_BASE = 'https://api.shotstack.io/edit/v1';
const EDIT_HEADERS = {
'x-api-key': process.env.SHOTSTACK_API_KEY,
'Content-Type': 'application/json',
};
const VIDEO_DURATION = 20; // seconds — matches the 15-20s script target
function escapeHtml(value) {
return value
.replaceAll('&', '&')
.replaceAll('<', '<')
.replaceAll('>', '>')
.replaceAll('"', '"')
.replaceAll("'", ''');
}
async function renderReel(backgroundUrl, voiceoverUrl, hookText) {
const edit = {
timeline: {
soundtrack: { src: voiceoverUrl, effect: 'fadeOut' },
tracks: [
{
// Text hook overlay (top layer)
clips: [
{
asset: {
type: 'html5',
html: `<p>${escapeHtml(hookText)}</p>`,
css: `p {
font-family: "Open Sans"; font-size: 42px;
color: white; text-align: center;
text-shadow: 2px 2px 8px rgba(0,0,0,0.8);
padding: 20px;
}`,
},
start: 0,
length: VIDEO_DURATION,
width: 1080,
height: 300,
position: 'bottom',
offset: { y: 0.15 },
},
],
},
{
// Background image (bottom layer)
clips: [
{
asset: { type: 'image', src: backgroundUrl },
start: 0,
length: VIDEO_DURATION,
fit: 'crop',
effect: 'zoomIn',
},
],
},
],
},
output: {
format: 'mp4',
size: { width: 1080, height: 1920 },
fps: 30,
quality: 'medium',
},
};
const renderRes = await fetch(`${EDIT_BASE}/render`, {
method: 'POST',
headers: EDIT_HEADERS,
body: JSON.stringify(edit),
});
if (!renderRes.ok)
throw new Error(`Shotstack render submit failed: ${renderRes.status}`);
const { response } = await renderRes.json();
// Poll until done
for (let i = 0; i < 30; i++) {
await new Promise((r) => setTimeout(r, 5000));
const statusRes = await fetch(`${EDIT_BASE}/render/${response.id}`, {
headers: EDIT_HEADERS,
});
const { response: render } = await statusRes.json();
if (render.status === 'done') return render.url;
if (render.status === 'failed') throw new Error('Shotstack render failed');
}
throw new Error('Shotstack render timed out');
}
When status is “done”, render.url is a Shotstack-hosted URL that is publicly accessible and can be passed directly to Instagram as the video_url. Note that rendered files expire after 24 hours — publish promptly, or transfer the file to permanent hosting with the Serve API if you need it longer.
This tutorial uses a fixed VIDEO_DURATION of 20 seconds for simplicity. In production, calculate the actual duration from the generated voiceover and use that value for the background and overlay clips so the video ends cleanly with the narration.
This uses a static text overlay rather than timed captions. For accurate timed subtitles, you would transcribe the voiceover (via Whisper or Shotstack’s transcription workflow) and add timed subtitle clips — a separate step beyond the scope of this tutorial.
Step 5: Publish to Instagram via the Graph API
Instagram Reels publishing is asynchronous: create a media container, wait for it to finish processing, then publish. Meta recommends polling the container status no more than once per minute for up to five minutes. The loop below enforces both constraints and throws if the container doesn’t reach FINISHED in time.
Keep the Shotstack video URL publicly accessible until the container status reaches FINISHED and the post has been published. Do not delete or expire the rendered video before that point.
async function postToInstagram(videoUrl, caption) {
  const igUserId = process.env.IG_USER_ID;
  const accessToken = process.env.IG_ACCESS_TOKEN;
  const BASE = 'https://graph.facebook.com/v25.0';

  // The Graph API accepts both JSON and form-encoded bodies; form-encoded is used
  // here to match Meta's own examples and Postman collection.

  // 1. Create the Reels container
  const containerRes = await fetch(`${BASE}/${igUserId}/media`, {
    method: 'POST',
    body: new URLSearchParams({
      media_type: 'REELS',
      video_url: videoUrl,
      caption,
      share_to_feed: 'true',
      access_token: accessToken,
    }),
  });
  if (!containerRes.ok)
    throw new Error(`Container creation failed: ${containerRes.status}`);
  const { id: containerId } = await containerRes.json();

  // 2. Poll until FINISHED — once per minute, up to 5 minutes (per Meta's guidance)
  let isFinished = false;
  for (let i = 0; i < 5; i++) {
    await new Promise((r) => setTimeout(r, 60_000));
    const statusRes = await fetch(
      `${BASE}/${containerId}?fields=status_code&access_token=${accessToken}`,
    );
    if (!statusRes.ok)
      throw new Error(`Container status check failed: ${statusRes.status}`);
    const { status_code } = await statusRes.json();
    if (status_code === 'FINISHED') {
      isFinished = true;
      break;
    }
    if (status_code === 'ERROR' || status_code === 'EXPIRED')
      throw new Error(`Instagram container ${status_code.toLowerCase()}`);
  }
  if (!isFinished)
    throw new Error(
      'Instagram container was not ready to publish after 5 minutes',
    );

  // 3. Publish the container
  const publishRes = await fetch(`${BASE}/${igUserId}/media_publish`, {
    method: 'POST',
    body: new URLSearchParams({
      creation_id: containerId,
      access_token: accessToken,
    }),
  });
  if (!publishRes.ok) throw new Error(`Publish failed: ${publishRes.status}`);
  const { id: mediaId } = await publishRes.json();
  return mediaId;
}
Step 6: The full pipeline
Chain all the steps into a single function:
async function createAndPostReel(topic) {
  console.log(`Starting pipeline for: "${topic}"`);

  const { script, caption } = await generateContent(topic);
  console.log('✓ Script and caption generated');

  // Generate voiceover and background image in parallel
  const [voiceoverBuffer, backgroundBuffer] = await Promise.all([
    generateVoiceover(script),
    generateBackground(topic),
  ]);

  // Upload both assets to Shotstack Ingest in parallel
  const [voiceoverUrl, backgroundUrl] = await Promise.all([
    uploadToShotstack(voiceoverBuffer, 'audio/mpeg'),
    uploadToShotstack(backgroundBuffer, 'image/png'),
  ]);
  console.log('✓ Assets uploaded to Shotstack Ingest');

  const hookText = script.split('.')[0];
  const videoUrl = await renderReel(backgroundUrl, voiceoverUrl, hookText);
  console.log('✓ Reel rendered:', videoUrl);

  const mediaId = await postToInstagram(videoUrl, caption);
  console.log('✓ Published to Instagram. Media ID:', mediaId);

  return { mediaId, videoUrl, caption };
}

// Run it
createAndPostReel('the future of remote work').catch(console.error);
Run with:
node index.js
When you run the code, you should see an update in the terminal as each step completes successfully:
Starting pipeline for: "the future of remote work"
✓ Script and caption generated
✓ Assets uploaded to Shotstack Ingest
✓ Reel rendered: https://shotstack-api-v1-output.s3-ap-southeast-2.amazonaws.com/c2qtqhhmqa/389fa06b-b2ad-4e06-a1b4-288e851370d9.mp4
✓ Published to Instagram. Media ID: 18147761329431797
The voiceover and background generation are parallelized with Promise.all because there’s no dependency between them — this cuts the asset generation time roughly in half.
The full code file can be found in the instagram-ai-video-demo repository on GitHub
Scaling: batch posting safely
Once the single-post pipeline works, the natural next step is batch generation. This is the architecture behind many faceless AI content workflows: a list of topics goes in, a batch of published Reels comes out.
The constraint to design around: Instagram accounts are limited to 100 API-published posts per 24-hour moving period. Parallel publishing against a single account will hit this quickly.
The safe pattern is to generate and render all videos in parallel, then publish them sequentially with a throttle between posts:
async function batchPost(topics, delayMs = 60_000) {
  const results = [];

  // Generate and render all videos in parallel
  const assets = await Promise.all(
    topics.map(async (topic) => {
      const { script, caption } = await generateContent(topic);
      const [voiceoverBuffer, backgroundBuffer] = await Promise.all([
        generateVoiceover(script),
        generateBackground(topic),
      ]);
      const [voiceoverUrl, backgroundUrl] = await Promise.all([
        uploadToShotstack(voiceoverBuffer, 'audio/mpeg'),
        uploadToShotstack(backgroundBuffer, 'image/png'),
      ]);
      const hookText = script.split('.')[0];
      const videoUrl = await renderReel(backgroundUrl, voiceoverUrl, hookText);
      return { topic, videoUrl, caption };
    }),
  );

  // Publish one at a time with a delay between posts
  for (let i = 0; i < assets.length; i++) {
    const { topic, videoUrl, caption } = assets[i];
    try {
      const mediaId = await postToInstagram(videoUrl, caption);
      results.push({ topic, mediaId, status: 'published' });
      console.log(`✓ Published: ${topic}`);
    } catch (err) {
      results.push({ topic, status: 'failed', error: err.message });
      console.error(`✗ Failed: ${topic}`, err.message);
    }
    if (i < assets.length - 1) {
      await new Promise((r) => setTimeout(r, delayMs));
    }
  }

  return results;
}
For production, replace setTimeout-based throttling with a proper queue — BullMQ, Cloud Tasks, or SQS — and track remaining quota by calling GET /{ig-user-id}/content_publishing_limit before each publish.
Taking this to production
The pipeline above is designed to be readable and runnable. A few additions before deploying it:
Use a queue with job state tracking. For unattended or scheduled workflows, store each job’s state in a database — queued → generating → rendering → ready → publishing → published — so failures at any stage can be retried without re-running the whole pipeline from scratch.
Schedule with your own database, not a platform parameter. The most portable approach is to store posts with a scheduled_at timestamp and run a worker that calls postToInstagram() when the time comes. This works across Instagram, TikTok, and other destinations without depending on platform-specific scheduling support.
Validate video specs before publishing. Before sending a rendered video to Instagram, confirm it meets Reels requirements: MP4 or MOV container, H.264 or HEVC video, AAC audio, minimum 3 seconds, maximum 15 minutes, maximum 300 MB file size. Shotstack renders H.264 MP4 by default, so this is usually automatic — but worth asserting explicitly if you’re modifying the output settings.
Add an optional review step. Fully automated publishing works well for evergreen or low-risk content, but for regulated industries or brand-sensitive accounts, inserting a human review stage between rendering and publishing significantly reduces risk.
Monitor token expiry. Long-lived Instagram access tokens are valid for about 60 days and should be refreshed before they expire. For unattended workflows, store token metadata, monitor expiry, and reconnect before tokens lapse — otherwise the pipeline fails silently at the publish step.
What to build next
The same pipeline architecture adapts to other short-form platforms and use cases:
Automating TikTok videos with AI
Wrapping up
You now have a complete pipeline that turns a one-line topic into a published Instagram Reel: OpenAI writes the script and caption, ElevenLabs voices it, a GPT Image model generates the background, Shotstack Ingest hosts the generated assets, the Edit API renders the vertical video, and the Instagram Graph API publishes it — all from a single createAndPostReel() call. Layer in the production checklist — a job queue, quota tracking, and token monitoring — and the same code scales from one Reel to a full content operation.
Ready to start building? Create a free Shotstack account to get your API key. You get 10 free credits when you sign up, valid for 30 days.
Frequently asked questions (FAQs)
Does this work with a personal Instagram account?
No. The Instagram Graph API requires a Professional account — Business or Creator — linked to a Facebook Page. Personal accounts are not supported.
What happened to DALL-E?
OpenAI removed the DALL-E 2 and DALL-E 3 API model snapshots from the API on May 12, 2026. Integrations should use gpt-image-1 or gpt-image-2 instead. Both return base64-encoded image data rather than URLs, which is why the upload step in this tutorial is necessary.
Does ElevenLabs return an audio URL?
No. The text-to-speech API returns raw audio bytes. This tutorial saves those bytes and uploads them to Shotstack Ingest to get a public URL before passing them to the renderer.
Can I add timed subtitles instead of a text overlay?
Yes, but it’s a separate step. You’d need to transcribe the voiceover audio — using Whisper or Shotstack’s transcription workflow — and add timed subtitle clips to the Shotstack edit JSON. The text hook overlay in this tutorial is a simpler alternative that works well for short Reels.
How many posts can I publish per day via the API?
Meta’s Content Publishing docs set the limit at 100 API-published posts within a 24-hour moving period. Design any batch workflow around this ceiling.
Get started with Shotstack's video editing API in two steps:
- Sign up for free to get your API key.
- Send an API request to create your video:
curl --request POST 'https://api.shotstack.io/v1/render' \
--header 'x-api-key: YOUR_API_KEY' \
--data-raw '{
  "timeline": {
    "tracks": [
      {
        "clips": [
          {
            "asset": {
              "type": "video",
              "src": "https://shotstack-assets.s3.amazonaws.com/footage/beach-overhead.mp4"
            },
            "start": 0,
            "length": "auto"
          }
        ]
      }
    ]
  },
  "output": {
    "format": "mp4",
    "size": {
      "width": 1280,
      "height": 720
    }
  }
}'

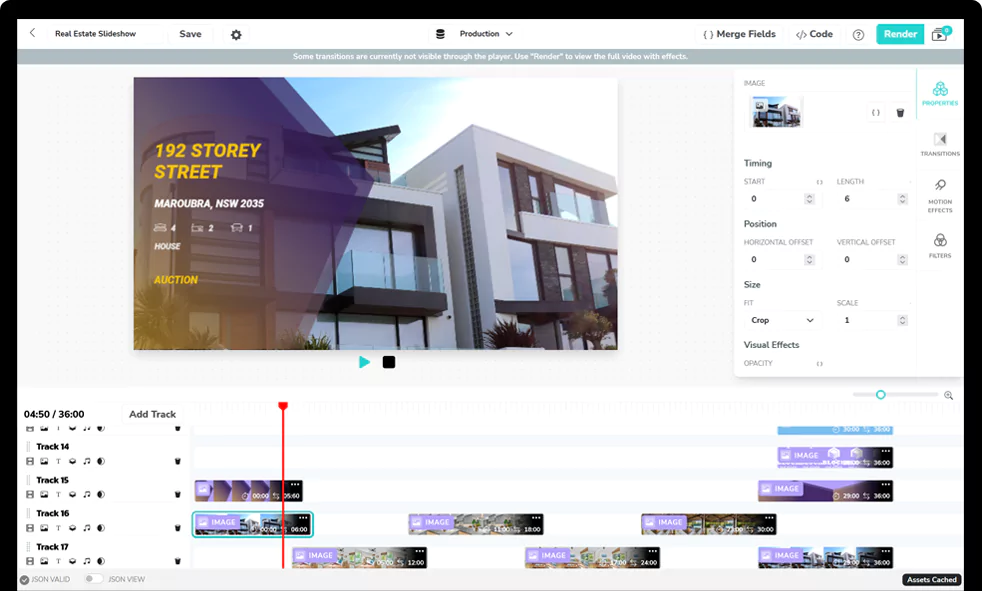
Experience Shotstack for yourself.
- Seamless integration
- Dependable high-volume scaling
- Blazing fast rendering
- Save thousands