Contents
 Claude
  ChatGPT
  Perplexity
  Google AI
 Contents
Rendering a video once is straightforward when you already have a template and the data to fill it. But if new products land in your catalog every week, someone still has to check for them, start each render, and collect the finished videos.
Automated video creation removes that job, provided each run can tell what is new and pick up where the previous one left off.
In this tutorial, you’ll write a small Node.js script that generates product videos automatically from a JSON feed. You’ll render one item first, add submission history, put the script on cron, and then build a callback receiver. Each step extends the code you’ve already written.
TL;DR
How do I automatically create a new video every day from my data?
- Schedule a script that reads your data and renders a Shotstack template for each new record, so videos are created automatically, at scale, without anyone pressing a button.
- Keep a persistent history file so every run skips records it has already submitted.
- Use webhooks to collect finished results as soon as they are ready.
- Keep polling as a fallback, so a missed notification never strands a render.
What you’ll build
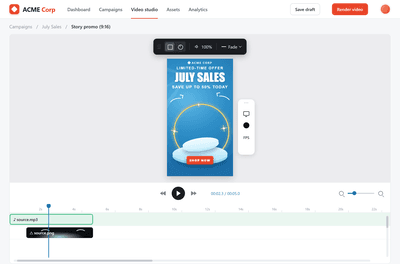
The example will produce a five-second video that cycles through up to four product photos with a slow zoom on each, and a headline underneath. Adding a new item to the feed will make it eligible for rendering on the next scheduled run. This is the first item’s render:
Two JavaScript files will do the work. videos.mjs reads the feed, submits renders, and records results. webhook.mjs receives notifications. A small shell wrapper prevents overlapping worker runs; no npm packages or database are required.
This is a small, single-host example. The worker submits at most three new items per run, keeps at most ten renders pending, and the feed reader accepts up to 1,000 records. On the hourly schedule in Step 4 that is 72 new videos a day. Step 3 shows where those limits live, and the last FAQ covers what changes at real scale.
The finished video automation workflow looks like this:
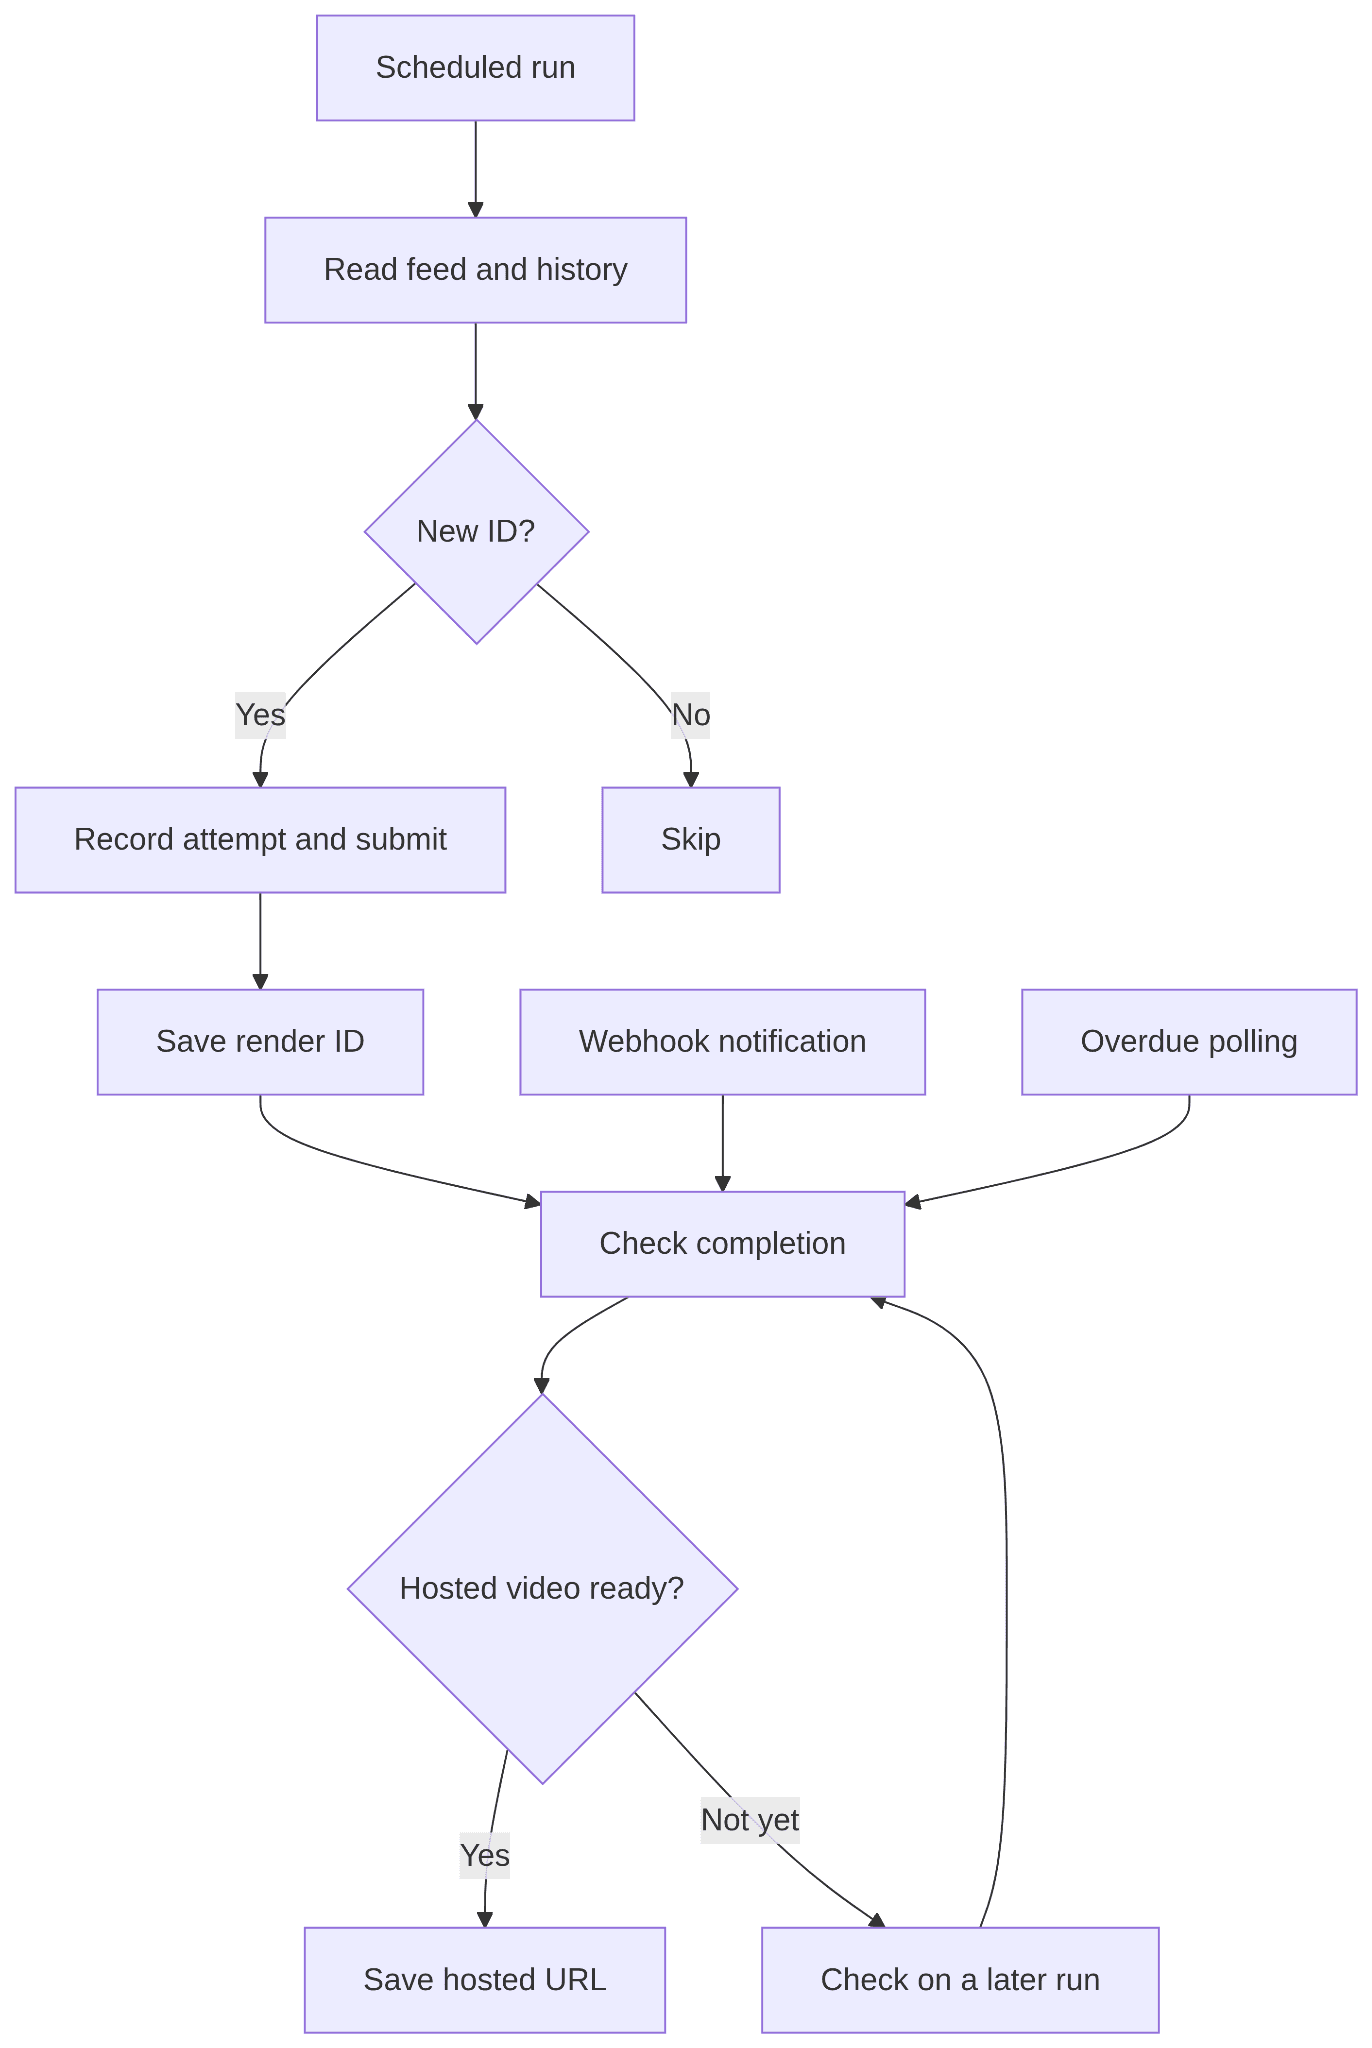
This is one practical use of video automation. An e-commerce store, a publisher or a SaaS platform generates videos programmatically: the schedule determines when to check, while the data determines what to create.
Prerequisites
Use Node.js 22 or later, a Shotstack production API key, and Linux or WSL with Bash, cron, and flock. The example uses Node’s built-in modules, so there are no npm packages to install.
You should be comfortable with JavaScript and template merge fields. If templating is new to you, start with our guide to generating videos in bulk from a spreadsheet. A minimal template will be included so everyone can follow the same example.
You’ll need a public HTTPS endpoint only when you reach callbacks in Step 5. Until then, everything runs from your terminal.
Keep one project directory on persistent local storage, and use the same account and API key throughout the walkthrough. Production renders use credits; the pricing page has the current rates.
Step 1: Prepare your data and save a template
Start with a single feed item so you can verify the result before processing more data.
mkdir scheduled-video-workflow
cd scheduled-video-workflow
Create feed.json:
[
  {
    "id": "sku-1001",
    "title": "New arrival: the Aria crossbody bag",
    "images": [
      "https://d2jn8jtjz02j0j.cloudfront.net/aria_front_851f81b735.jpg",
      "https://d2jn8jtjz02j0j.cloudfront.net/aria_back_57be0935ba.jpg",
      "https://d2jn8jtjz02j0j.cloudfront.net/aria_side_38b707e8f9.jpg",
      "https://d2jn8jtjz02j0j.cloudfront.net/aria_detail_4585a8ff1b.jpg"
    ]
  }
]
images holds the product’s photos in the order they should appear, from one to four. To use your own photos, remember that each must be a publicly accessible HTTPS URL.
Keep id stable between feed updates; it will identify the product in your submission history.
Create template.json with the following complete Edit:
{
  "timeline": {
    "background": "#f6f3ee",
    "tracks": [
      {
        "clips": [
          {
            "asset": {
              "type": "rich-text",
              "text": "{{TITLE}}",
              "font": { "family": "Roboto", "size": 44, "weight": "500", "color": "#1c1c1c" },
              "align": { "horizontal": "center", "vertical": "middle" }
            },
            "start": 0,
            "length": 5,
            "width": 1100,
            "height": 100,
            "position": "bottom",
            "offset": { "x": 0, "y": 0.04 }
          }
        ]
      },
      {
        "clips": [
          {
            "asset": { "type": "image", "src": "{{IMAGE_1}}" },
            "start": 0,
            "length": 1.25,
            "fit": "contain",
            "scale": 0.8,
            "position": "center",
            "offset": { "x": 0, "y": 0.06 },
            "effect": "zoomInSlow",
            "transition": { "out": "fade" }
          },
          {
            "asset": { "type": "image", "src": "{{IMAGE_2}}" },
            "start": 1.25,
            "length": 1.25,
            "fit": "contain",
            "scale": 0.8,
            "position": "center",
            "offset": { "x": 0, "y": 0.06 },
            "effect": "zoomInSlow",
            "transition": { "in": "fade", "out": "fade" }
          },
          {
            "asset": { "type": "image", "src": "{{IMAGE_3}}" },
            "start": 2.5,
            "length": 1.25,
            "fit": "contain",
            "scale": 0.8,
            "position": "center",
            "offset": { "x": 0, "y": 0.06 },
            "effect": "zoomInSlow",
            "transition": { "in": "fade", "out": "fade" }
          },
          {
            "asset": { "type": "image", "src": "{{IMAGE_4}}" },
            "start": 3.75,
            "length": 1.25,
            "fit": "contain",
            "scale": 0.8,
            "position": "center",
            "offset": { "x": 0, "y": 0.06 },
            "effect": "zoomInSlow",
            "transition": { "in": "fade" }
          }
        ]
      }
    ]
  },
  "output": { "format": "mp4", "resolution": "hd", "aspectRatio": "16:9" }
}
The upper track holds a rich-text headline that stays on screen for the full five seconds. The lower track plays the four photos back to back, 1.25 seconds each, with a fade between them.
fit: "contain" keeps each packshot whole on the light background instead of cropping it. {{TITLE}} and {{IMAGE_1}} to {{IMAGE_4}} are the values each feed item will replace. See the rich-text asset documentation if you want to change the design later.
Save your Shotstack API key in an environment variable:
export SHOTSTACK_API_KEY='YOUR_API_KEY'
Now save the template to Shotstack. Run this command from the project directory:
curl -i --request POST \
  'https://api.shotstack.io/edit/v1/templates' \
  --header "x-api-key: $SHOTSTACK_API_KEY" \
  --header 'Content-Type: application/json' \
  --data-binary @- <<EOF
{
  "name": "Scheduled product video",
  "template": $(cat template.json)
}
EOF
The response contains the new template’s ID at response.id. Create .env with your API key and that template ID:
SHOTSTACK_API_KEY=YOUR_API_KEY
SHOTSTACK_TEMPLATE_ID=
FEED_URL=
This walkthrough uses feed.json as its data source. To connect a live JSON feed, set FEED_URL in .env to an endpoint returning the same array structure. The script will then fetch that endpoint instead of reading the local file.
Protect the file:
chmod 600 .env
You now have a saved template and one record to populate it. This setup command creates a template, not a video; you only need to run it once.
Saved templates let subsequent requests supply the template ID and changing values instead of the whole Edit.
Step 2: Write a script that renders one video
We’ll first make a single render work from the terminal. It won’t be ready for scheduling until it has history and an overlap guard in the following steps.
Create videos.mjs with these imports, settings, and HTTP helper:
import { readFileSync } from 'node:fs';
import { setTimeout as sleep } from 'node:timers/promises';

const key = process.env.SHOTSTACK_API_KEY;
const templateId = process.env.SHOTSTACK_TEMPLATE_ID;
const UUID = /^[0-9a-f]{8}(?:-[0-9a-f]{4}){3}-[0-9a-f]{12}$/i;
if (!key || !UUID.test(templateId))
  throw new Error('Set the API key and template ID in .env');

async function api(service, path, method = 'GET', body) {
  const response = await fetch(
    `https://api.shotstack.io/${service}/v1${path}`,
    {
      method,
      headers: { 'x-api-key': key, 'Content-Type': 'application/json' },
      body: body === undefined ? undefined : JSON.stringify(body),
      signal: AbortSignal.timeout(30_000),
    },
  );
  if (!response.ok) {
    await response.body?.cancel();
    if (response.status === 429) await sleep(60_000);
    throw Object.assign(
      new Error(`${service}${path}: HTTP ${response.status}`),
      {
        status: response.status,
      },
    );
  }
  return response.json();
}
api() handles authentication and checks the HTTP response before parsing JSON. It supports the Edit and Serve APIs with the same key.
A rate-limited request pauses for a full minute before surfacing the error; it does not silently repeat a render submission.
Append these functions to videos.mjs:
async function readFeed() {
  let items;
  if (process.env.FEED_URL) {
    const response = await fetch(process.env.FEED_URL, {
      signal: AbortSignal.timeout(30_000),
    });
    if (!response.ok) throw new Error(`Feed: HTTP ${response.status}`);
    items = await response.json();
  } else {
    items = JSON.parse(readFileSync('feed.json', 'utf8'));
  }
  if (!Array.isArray(items) || items.length > 1000)
    throw new Error('Expected a small array of feed items');
  const ids = new Set();
  for (const item of items) {
    if (
      !item ||
      typeof item.id !== 'string' ||
      !/^[a-zA-Z0-9][a-zA-Z0-9_-]{0,79}$/.test(item.id) ||
      ids.has(item.id) ||
      typeof item.title !== 'string' ||
      !item.title.trim() ||
      item.title.length > 80 ||
      !Array.isArray(item.images) ||
      item.images.length < 1 ||
      item.images.length > 4 ||
      !item.images.every(
        (url) => typeof url === 'string' && new URL(url).protocol === 'https:',
      )
    ) {
      throw new Error(
        'Each item needs a unique ID, a short title, and one to four HTTPS image URLs',
      );
    }
    ids.add(item.id);
  }
  return items;
}

async function submit(item) {
  const merge = [{ find: 'TITLE', replace: item.title }];
  for (let i = 0; i < 4; i++) {
    // Products with fewer than four photos repeat the last one, so every slot renders.
    const url = item.images[Math.min(i, item.images.length - 1)];
    merge.push({ find: `IMAGE_${i + 1}`, replace: url });
  }
  const result = await api('edit', '/templates/render', 'POST', {
    id: templateId,
    merge,
  });
  if (!UUID.test(result.response?.id))
    throw new Error(
      'No render ID returned; check the submission before retrying',
    );
  return result.response.id;
}
readFeed() uses the local fixture for now. Setting FEED_URL later connects an endpoint returning the same JSON array. Validating all items before submitting any of them catches malformed records early, including an images list that is empty or longer than four.
submit() maps the data to the template’s merge fields. A product with fewer than four photos repeats its last one, so every image slot renders. The response contains a render ID, which you use to check progress. Rendering is asynchronous: receiving the ID means the job was accepted, not that the video is ready.
Check for the finished, hosted MP4
Append getResult() below submit():
async function getResult(renderId) {
  const { response } = await api('edit', `/render/${renderId}?data=false`);
  if (response?.id !== renderId || !response.status)
    throw new Error('Unexpected render response');
  console.log(`render=${renderId} status=${response.status}`);
  if (response.status === 'failed') {
    return { status: 'failed', error: response.error || 'Render failed' };
  }
  if (response.status !== 'done') return { status: 'pending' };

  let assets;
  try {
    assets = await api('serve', `/assets/render/${renderId}`);
  } catch (error) {
    if (error.status === 404) return { status: 'pending' };
    throw error;
  }
  const video = assets.data
    ?.map((asset) => asset.attributes)
    .find(
      (asset) =>
        asset?.renderId === renderId && /\.mp4$/i.test(asset.filename || ''),
    );
  if (video?.status === 'failed' || video?.status === 'deleted')
    throw new Error(
      `Hosting status is ${video.status}; investigate this render before doing anything else`,
    );
  if (video?.status !== 'ready' || !video.url?.startsWith('https://')) {
    return { status: 'pending' };
  }
  return { status: 'done', url: video.url };
}
Why check two APIs? The Edit API reports rendering progress, while Serve reports the hosted file’s availability, and the copy happens asynchronously.
We select the matching MP4 because the asset list can also contain a thumbnail or poster. Hosting completion is a separate event from rendering completion. If the hosted copy reports failed or deleted, the worker records the error and keeps the render ID rather than rendering again.
The Edit output URL expires after 24 hours, so we’re collecting the hosted copy instead. Shotstack hosting is enabled by default, so this example doesn’t require another storage account.
Finally, append this main() function and its error handler at the bottom of videos.mjs:
async function main() {
  const [item] = await readFeed();
  if (!item) throw new Error('Add an item to feed.json');
  const renderId = process.argv[2] || (await submit(item));
  if (!UUID.test(renderId)) throw new Error('Expected a render ID');
  console.log(`item=${item.id} render=${renderId}`);

  const deadline = Date.now() + 5 * 60_000;
  while (Date.now() < deadline) {
    const result = await getResult(renderId);
    if (result.status === 'failed') throw new Error(result.error);
    if (result.status === 'done') {
      console.log(result.url);
      return;
    }
    await sleep(5000);
  }
  console.log(`Still pending. Check the same render again: ${renderId}`);
}

main().catch((error) => {
  console.error(error.message);
  process.exitCode = 1;
});
Run your script:
node --env-file=.env videos.mjs
It prints the item and render IDs, checks progress, and eventually prints a hosted URL. Open that URL to see your five-second product video. Keep the render ID for Step 3.
item=sku-1001 render=a1cd315c-c757-4ac2-a374-ec2077a757b5
render=a1cd315c-c757-4ac2-a374-ec2077a757b5 status=fetching
render=a1cd315c-c757-4ac2-a374-ec2077a757b5 status=done
https://cdn.shotstack.io/au/v1/35tqpmb0ya/a1cd315c-c757-4ac2-a374-ec2077a757b5.mp4
The loop checks every five seconds for roughly five minutes. Individual requests and a rate-limit pause can extend that duration.
If it stops while still pending, check the existing job by passing its printed ID:
node --env-file=.env videos.mjs YOUR_RENDER_ID
Replace YOUR_RENDER_ID with the actual value. This checks the same job without submitting another. If a submission fails before returning an ID, investigate the attempt before rerunning the original command.
Step 3: Add history so repeated runs skip known items
Running the first command again without a render ID submits another video of the same product. A cron job would do that on every tick.
To prevent it, the script needs a record of items it has already attempted, including jobs that aren’t finished yet.
You can deliberately run Step 2’s original command a second time to see a different render ID, but an extra render isn’t necessary to continue. We’ll carry the first render into the history we’re about to create.
Create state.json with the following content, replacing YOUR_RENDER_ID with the ID you printed in Step 2:
{
  "sku-1001": {
    "status": "pending",
    "renderId": "YOUR_RENDER_ID",
    "checkedAt": 0
  }
}
The outer key is your feed ID; the inner renderId is Shotstack’s job ID. We use pending and checkedAt: 0 so the next run verifies the result and records the hosted URL itself. It won’t submit the listing again.
Read and update the history
Replace the node:fs import at the top of videos.mjs with:
import { readFileSync, writeFileSync, renameSync } from 'node:fs';
Add the following functions immediately above main():
function readState() {
  const state = JSON.parse(readFileSync('state.json', 'utf8'));
  if (!state || typeof state !== 'object' || Array.isArray(state)) {
    throw new Error('Invalid state.json; restore your history');
  }
  for (const entry of Object.values(state)) {
    if (
      !entry ||
      !['unknown', 'pending', 'done', 'failed', 'rejected'].includes(
        entry.status,
      ) ||
      (['pending', 'done', 'failed'].includes(entry.status) &&
        !UUID.test(entry.renderId)) ||
      (entry.status === 'pending' && !Number.isFinite(entry.checkedAt))
    ) {
      throw new Error('Invalid state entry; check your saved IDs and statuses');
    }
  }
  return state;
}

function saveState(state) {
  writeFileSync('state.json.tmp', JSON.stringify(state, null, 2) + '\n', {
    mode: 0o600,
  });
  renameSync('state.json.tmp', 'state.json');
}

function pendingEntries(state) {
  return Object.entries(state)
    .filter(([, entry]) => entry.status === 'pending')
    .sort((a, b) => a[1].checkedAt - b[1].checkedAt);
}
A missing or malformed file stops the script. Silently replacing it with empty history could cause every product to be rendered again.
saveState() writes a replacement file and renames it into place, avoiding a half-written JSON document. It doesn’t coordinate concurrent writers; we’ll add that protection before scheduling.
Next, add this function above main():
async function submitNew(item, state) {
  const entry = (state[item.id] = {
    status: 'unknown',
    attemptedAt: new Date().toISOString(),
  });
  saveState(state);

  try {
    entry.renderId = await submit(item);
    entry.status = 'pending';
    entry.checkedAt = Date.now();
  } catch (error) {
    entry.status = [400, 401, 403, 404, 422, 429].includes(error.status)
      ? 'rejected'
      : 'unknown';
    entry.error = error.message;
  }
  saveState(state);
  console.log(
    `item=${item.id} status=${entry.status} render=${entry.renderId || 'unknown'}`,
  );
  if (entry.status !== 'pending')
    throw new Error('Submission stopped; inspect state.json before retrying');
}
The attempt is saved before making the request. That ordering matters if the process crashes or the network drops after Shotstack accepts it.
Until a render ID is returned, we don’t know the outcome, so the entry is unknown. An explicit rejection becomes rejected; a known job becomes pending. Later checks record done or a confirmed render failure.
These are our local bookkeeping states, not the complete list of Shotstack render statuses.
A saved attempt prevents automatic resubmission, but it cannot guarantee exactly-once rendering across the local filesystem and a remote API. The bulk generation guide explains the same boundary: an uncertain response is not proof that no render was created.
Check saved jobs and submit only new records
Add this checker above main():
async function checkPending(state, force = false) {
  for (const [id, entry] of pendingEntries(state).slice(0, 5)) {
    try {
      const result = await getResult(entry.renderId);
      Object.assign(entry, result);
      if (result.status === 'done') {
        delete entry.error;
        console.log(`item=${id} ready ${entry.url}`);
      }
    } catch (error) {
      entry.error = error.message;
      console.error(`item=${id} check deferred: ${error.message}`);
    }
    entry.checkedAt = Date.now();
    saveState(state);
  }
}
This reuses getResult() rather than introducing another completion path. A failed status request leaves the known render available for a later check. The unused force argument will let us distinguish immediate checks from scheduled checks in Step 5.
Now replace only the existing main() function with this version. Keep its main().catch(...) error handler at the bottom:
async function main() {
  const state = readState();
  await checkPending(state, process.argv.includes('--now'));
  if (process.argv.includes('--check')) return;

  const items = await readFeed();
  let submitted = 0;
  for (const item of items) {
    if (Object.hasOwn(state, item.id)) {
      console.log(`item=${item.id} skipped (${state[item.id].status})`);
      continue;
    }
    if (submitted === 3 || pendingEntries(state).length >= 10) break;
    await submitNew(item, state);
    submitted++;
  }

  if (process.argv.includes('--wait')) {
    const deadline = Date.now() + 5 * 60_000;
    while (pendingEntries(state).length && Date.now() < deadline) {
      await checkPending(state, true);
      if (pendingEntries(state).length) await sleep(5000);
    }
    if (pendingEntries(state).length)
      console.log('Jobs remain pending; check their saved IDs later');
  }
}
Run it:
node --env-file=.env videos.mjs --wait
The previous render should be verified and sku-1001 skipped. Open state.json: once hosting is ready, the entry contains status: "done" and url. No new render was needed to establish that history.
{
  "sku-1001": {
    "status": "done",
    "attemptedAt": "2026-09-21T18:14:03.632Z",
    "renderId": "a1cd315c-c757-4ac2-a374-ec2077a757b5",
    "checkedAt": 1790014457662,
    "url": "https://cdn.shotstack.io/au/v1/35tqpmb0ya/a1cd315c-c757-4ac2-a374-ec2077a757b5.mp4"
  }
}
Add a second object to feed.json, retaining the first. Use sku-1002, a new title, and the same images list. Run the command again. You should see the first item skipped and only the second submitted:
item=sku-1001 skipped (done)
item=sku-1002 status=pending render=c239fa96-9013-406c-b2ce-b203f3c8f0ec
render=c239fa96-9013-406c-b2ce-b203f3c8f0ec status=rendering
render=c239fa96-9013-406c-b2ce-b203f3c8f0ec status=done
item=sku-1002 ready https://cdn.shotstack.io/au/v1/35tqpmb0ya/c239fa96-9013-406c-b2ce-b203f3c8f0ec.mp4
Repeat once more to verify both are skipped:
item=sku-1001 skipped (done)
item=sku-1002 skipped (done)
The worker submits at most three new items per invocation and permits at most ten pending jobs. Those small limits make the example predictable while you’re testing; raise them in main() once the loop is proven.
An entry that keeps failing its check stays pending with its error recorded, and it counts toward the ten. Fix its cause and --retry it, or remove the entry by hand, so stuck jobs don’t block new submissions.
Checking the least recently inspected jobs first stops one slow job from monopolizing the completion checks.
The identity rule is one video per feed ID. Editing the title under the same ID does not trigger another render. If updates should produce new videos, use a versioned ID such as sku-1001-v2, or extend the key with a hash of the values merged into the template.
The old positional render-ID command has now been replaced by history-based checking. To check saved jobs without reading or submitting feed records, use:
node --env-file=.env videos.mjs --check --now
Step 4: Put the script on cron
You can now repeat the worker without intentionally duplicating known records. Before scheduling it, make sure two invocations can’t read and update the same history concurrently.
Create run.sh:
#!/usr/bin/env bash
set -euo pipefail
cd -- "$(dirname -- "$0")"
umask 077
exec 9>.run.lock
if ! flock -n 9; then
  echo 'Another worker is running; skipping this tick.'
  exit 0
fi
node --env-file=.env videos.mjs "$@"
The wrapper changes to the project directory and acquires a lock with flock. It keeps that lock until the worker exits. Another invocation skips its work rather than competing over the file or submitting the same new item.
Make it executable and test it:
chmod +x run.sh
./run.sh --wait
From now on, start the worker through run.sh. For example, use ./run.sh --check --now for a manual completion check. The wrapper prevents two worker processes from running simultaneously and overwriting each other’s saved progress.
The rename in saveState() prevents partial JSON writes; the lock prevents competing workers from losing each other’s updates.
Schedule the worker
Run these commands from your project directory:
pwd
command -v node
date
They show your project’s absolute path, the location of Node, and your computer’s current time and timezone. You’ll use the first two results to configure cron.
Open your user account’s schedule:
crontab -e
If prompted to choose an editor, select nano. Add the following entries at the bottom, keeping any existing jobs:
PATH=/usr/local/bin:/usr/bin:/bin
0 * * * * /absolute/path/scheduled-video-workflow/run.sh >> /absolute/path/scheduled-video-workflow/worker.log 2>&1
1-59 * * * * /absolute/path/scheduled-video-workflow/run.sh --check >> /absolute/path/scheduled-video-workflow/worker.log 2>&1
Replace every /absolute/path/scheduled-video-workflow with the full directory printed by pwd. If that path contains spaces, put double quotes around each complete script path and log path.
PATH tells cron where to find commands. If command -v node returned a location outside the three directories shown, add the directory containing that binary to the beginning of PATH. For example, if it returned /home/your-user/.nvm/versions/node/v24.13.1/bin/node, use:
PATH=/home/your-user/.nvm/versions/node/v24.13.1/bin:/usr/local/bin:/usr/bin:/bin
Use your actual Node directory, not this example path.
The first job reads the feed at the start of every hour and submits new items. The second checks saved jobs on minutes 1 through 59 of each hour, avoiding a simultaneous start with the hourly submission job.
Both append their output and errors to worker.log; >> appends output, and 2>&1 sends errors to the same file. Neither uses --wait: the worker saves submitted IDs and exits, allowing later runs to collect results.
A slow worker can still overlap a later invocation. The lock lets one run and skips the other until its next scheduled time. If the submission job is skipped, new feed items wait until the next hourly or daily submission run. This example prevents concurrent updates; it doesn’t guarantee execution at an exact time.
In nano, press Ctrl+O, then Enter to save, and Ctrl+X to exit. Confirm your entries were saved:
crontab -l
Choose the time
Cron normally uses the host’s timezone, which you checked with date. For a daily 09:00 run, change the first job’s 0 * * * * to 0 9 * * *. Keep the completion-check schedule at 1-59 * * * *.
If your host uses UTC and you want 09:00 East Africa Time, use 0 6 * * *. For regions with daylight saving, choose a scheduler with explicit named-timezone support when the requirement is a fixed local hour. Cron timezone behavior depends on its implementation and configuration.
Verify the schedule
To test without waiting for the next hour:
Run
crontab -eagain and temporarily change the first job’s schedule to* * * * *. During this test, both jobs can start together; an occasionalAnother worker is running; skipping this tick.message is expected. Check that other log entries show progress.Add an item with a new ID to
feed.jsonand save it.Wait for the next minute, then run this from the project directory:
tail -n 30 worker.log
Look for the new item’s render ID. On a later run, that item should be skipped because it is already in the history. To watch new log entries as they arrive, use:
tail -f worker.log
Press Ctrl+C to stop watching; this doesn’t stop cron. Once you’ve confirmed that the item is submitted once and its finished URL is recorded, restore the first job’s hourly or daily schedule with crontab -e.
Your computer must be on, awake, and connected to the internet for these jobs to work. Cron must also be running. On Ubuntu with systemd, check it with:
systemctl is-active cron
If it reports inactive, start it with sudo systemctl start cron. WSL installations without systemd need their own service setup; don’t assume cron is running just because the entries were saved.
Keep the project on local persistent storage and back up state.json, since its history is what prevents known items from being submitted again.
You now have a scheduled workflow using polling. Next, you’ll add callbacks so completion checks can follow notifications, with polling retained as a fallback.
Step 5: Receive completion notifications
Callbacks make completed jobs eligible for a check as soon as the next worker tick. We’ll keep less frequent polling so a missed callback doesn’t strand a saved render.
There will now be two processes: your scheduled worker and a small HTTP receiver. To avoid two writers sharing the state file, the receiver will only create an empty notification file named after the render ID. The locked worker will verify and record the result.
Build the receiver
Generate a secret:
node -e 'console.log(require("node:crypto").randomBytes(32).toString("hex"))'
Add it to .env:
WEBHOOK_SECRET=PASTE_THE_GENERATED_HEX_STRING
CALLBACK_URL=
Create webhook.mjs with this complete code:
import { createServer } from 'node:http';
import { timingSafeEqual } from 'node:crypto';
import { mkdirSync, writeFileSync } from 'node:fs';
import { fileURLToPath } from 'node:url';

process.chdir(fileURLToPath(new URL('.', import.meta.url)));
const secret = process.env.WEBHOOK_SECRET || '';
if (!/^[a-f0-9]{64}$/i.test(secret))
  throw new Error('Set WEBHOOK_SECRET to the generated hex string');
const UUID = /^[0-9a-f]{8}(?:-[0-9a-f]{4}){3}-[0-9a-f]{12}$/i;
mkdirSync('inbox', { recursive: true });

const server = createServer(async (request, response) => {
  const reply = (code) => {
    response.writeHead(code);
    response.end();
  };
  try {
    const url = new URL(request.url, 'http://localhost');
    if (request.method !== 'POST' || url.pathname !== '/webhook')
      return reply(404);
    const received = Buffer.from(url.searchParams.get('token') || '');
    const expected = Buffer.from(secret);
    if (
      received.length !== expected.length ||
      !timingSafeEqual(received, expected)
    )
      return reply(403);

    request.setEncoding('utf8');
    let body = '';
    for await (const chunk of request) {
      body += chunk;
      if (Buffer.byteLength(body) > 16_384) return reply(413);
    }
    let event;
    try {
      event = JSON.parse(body);
    } catch {
      return reply(400);
    }
    const renderId =
      event?.type === 'edit' && event.action === 'render'
        ? event.id
        : event?.type === 'serve' && event.action === 'copy'
          ? event.render
          : null;
    if (!UUID.test(renderId)) return reply(400);

    try {
      writeFileSync(`inbox/${renderId}`, '', { flag: 'wx' });
    } catch (error) {
      if (error.code !== 'EEXIST') throw error;
    }
    reply(204);
  } catch {
    if (!response.headersSent) reply(500);
  }
});
server.requestTimeout = 8000;
server.headersTimeout = 8000;
server.listen(3000, '127.0.0.1', () =>
  console.log('Receiver listening on 127.0.0.1:3000'),
);
The secret restricts access to the endpoint. After parsing the body, we extract the render ID from either an Edit notification’s id or a Serve notification’s render field.
Serve’s own id identifies an asset, not the original render. The polling and webhook guide for hosted assets shows that distinction.
The wx flag creates a marker only if it doesn’t exist. Simultaneous duplicate callbacks therefore leave one marker. The receiver responds without rendering, downloading, or editing the history.
Connect the callback to your saved template
Start the receiver in one terminal:
node --env-file=.env webhook.mjs
For local testing, install cloudflared and run this in another terminal:
cloudflared tunnel --url http://127.0.0.1:3000
Set CALLBACK_URL in .env to the HTTPS address printed by the tunnel plus /webhook. Keep both processes running. The tunnel is necessary because Shotstack cannot reach your machine’s localhost directly.
Update your saved template with this complete command:
node --env-file=.env --input-type=module <<'JS'
import { readFileSync } from 'node:fs';

const secret = process.env.WEBHOOK_SECRET || '';
if (!/^[a-f0-9]{64}$/i.test(secret)) throw new Error('Set WEBHOOK_SECRET first');
const callback = new URL(process.env.CALLBACK_URL);
if (callback.protocol !== 'https:') throw new Error('Use a public HTTPS callback');
callback.searchParams.set('token', secret);
const template = JSON.parse(readFileSync('template.json', 'utf8'));
template.callback = callback.href;

const response = await fetch(
  `https://api.shotstack.io/edit/v1/templates/${process.env.SHOTSTACK_TEMPLATE_ID}`,
  {
    method: 'PUT',
    headers: { 'Content-Type': 'application/json', 'x-api-key': process.env.SHOTSTACK_API_KEY },
    body: JSON.stringify({ name: 'Scheduled product video', template }),
    signal: AbortSignal.timeout(30_000),
  },
);
if (!response.ok) {
  const details = await response.text();
  throw new Error(`Template update: HTTP ${response.status}\n${details}`);
}
console.log('Callback enabled for future renders');
JS
Notice where callback goes: inside the saved Edit, beside timeline and output. The template-render request still contains only id and merge. This update replaces your demo template’s definition and affects future renders.
Shotstack retries callbacks that fail or aren’t acknowledged within ten seconds. Its webhook payloads are unsigned, so the worker will verify results through the API rather than accepting a claimed status or URL.
Keep the secret-bearing callback URL out of proxy access logs. See the webhooks guide for those behaviors and optional query-string metadata.
Check notified jobs first, and overdue jobs as a fallback
In videos.mjs, replace the node:fs import with:
import {
  readFileSync,
  writeFileSync,
  renameSync,
  existsSync,
  rmSync,
} from 'node:fs';
Replace the entire existing checkPending() function with this version:
async function checkPending(state, force = false) {
  let checked = 0;
  for (const [id, entry] of pendingEntries(state)) {
    const marker = `inbox/${entry.renderId}`;
    const overdue = Date.now() - entry.checkedAt >= 15 * 60_000;
    if (!force && !existsSync(marker) && !overdue) continue;
    if (checked === 5) break;
    checked++;
    rmSync(marker, { force: true });

    try {
      const result = await getResult(entry.renderId);
      Object.assign(entry, result);
      if (result.status === 'done') {
        delete entry.error;
        console.log(`item=${id} ready ${entry.url}`);
      }
    } catch (error) {
      entry.error = error.message;
      console.error(`item=${id} check deferred: ${error.message}`);
    }
    entry.checkedAt = Date.now();
    saveState(state);
  }
  for (const entry of Object.values(state)) {
    if (entry.renderId && entry.status !== 'pending') {
      rmSync(`inbox/${entry.renderId}`, { force: true });
    }
  }
}
The worker now checks a pending job when a notification exists, when its last check was at least 15 minutes ago, or when you explicitly force a check. The same getResult() function verifies everything using your API key.
We remove the marker before the lookup. A notification arriving during that lookup can create another one; a lookup that fails can still recover through the fallback. Markers are hints, while state.json remains the record of what the workflow has done.
Your cron entries and main() don’t need changing. Add another feed ID and run:
./run.sh
After Shotstack sends a notification, the next scheduled completion check should check the job and eventually save its hosted URL. You can also run ./run.sh --check yourself. If the render is done before its hosted copy is ready, the Serve callback or a later fallback check completes the same entry.
To test checking a render when callbacks cannot reach your receiver:
In the terminal running
webhook.mjs, press Ctrl+C to stop it. Leavecloudflaredrunning in its other terminal.Add an item with a new ID to
feed.jsonand save it.From your project directory, submit the new item:
./run.sh
Confirm that the output includes a render ID for the new item. If another worker holds the lock, wait for it to finish and run the command again.
Now check the saved render:
./run.sh --check --now
If it is still rendering or its hosted copy is not ready, wait a few seconds and repeat the check. This command uses the saved render ID and never submits a new video.
No output can mean there are no pending jobs; inspect state.json to see whether the item is already done, or whether its submission needs attention.
This test bypasses the 15-minute fallback delay. It demonstrates recovery without callbacks, rather than verifying the automatic delay itself. To test the automatic fallback instead, leave the receiver stopped and let cron check the pending job once it has gone at least 15 minutes without a check.
After the finished URL is recorded, restart the receiver in its terminal:
node --env-file=.env webhook.mjs
A late callback cannot cause a new render: it doesn’t submit anything, and completed entries aren’t processed again.
The final workflow is webhook-first with polling fallback. --wait remains useful for interactive checks, but scheduled runs rely on notifications and saved history.
Handle failures without creating duplicate videos
A retry is appropriate when you know the previous request was rejected or the render failed. A timeout or missing response does not establish either fact.
Add a controlled retry branch to main(). Insert the following block immediately after const items = await readFeed(); and before let submitted = 0;:
if (process.argv[2] === '--retry') {
  const id = process.argv[3];
  const item = items.find((item) => item.id === id);
  const previous = Object.hasOwn(state, id) ? state[id] : null;
  if (!item || !previous || !['rejected', 'failed'].includes(previous.status)) {
    throw new Error(
      'Retry requires a corrected feed item and a rejected or failed state entry',
    );
  }
  console.log(
    `item=${id} retrying; previous render=${previous.renderId || 'none'}`,
  );
  await submitNew(item, state);
  return;
}
For example, if sku-1002 has a saved status of failed or rejected, correct the cause and retry it with:
./run.sh --retry sku-1002
This is an example for a failed or rejected item, not a required step after a successful render. If your sku-1002 is already done, the retry command will correctly refuse it:
Retry requires a corrected feed item and a rejected or failed state entry
After an accepted retry, let the scheduled checker collect the result, or use ./run.sh --check --now. The branch reuses submitNew(), so it records the new attempt before sending it. It refuses unknown, pending, and completed records.
When a request fails, the next step depends on whether Shotstack accepted the render. Checking an existing render is safe to repeat, but submitting the same item again could create a duplicate. The table below explains what each outcome means and what to do next.
| Situation | What your script does | What to do next |
|---|---|---|
| Feed fetch or validation fails | Submits no new feed records in that invocation | Correct the source and run again |
| Render request is explicitly rejected | Saves rejected and stops that batch | Fix the cause, then use --retry |
| Submit times out, returns a server error, or has no render ID | Keeps unknown and stops that batch | Investigate the attempt; don’t erase its history and guess |
| API confirms the render failed | Saves failed and the error | Correct the data, then use --retry |
| Completion lookup fails | Retains the render ID for another check | Usually let the checker recover; investigate repeated errors |
| Hosting is not ready | Keeps the job pending | Wait for hosting; don’t submit another render |
Hosting reports failed or deleted | Records a check error and retains the render ID; the job stays pending | Investigate the copy rather than re-rendering; clear the entry by hand if it must not block new work |
| API returns HTTP 429 | Pauses 60 seconds, then surfaces the error | Use controlled retry for a rejected submission; saved jobs remain checkable |
Shotstack documents fixed 60-second rate-limit windows, shared by callers using the same key. A larger system can add bounded exponential backoff after explicit rate-limit rejections. That is different from automatically retrying an ambiguous render POST.
An unknown submission may need manual reconciliation against account records or help from Shotstack. The small example intentionally stops there. It doesn’t promise to resolve every network failure without human intervention.
For reference, the render API statuses are:
| Status | Meaning |
|---|---|
queued | Waiting for rendering |
fetching | Retrieving source assets |
generating | Generating AI media, when the template uses it |
preprocessing | Preparing media for rendering |
rendering | Composing the output |
saving | Writing the rendered file |
done | Rendering finished; hosted availability is checked separately |
failed | Rendering failed; inspect the error |
Intermediate statuses may pass between checks, which is why the worker treats anything other than done or failed as still pending.
What to build next
You now have the complete local example: two JavaScript files, a shell wrapper, data and template JSON, configuration, and history. Here are the places to adapt it for your own project.
Connect your source. Set FEED_URL to a JSON endpoint returning the same array. For an e-commerce store or a Shopify catalog, id is the SKU and images are the product’s photos in display order, which is what the example already assumes. For spreadsheets, map a stable row ID to id; for databases, use the primary key; for RSS, use a stable GUID and select an image.
Map source identifiers to a stable string that meets the example’s ID restrictions: 1 to 80 characters, starting with a letter or digit, and containing only ASCII letters, digits, underscores, or hyphens. Use a deterministic hash when necessary, such as for an RSS GUID that is a URL.
Replace readFeed() when the source needs another adapter. Ensure records remain discoverable until processed, or add pagination and a persistent cursor.
Choose when to trigger it. Our schedule polls the source and uses new IDs as the event. Other triggers can call the same submission logic, for example a content pipeline that includes video creation:
| Trigger | Use it for | Responsibility that remains |
|---|---|---|
| Fixed schedule | Daily reports or predictable publishing windows | Select the records belonging to that run |
| Source event | A new product should produce a video promptly | Deduplicate repeated events |
| Scheduled feed check | An API supplies data but no push notifications | Keep stable IDs and submission history |
Choose delivery. The example records the ready Shotstack-hosted URL. Configure an output destination when you need S3, Google Cloud Storage, Azure Blob Storage, Google Drive, Akamai NetStorage, or Vimeo.
Social publication needs a further step with its own duplicate protection; see the production advice in our guide to automating Instagram posts with AI video.
Add generated media. You can use the same data to supply a generated background or voice-over without changing the schedule. Consult the generative AI asset documentation for prompts on image, video, and audio assets.
Generate reusable media once when appropriate, and account for AI generation charges separately.
Prepare the host for unattended use. Keep the receiver running with a process manager and give it a stable HTTPS address. Quick Tunnels are for development; their address can change after restarting.
If it changes, update CALLBACK_URL and repeat the template-update command. Restart the receiver too if you change the secret.
Shotstack also has a sandbox environment (stage in place of v1) that watermarks its output. If you use it for throwaway tests, give it its own template and history file, and never point one worker at both.
The script logs item IDs, render IDs, and outcomes; production monitoring should also add timestamps, log rotation, and alerts for errors or jobs stuck in unknown or pending.
Back up state, keep the project directory private, and exclude .env, state.json, temporary state files, inbox/, .run.lock, and logs from Git. Don’t delete history to start a fresh run.
The local lock coordinates one host. Multiple workers on different machines need shared transactional state or a queue. Our guides to automating video production for multiple clients and adding video creation to your app cover those broader designs.
Run the same pattern without code
A scheduled Zapier or Make workflow can read data and render a template too. Follow our Zapier real estate listings guide or Make tutorial for the interface steps, and n8n has an official Shotstack node too.
You still need to configure deduplication, failure recovery, and durable delivery deliberately. The rules don’t change with the tool: stable IDs, saved history, and a check that confirms the finished file.
Put your feed on a schedule
You’ve built a worker that reads a feed, submits only what it hasn’t seen, and records every attempt before it makes it. Cron decides when to look, the feed decides what to make, and state.json keeps the worker from resubmitting anything it has already attempted.
Webhooks collect results as they finish, and the overdue check catches anything the notification missed. The same three files run a small catalog on one host; the limits in Step 3 and the queue-backed design in the last FAQ are how automated video creation grows from there.
Create a free Shotstack account, render your first feed item, and then follow the remaining steps to put it on a schedule.
Frequently asked questions (FAQs)
Can I use GitHub Actions or a serverless scheduler?
Yes, but adapt persistence and callback hosting. GitHub-hosted jobs use fresh runners, so don’t rely on the local state file surviving across jobs.
Persist history externally, coordinate concurrent executions, and host the receiver separately. Serverless deployments also need durable external state. Those services aren’t necessary for this single-host walkthrough.
How do I create one report per day if the source ID never changes?
Make the report itself a distinct record, such as daily-report-2026-09-20. Derive the date in your reporting timezone. Attempts on the same day share an ID; the next day’s report has a new one.
How do I keep rendering costs under control?
Keep IDs stable, limit work per run, and test with a short video before you scale up. Every render uses credits, and AI generation is charged separately.
Check current pricing before you scale up, and the rate limits if you plan to submit many renders a minute. The script’s per-run limits are not an account-wide spending cap.
Can a SaaS platform use this to generate videos at scale?
Yes. The loop is the same: read new records, submit one render each, record the attempt before it is sent, and confirm the finished file. Swap the local history file for a database table and the single cron worker for a queue with several consumers, so many hosts can share one record of what has been submitted.
Our guide to automating video production for multiple clients covers that architecture.
Do I need to host the finished videos myself?
No. The example uses Shotstack’s hosted copy, subject to its account and hosting terms. Use your own destination when retention or access requirements call for it.
Neither an expired temporary URL nor a guessed CDN address should be treated as a verified finished result.
Get started with Shotstack's video editing API in two steps:
- Sign up for free to get your API key.
- Send an API request to create your video:
curl --request POST 'https://api.shotstack.io/v1/render' \
--header 'x-api-key: YOUR_API_KEY' \
--data-raw '{
  "timeline": {
    "tracks": [
      {
        "clips": [
          {
            "asset": {
              "type": "video",
              "src": "https://shotstack-assets.s3.amazonaws.com/footage/beach-overhead.mp4"
            },
            "start": 0,
            "length": "auto"
          }
        ]
      }
    ]
  },
  "output": {
    "format": "mp4",
    "size": {
      "width": 1280,
      "height": 720
    }
  }
}'

Published September 21, 2026 Updated September 22, 2026
Joyce Echessa is a full-stack web developer specializing in JavaScript, currently expanding into AI engineering through hands-on learning and projects. She writes developer tutorials for Shotstack. More from Joyce
Experience Shotstack for yourself.
- Seamless integration
- Dependable high-volume scaling
- Blazing fast rendering
- Save thousands