FFmpeg is a popular command-line tool for video and audio processing. Traditionally, using FFmpeg with JavaScript meant running it server-side — either through shell commands or an ffmpeg js wrapper in Node.js. Want to use it directly on the client-side (web browsers) without any backend setup? ffmpeg.wasm lets you do exactly that. This FFmpeg WASM tutorial covers everything you need to know about FFmpeg WebAssembly — from basic setup to complete working examples for various use cases.
TL;DR
In this tutorial, we’ve provided a step-by-step guide on how to use ffmpeg.wasm, from installation to actual use cases, such as converting video format, extracting audio from video, generating a video thumbnail, trimming a video, and compressing a video. We also cover React and Next.js integration, performance considerations, and when to consider server-side alternatives.
What Is ffmpeg.wasm?
ffmpeg.wasm is a WebAssembly version of FFmpeg that runs entirely inside the browser as JavaScript. You don’t need any server or backend setup at all because video processing happens locally on the user’s machine.
Developers can use ffmpeg.wasm for converting video formats, extracting audio, trimming clips, and performing many other video processing tasks. And since everything is done directly in the client environment, video data remains secure as it never leaves the user’s device. That is especially important for privacy-sensitive media.
Under the hood, ffmpeg.wasm is compiled from FFmpeg’s C source via Emscripten into a WASM binary. It is loaded and controlled through JavaScript APIs, such as new FFmpeg(), ffmpeg.exec(), ffmpeg.writeFile(), and ffmpeg.readFile(), and the performance is also better than typical web JavaScript. That’s because WebAssembly makes heavy tasks run much faster than regular browser JavaScript.
ffmpeg.wasm supports almost all common video and audio codecs, including H.264, H.265, VP8/VP9, MP3 (LAME), OGG, Opus, and WebP. It also supports subtitle and font rendering libraries for complex workflows. This lets you use FFmpeg in the browser and do almost everything you’d do with CLI ffmpeg.
How ffmpeg.wasm Works
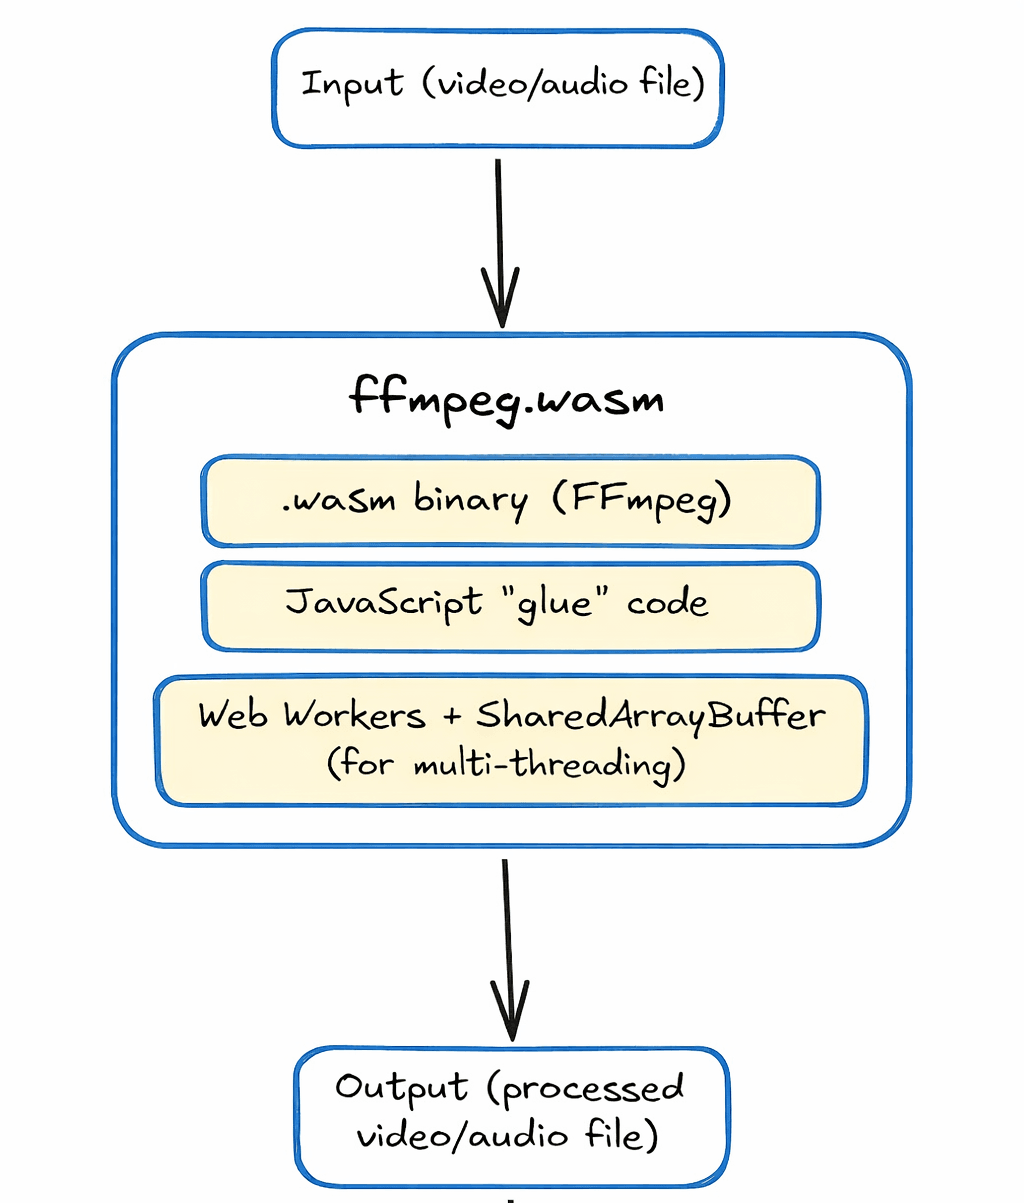
ffmpeg.wasm uses WebAssembly to run FFmpeg in the browser. WebAssembly is a low-level binary format that allows compiled C/C++ code to run inside browsers at near-native speed. Basically, Emscripten, a compiler toolchain, converts FFmpeg’s C code into:
- A
.wasmbinary file (the actual compiled FFmpeg core) - JavaScript “glue” code to load and run it
This means you can write the same FFmpeg commands you’d use on the command line through JavaScript APIs and ffmpeg.wasm executes them entirely in the browser.
For multi-threaded processing, ffmpeg.wasm relies on SharedArrayBuffer and Web Workers. SharedArrayBuffer lets the main thread and background workers share memory, which allows FFmpeg to run tasks in parallel in the browser.
But there are some security requirements that need proper configuration. We’ll cover this in the next section. Once set up correctly, multi-threading works seamlessly.
The diagram below provides a quick overview of how ffmpeg.wasm works:
Installing ffmpeg.wasm
Here’s how you can install ffmpeg.wasm via npm:
npm install @ffmpeg/ffmpeg @ffmpeg/util
In this installation, the @ffmpeg/ffmpeg package contains the JavaScript wrapper, and @ffmpeg/util provides helper utilities for reading and writing files.
Note: If you plan to self-host the WASM binary (recommended for production), you’ll also need
@ffmpeg/core. We cover this in the Setting Up ffmpeg.wasm section below.
The current stable version is 0.12.x. You can check your installed version through this command:
npm list @ffmpeg/ffmpeg
If you want a simpler setup without a build step, such as for a static HTML page, you can load ffmpeg.wasm from a CDN:
<script type="module">
  import { FFmpeg } from 'https://cdn.jsdelivr.net/npm/@ffmpeg/ffmpeg@0.12.10/dist/esm/index.js';
  import { fetchFile } from 'https://cdn.jsdelivr.net/npm/@ffmpeg/util@0.12.1/dist/esm/index.js';
</script>
Using ffmpeg.wasm in the browser requires SharedArrayBuffer. But browsers often restrict SharedArrayBuffer, so we need to serve our page with specific cross-origin isolation headers. We need to set both of these on our server:
Cross-Origin-Opener-Policy: same-origin
Cross-Origin-Embedder-Policy: require-corp
SharedArrayBuffer is also required for multi-threading. But not all browsers support it. Currently, the following browsers support SharedArrayBuffer:
- Chrome 92+
- Firefox 79+
- Safari 15.2+
- Edge (Chromium)
Setting Up ffmpeg.wasm — Your First Script
In this section, we’ll provide a complete FFmpeg WASM tutorial showing you how to initialize FFmpeg, load a WASM binary, and run a simple transcode. We’ll create a single-page web app where a user can pick an MP4 video, click a transcode button, and receive a converted WebM file, all without any video ever leaving their machine.
To run our HTML page, we need to start and configure a dev server. We’ll use Vite, a JavaScript build tool and a development server for this. Vite makes it easy to handle the Cross-Origin Isolation security requirements with simple configuration. It also makes VFS management easier.
Create and Initialize your Project
npm create vite@latest my-ffmpeg-app -- --template vanilla
cd my-ffmpeg-app
Install ffmpeg.wasm Packages
npm install @ffmpeg/ffmpeg @ffmpeg/util @ffmpeg/core
@ffmpeg/ffmpegis the JavaScript wrapper@ffmpeg/utilprovides helpers liketoBlobURLandfetchFile@ffmpeg/coreis the WASM binary
Since browsers can’t access files in node_modules directly, we need to serve them as static assets. Vite serves everything in the public/ folder at the root URL, so we need to copy the core files there:
Windows (PowerShell):
Copy-Item node_modules\@ffmpeg\core\dist\esm\ffmpeg-core.js public\ffmpeg-core.js -Force
Copy-Item node_modules\@ffmpeg\core\dist\esm\ffmpeg-core.wasm public\ffmpeg-core.wasm -Force
macOS / Linux:
cp node_modules/@ffmpeg/core/dist/esm/ffmpeg-core.js public/ffmpeg-core.js
cp node_modules/@ffmpeg/core/dist/esm/ffmpeg-core.wasm public/ffmpeg-core.wasm
Create a vite.config.js File
Now, we’ll create a vite.config.js file in our root folder. This file enables SharedArrayBuffer by establishing cross-origin isolation.
import { defineConfig } from 'vite';

export default defineConfig({

  // Fallback headers for the main HTML page
  server: {
    headers: {
      "Cross-Origin-Opener-Policy": "same-origin",
      "Cross-Origin-Embedder-Policy": "require-corp",
    },
  },

  // Exclude ffmpeg packages from Vite's dependency pre-bundler
  optimizeDeps: {
    exclude: ['@ffmpeg/ffmpeg', '@ffmpeg/util'],
  },

  // Middleware plugin
  plugins: [
    {
      name: 'configure-response-headers',
      configureServer(server) {
        server.middlewares.use((_req, res, next) => {
          res.setHeader("Cross-Origin-Opener-Policy",   "same-origin");
          res.setHeader("Cross-Origin-Embedder-Policy", "require-corp");
          res.setHeader("Cross-Origin-Resource-Policy", "cross-origin");
          next();  // pass the request on to Vite's normal handler
        });
      },
    },
  ],
});
In this code, we first import Vite’s helper function for defining configuration. In the server headers section, we’ve added two security headers to enable cross-origin isolation, which is required to use SharedArrayBuffer in the browser.
However, some assets, such as files served from node_modules or pre-bundled by Vite’s optimizer, may bypass the static server.headers config, so we’ve added a middleware plugin.
This middleware checks every response from the dev server and applies all three required headers:
- COOP: prevents other windows from accessing this page’s globals
- COEP: tells the browser this page only loads trusted resources
- CORP: tells the browser that each resource allows cross-origin reads
Update your index.html File
Now, we’ll update our index.html file. Here is an ffmpeg.wasm example index.html file:
<!DOCTYPE html>
<html lang="en">
<head>
<meta charset="UTF-8">
<meta name="viewport" content="width=device-width, initial-scale=1.0">
<title>FFmpeg Transcoder</title>
</head>
<body>
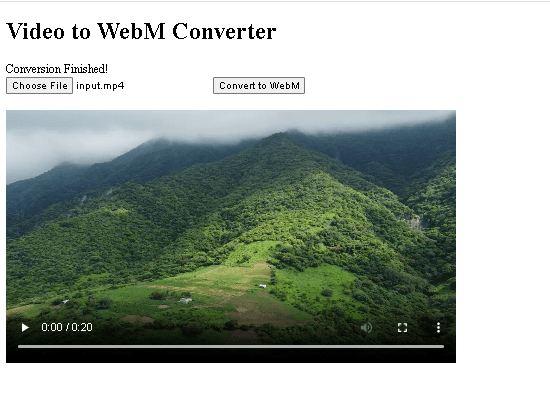
<h1>Video to WebM Converter</h1>
<!-- Status line: updated by JavaScript to show the current state -->
<div id="status">Initializing...</div>
<!-- File picker: restricted to video files -->
<input type="file" id="uploader" accept="video/mp4,video/x-m4v,video/*">
<!-- Button starts disabled; JavaScript enables it once a file is chosen -->
<button id="convertBtn" disabled>Convert to WebM</button>
<br><br>
<!-- Hidden video player: revealed after conversion is complete -->
<video id="output" controls
style="width: 100%; max-width: 600px; display:none;">
</video>
<!-- type="module" lets us use ES import statements in main.js -->
<script type="module" src="/src/main.js"></script>
</body>
</html>
Update the main.js File: Convert Video Format (MP4 to WebM)
Finally, we’ll update the main.js file, which is inside the src folder. This is the main logic file that sets up ffmpeg.wasm, loads the engine, and manages the entire client-side browser conversion workflow.
// Import the FFmpeg WebAssembly wrapper
import { FFmpeg } from '@ffmpeg/ffmpeg';
// Utility to convert local/remote files into Blob URLs
// Helps avoid CORS and cross-origin isolation issues
import { toBlobURL } from '@ffmpeg/util';
// Create a new FFmpeg instance
const ffmpeg = new FFmpeg();
// Cache references to important DOM elements
const el = {
uploader: document.getElementById('uploader'), // File input element
convertBtn: document.getElementById('convertBtn'), // Convert button
status: document.getElementById('status'), // Status message display
video: document.getElementById('output'), // Output video element
};
// Listen for internal FFmpeg log messages
ffmpeg.on('log', ({ message }) => {
console.log("FFmpeg Engine:", message);
});
// Listen for transcoding progress updates
ffmpeg.on('progress', ({ progress, time }) => {
console.log(`Progress: ${Math.round(progress * 100)}% | Time: ${time}`);
});
// Function to load and initialize the FFmpeg WebAssembly engine
async function loadFFmpeg() {
try {
el.status.innerText = "Loading FFmpeg Engine...";
// Convert ffmpeg-core.js into a Blob URL
const coreURL = await toBlobURL(
`${window.location.origin}/ffmpeg-core.js`,
'text/javascript'
);
// Convert ffmpeg-core.wasm into a Blob URL
const wasmURL = await toBlobURL(
`${window.location.origin}/ffmpeg-core.wasm`,
'application/wasm'
);
// Load the FFmpeg engine using the generated Blob URLs
await ffmpeg.load({ coreURL, wasmURL });
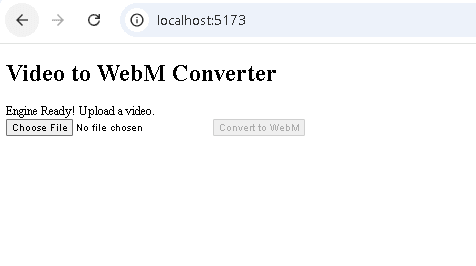
el.status.innerText = "Engine Ready! Upload a video.";
} catch (err) {
console.error("LOAD FAILED:", err);
el.status.innerText = "Load failed. Check console for details.";
}
}
// Enable convert button once a file is selected
el.uploader.onchange = () => {
if (el.uploader.files.length > 0) {
el.convertBtn.disabled = false;
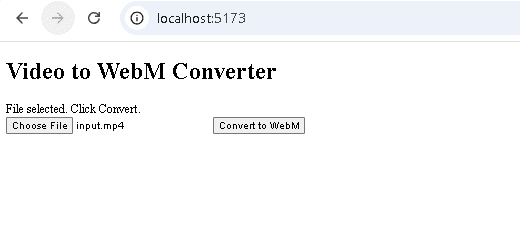
el.status.innerText = "File selected. Click Convert.";
}
};
// Handle Convert button click
el.convertBtn.onclick = async () => {
const file = el.uploader.files[0];
if (!file) return;
el.convertBtn.disabled = true;
el.status.innerText = "Transcoding...";
try {
// Read the uploaded file as binary data
const fileData = await new Promise((resolve, reject) => {
const reader = new FileReader();
reader.onload = () => resolve(new Uint8Array(reader.result));
reader.onerror = reject;
reader.readAsArrayBuffer(file);
});
// Write file into FFmpeg's in-memory virtual file system
await ffmpeg.writeFile('input.mp4', fileData);
// Execute FFmpeg command to convert MP4 to WebM
await ffmpeg.exec([
'-i', 'input.mp4', // Input file
'-c:v', 'libvpx', '-b:v', '1M', // Video codec and bitrate
'-c:a', 'libvorbis', // Audio codec
'output.webm' // Output file
]);
// Read the converted file from FFmpeg's virtual file system
const data = await ffmpeg.readFile('output.webm');
// Create a playable video URL from the output data
const url = URL.createObjectURL(
new Blob([data], { type: 'video/webm' })
);
// Display the converted video
el.video.src = url;
el.video.style.display = 'block';
el.status.innerText = "Conversion Finished!";
} catch (error) {
console.error("TRANSCODE ERROR:", error);
el.status.innerText = "Error during conversion.";
} finally {
// Re-enable the convert button
el.convertBtn.disabled = false;
}
};
// Automatically load FFmpeg when the page loads
loadFFmpeg();
This script uses ffmpeg.wasm to convert a video file directly in the browser.
Note: We write the input as
input.mp4in FFmpeg’s virtual file system regardless of the original filename. FFmpeg detects the actual format from the file’s headers, not the extension, so this works for most video files. However, if you want to be precise, you can extract the original extension from the uploadedfile.name.
Run the Server
Now that we’ve updated all our files, we’ll run our server through the terminal:
npm run dev
If your server initializes correctly, you’ll see an output like this:

Now, go to your browser and open http://localhost:5173/. You’ll see this HTML page:
When you upload an MP4 video, it’ll allow you to convert it to WebM:
Once the conversion is completed, you’ll get the converted video in your browser:
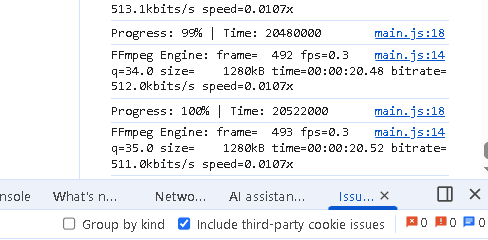
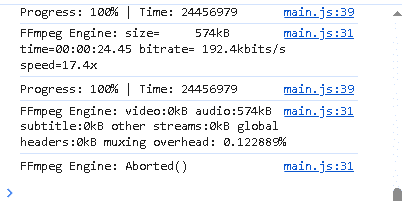
You can also check the browser console for conversion progress:
Core Use Cases with Code Examples
Let’s explore some of the most common ffmpeg.wasm video processing tasks. Each example is complete code with proper error handling. Our vite.config.js file will remain the same for all examples. We need to change the logic for each use case in the main.js file and update our index.html file accordingly.
Convert Video Format (MP4 to WebM)
We’ve discussed this use case in the previous section. You can use the exact code (main.js and index.html) to convert an MP4 video to WebM in the browser through ffmpeg.wasm.
Extract Audio from Video
This feature is useful in an FFmpeg WASM video editor for tasks like independent audio editing and better sound cleanup. To extract audio from a video using ffmpeg.wasm, here’s how we’ll change our main.js code:
import { FFmpeg } from '@ffmpeg/ffmpeg';
import { toBlobURL } from '@ffmpeg/util';

// Create one shared FFmpeg instance for the whole page.
const ffmpeg = new FFmpeg();

// Grab references to all UI elements once at startup
const el = {
  uploader:   document.getElementById('uploader'),   // file picker
  convertBtn: document.getElementById('convertBtn'), // action button
  status:     document.getElementById('status'),     // status message
};

// Log all internal FFmpeg messages to the console.
ffmpeg.on('log', ({ message }) => {
  console.log('FFmpeg Engine:', message);
});

// Track transcode progress.
ffmpeg.on('progress', ({ progress, time }) => {
  console.log(`Progress: ${Math.round(progress * 100)}% | Time: ${time}`);
});

// Load FFmpeg engine
async function loadFFmpeg() {
  try {
    el.status.innerText = 'Loading FFmpeg Engine...';

    const coreURL = await toBlobURL(
      `${window.location.origin}/ffmpeg-core.js`,
      'text/javascript'
    );

    const wasmURL = await toBlobURL(
      `${window.location.origin}/ffmpeg-core.wasm`,
      'application/wasm'
    );

    await ffmpeg.load({ coreURL, wasmURL });

    el.status.innerText = 'Engine Ready! Upload a video.';
  } catch (err) {
    console.error('LOAD FAILED:', err);
    el.status.innerText = 'Load failed. Check console for details.';
  }
}

// Enable the action button only after the user picks a file.
el.uploader.onchange = () => {
  if (el.uploader.files.length > 0) {
    el.convertBtn.disabled = false;
    el.status.innerText = 'File selected. Click the button to proceed.';
  }
};

// Track the current blob URL so we can revoke it later
let currentBlobURL = null;

// Extract audio (MP4 to MP3)
el.convertBtn.onclick = async () => {
  const file = el.uploader.files[0];
  if (!file) return;

  el.convertBtn.disabled = true;
  el.status.innerText = 'Extracting audio...';

  try {
    // Read the user's file into memory
    const fileData = await new Promise((resolve, reject) => {
      const reader = new FileReader();
      reader.onload  = () => resolve(new Uint8Array(reader.result));
      reader.onerror = reject;
      reader.readAsArrayBuffer(file);
    });

    // Write the video into the VFS
    await ffmpeg.writeFile('input.mp4', fileData);

    // Run the audio extraction command
    await ffmpeg.exec([
      '-i',   'input.mp4',
      '-vn',                  // Drop the video stream
      '-c:a', 'libmp3lame',  // Encode audio as MP3
      '-b:a', '192k',        // 192 kbps bitrate
      'output.mp3'
    ]);

    // Read the MP3 bytes back from the VFS
    const data = await ffmpeg.readFile('output.mp3');

    // Revoke any previous blob URL to free memory
    if (currentBlobURL) URL.revokeObjectURL(currentBlobURL);

    // Create a blob URL with the correct MIME type
    currentBlobURL = URL.createObjectURL(
      new Blob([data], { type: 'audio/mpeg' })
    );

    // Trigger a file download so the user can save the result
    const a    = document.createElement('a');
    a.href     = currentBlobURL;
    a.download = 'audio.mp3';
    a.click();

    // Show the extracted audio in the <audio> element
    const audioEl         = document.getElementById('audioOutput');
    audioEl.src           = currentBlobURL;
    audioEl.style.display = 'block';
    el.status.innerText   = 'Audio extracted!';

  } catch (err) {
    console.error('Audio extraction failed:', err);
    el.status.innerText = 'Error. Check console.';
  } finally {
    el.convertBtn.disabled = false;
  }
};

loadFFmpeg();
Here’s how we will update our index.html file:
<!DOCTYPE html>
<html lang="en">
<head>
  <meta charset="UTF-8">
  <meta name="viewport" content="width=device-width, initial-scale=1.0">
  <title>Extract Audio from Video</title>
</head>
<body>
  <h1>Extract Audio from Video</h1>
  <p>Upload an MP4 video to extract its audio track as an MP3 file.</p>

  <!-- Status message updated by JavaScript -->
  <div id="status">Initializing...</div>

  <!-- File picker accepts video files -->
  <input type="file" id="uploader" accept="video/mp4,video/x-m4v,video/*">
  <button id="convertBtn" disabled>Extract Audio</button>
  <br><br>

  <!-- Audio output player -->
  <audio id="audioOutput" controls
         style="width:100%; max-width:640px; display:none;">
  </audio>

  <script type="module" src="/src/main.js"></script>
</body>
</html>
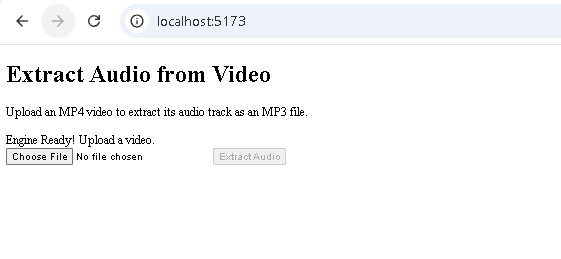
Once you update these files and run the server, you’ll see the following HTML page in your browser:
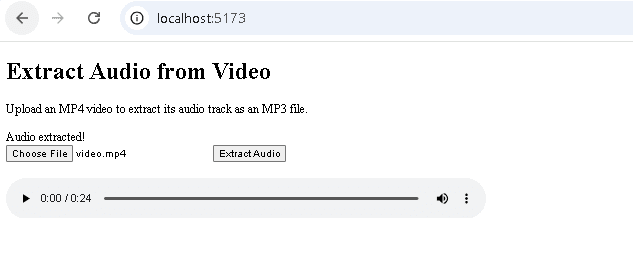
You can then upload an MP4 video and extract audio:
You can also check the browser console for progress:
Generate a Video Thumbnail
Below is an example main.js code to generate a thumbnail from a video. This code extracts a frame from a video at a specified timestamp and delivers it as a JPEG image. It is useful for generating preview thumbnails entirely on the client side without needing a backend.
import { FFmpeg } from '@ffmpeg/ffmpeg';
import { toBlobURL } from '@ffmpeg/util';

const ffmpeg = new FFmpeg();

// HTML element references
const el = {
  uploader:   document.getElementById('uploader'),
  convertBtn: document.getElementById('convertBtn'),
  status:     document.getElementById('status'),
};

// Engine event listeners
ffmpeg.on('log', ({ message }) => {
  console.log('FFmpeg Engine:', message);
});

ffmpeg.on('progress', ({ progress, time }) => {
  console.log(`Progress: ${Math.round(progress * 100)}% | Time: ${time}`);
});

// Load FFmpeg engine
async function loadFFmpeg() {
  try {
    el.status.innerText = 'Loading FFmpeg Engine...';

    const coreURL = await toBlobURL(
      `${window.location.origin}/ffmpeg-core.js`,
      'text/javascript'
    );

    const wasmURL = await toBlobURL(
      `${window.location.origin}/ffmpeg-core.wasm`,
      'application/wasm'
    );

    await ffmpeg.load({ coreURL, wasmURL });

    el.status.innerText = 'Engine Ready! Upload a video.';
  } catch (err) {
    console.error('LOAD FAILED:', err);
    el.status.innerText = 'Load failed. Check console for details.';
  }
}

// File input handler
el.uploader.onchange = () => {
  if (el.uploader.files.length > 0) {
    el.convertBtn.disabled = false;
    el.status.innerText = 'File selected. Click the button to proceed.';
  }
};

// Track the current blob URL so we can revoke it later
let currentBlobURL = null;

// Generate video thumbnail
el.convertBtn.onclick = async () => {
  const file = el.uploader.files[0];
  if (!file) return;

  el.convertBtn.disabled = true;
  el.status.innerText = 'Generating thumbnail...';

  const TIMESTAMP = '00:00:02'; // extract frame at the 2-second mark

  try {
    // Read the user's file into memory
    const fileData = await new Promise((resolve, reject) => {
      const reader = new FileReader();
      reader.onload  = () => resolve(new Uint8Array(reader.result));
      reader.onerror = reject;
      reader.readAsArrayBuffer(file);
    });

    // Write the video into the VFS
    await ffmpeg.writeFile('input.mp4', fileData);

    // Extract a single frame as JPEG
    await ffmpeg.exec([
      '-ss',       TIMESTAMP,
      '-i',        'input.mp4',
      '-frames:v', '1',        // Only one frame
      '-q:v',      '2',        // High JPEG quality
      'thumbnail.jpg'
    ]);

    // Read the JPEG bytes back from the VFS
    const data = await ffmpeg.readFile('thumbnail.jpg');

    // Revoke any previous blob URL to free memory
    if (currentBlobURL) URL.revokeObjectURL(currentBlobURL);

    currentBlobURL = URL.createObjectURL(
      new Blob([data], { type: 'image/jpeg' })
    );

    // Trigger a file download
    const a    = document.createElement('a');
    a.href     = currentBlobURL;
    a.download = 'thumbnail.jpg';
    a.click();

    // Show the thumbnail in the <img> element
    const img           = document.getElementById('thumbnailOutput');
    img.src             = currentBlobURL;
    img.style.display   = 'block';
    el.status.innerText = 'Thumbnail generated!';

  } catch (err) {
    console.error('Thumbnail failed:', err);
    el.status.innerText = 'Error. Check console.';
  } finally {
    el.convertBtn.disabled = false;
  }
};

loadFFmpeg();
Here is how you can update the index.html file:
<!DOCTYPE html>
<html lang="en">
<head>
  <meta charset="UTF-8">
  <meta name="viewport" content="width=device-width, initial-scale=1.0">
  <title>Video Thumbnail Generator</title>
</head>
<body>
  <h1>Video Thumbnail Generator</h1>
  <p>Upload a video to extract a single frame as a JPEG thumbnail.</p>

  <!-- Status message updated by JavaScript -->
  <div id="status">Initializing...</div>

  <!-- File picker accepts video files -->
  <input type="file" id="uploader" accept="video/mp4,video/x-m4v,video/*">

  <!-- Button label reflects the action -->
  <button id="convertBtn" disabled>Generate Thumbnail</button>

  <br><br>

  <!-- Thumbnail output image -->
  <img id="thumbnailOutput"
       alt="Generated thumbnail"
       style="display:none; max-width:400px; margin-top:16px; border:1px solid #ccc;">

  <script type="module" src="/src/main.js"></script>
</body>
</html>
When you run the server, your HTML page in the browser will look like this:

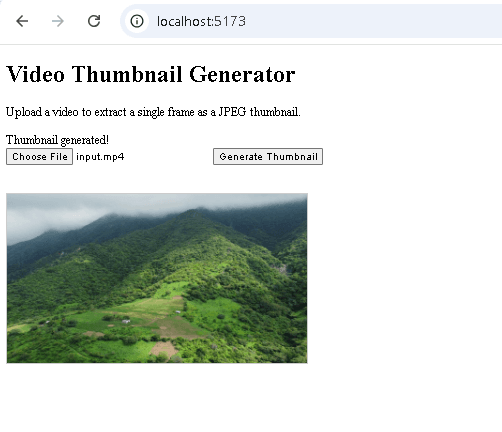
Once you upload a video and click “Generate Thumbnail”, you’ll get your thumbnail, and it’ll also be downloaded automatically:
Trim or Cut a Video Clip
Below is an example main.js code to trim a video clip using ffmpeg.wasm. It extracts a specific time range from a video. We’ve used -c copy as it skips re-encoding entirely and just copies the stream bytes, making the operation faster.
import { FFmpeg } from '@ffmpeg/ffmpeg';
import { toBlobURL } from '@ffmpeg/util';

const ffmpeg = new FFmpeg();

// HTML element references
const el = {
  uploader:   document.getElementById('uploader'),
  convertBtn: document.getElementById('convertBtn'),
  status:     document.getElementById('status'),
  video:      document.getElementById('output'),
};

// Engine event listeners
ffmpeg.on('log', ({ message }) => {
  console.log('FFmpeg Engine:', message);
});

ffmpeg.on('progress', ({ progress, time }) => {
  console.log(`Progress: ${Math.round(progress * 100)}% | Time: ${time}`);
});

// Load FFmpeg engine
async function loadFFmpeg() {
  try {
    el.status.innerText = 'Loading FFmpeg Engine...';

    const coreURL = await toBlobURL(
      `${window.location.origin}/ffmpeg-core.js`,
      'text/javascript'
    );

    const wasmURL = await toBlobURL(
      `${window.location.origin}/ffmpeg-core.wasm`,
      'application/wasm'
    );

    await ffmpeg.load({ coreURL, wasmURL });

    el.status.innerText = 'Engine Ready! Upload a video.';
  } catch (err) {
    console.error('LOAD FAILED:', err);
    el.status.innerText = 'Load failed. Check console for details.';
  }
}

// File input handler
el.uploader.onchange = () => {
  if (el.uploader.files.length > 0) {
    el.convertBtn.disabled = false;
    el.status.innerText = 'File selected. Click the button to proceed.';
  }
};

// Track the current blob URL so we can revoke it later
let currentBlobURL = null;

// Trim/cut a video clip
el.convertBtn.onclick = async () => {
  const file = el.uploader.files[0];
  if (!file) return;

  el.convertBtn.disabled = true;
  el.status.innerText = 'Trimming clip...';

  const START_TIME = '00:00:05'; // start 5 seconds into the video
  const DURATION   = '00:00:10'; // extract a 10-second clip

  try {
    // Read the user's file into memory
    const fileData = await new Promise((resolve, reject) => {
      const reader = new FileReader();
      reader.onload  = () => resolve(new Uint8Array(reader.result));
      reader.onerror = reject;
      reader.readAsArrayBuffer(file);
    });

    // Write the video into the VFS
    await ffmpeg.writeFile('input.mp4', fileData);

    // Trim the video
    await ffmpeg.exec([
      '-ss', START_TIME,
      '-i',  'input.mp4',
      '-t',  DURATION,
      '-c',  'copy',        // No re-encoding — fast stream copy
      'output.mp4'
    ]);

    // Read the trimmed clip back from the VFS
    const data = await ffmpeg.readFile('output.mp4');

    // Revoke any previous blob URL to free memory
    if (currentBlobURL) URL.revokeObjectURL(currentBlobURL);

    currentBlobURL = URL.createObjectURL(
      new Blob([data], { type: 'video/mp4' })
    );

    // Trigger a file download
    const a    = document.createElement('a');
    a.href     = currentBlobURL;
    a.download = 'clip.mp4';
    a.click();

    el.video.src           = currentBlobURL;
    el.video.style.display = 'block';
    el.status.innerText    = 'Clip ready!';

  } catch (err) {
    console.error('Trim failed:', err);
    el.status.innerText = 'Error. Check console.';
  } finally {
    el.convertBtn.disabled = false;
  }
};

loadFFmpeg();
Here is how you can update your index.html file:
<!DOCTYPE html>
<html lang="en">
<head>
  <meta charset="UTF-8">
  <meta name="viewport" content="width=device-width, initial-scale=1.0">
  <title>Video Trimmer</title>
</head>
<body>
  <h1>Video Trimmer</h1>
  <p>Upload a video to cut a clip from it. The clip starts at 5 seconds
     and is 10 seconds long. Edit START_TIME and DURATION in main.js
     to change the cut points.</p>

  <!-- Status message updated by JavaScript -->
  <div id="status">Initializing...</div>

  <!-- File picker accepts video files -->
  <input type="file" id="uploader" accept="video/mp4,video/x-m4v,video/*">

  <!-- Button label reflects the action -->
  <button id="convertBtn" disabled>Trim Clip</button>

  <br><br>

  <!-- Output video player -->
  <video id="output" controls
         style="width:100%; max-width:640px; display:none;">
  </video>

  <script type="module" src="/src/main.js"></script>
</body>
</html>
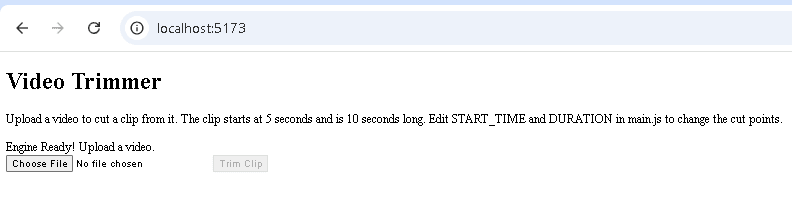
Here’s how your HTML page will look in the browser:
Compress a Video
The main.js code below compresses a video while preserving visual quality using CRF (Constant Rate Factor) mode. The CRF mode targets a specific visual quality, and the file size can vary. It’s the right option when quality matters more than hitting an exact file size.
You can also use Bitrate mode (-b:v 1M), which targets a specific average bitrate. It is a good option when you have a strict upload size limit.
import { FFmpeg } from '@ffmpeg/ffmpeg';
import { toBlobURL } from '@ffmpeg/util';

const ffmpeg = new FFmpeg();

const el = {
  uploader:   document.getElementById('uploader'),
  convertBtn: document.getElementById('convertBtn'),
  status:     document.getElementById('status'),
  video:      document.getElementById('output'),
};

// Engine event listeners
ffmpeg.on('log', ({ message }) => {
  console.log('FFmpeg Engine:', message);
});

ffmpeg.on('progress', ({ progress, time }) => {
  console.log(`Progress: ${Math.round(progress * 100)}% | Time: ${time}`);
});

// Load FFmpeg engine
async function loadFFmpeg() {
  try {
    el.status.innerText = 'Loading FFmpeg Engine...';

    const coreURL = await toBlobURL(
      `${window.location.origin}/ffmpeg-core.js`,
      'text/javascript'
    );

    const wasmURL = await toBlobURL(
      `${window.location.origin}/ffmpeg-core.wasm`,
      'application/wasm'
    );

    await ffmpeg.load({ coreURL, wasmURL });

    el.status.innerText = 'Engine Ready! Upload a video.';
  } catch (err) {
    console.error('LOAD FAILED:', err);
    el.status.innerText = 'Load failed. Check console for details.';
  }
}

// File input handler
el.uploader.onchange = () => {
  if (el.uploader.files.length > 0) {
    el.convertBtn.disabled = false;
    el.status.innerText = 'File selected. Click the button to proceed.';
  }
};

// Track the current blob URL so we can revoke it later
let currentBlobURL = null;

// Compress a video
el.convertBtn.onclick = async () => {
  const file = el.uploader.files[0];
  if (!file) return;

  el.convertBtn.disabled = true;
  el.status.innerText = 'Compressing...';

  // CRF (Constant Rate Factor) controls the quality/size tradeoff.
  // Lower = better quality but larger file. 30 is a good balance.
  const CRF_VALUE = '30';

  try {
    // Read the user's file into memory
    const fileData = await new Promise((resolve, reject) => {
      const reader = new FileReader();
      reader.onload  = () => resolve(new Uint8Array(reader.result));
      reader.onerror = reject;
      reader.readAsArrayBuffer(file);
    });

    // Write the video into the VFS
    await ffmpeg.writeFile('input.mp4', fileData);

    // Compress using CRF mode
    await ffmpeg.exec([
      '-i',   'input.mp4',
      '-c:v', 'libvpx-vp9',    // VP9 codec for good compression
      '-crf', CRF_VALUE,
      '-b:v', '0',              // Required for CRF mode with VP9
      '-c:a', 'libvorbis',
      '-b:a', '128k',
      'output.webm'
    ]);

    // Read the compressed output from the VFS
    const data = await ffmpeg.readFile('output.webm');

    // Show size savings
    const originalMB   = (file.size / 1024 / 1024).toFixed(2);
    const compressedMB = (data.byteLength / 1024 / 1024).toFixed(2);
    el.status.innerText = `Done! ${originalMB} MB → ${compressedMB} MB`;

    // Revoke any previous blob URL to free memory
    if (currentBlobURL) URL.revokeObjectURL(currentBlobURL);

    currentBlobURL = URL.createObjectURL(
      new Blob([data], { type: 'video/webm' })
    );

    // Trigger a file download
    const a    = document.createElement('a');
    a.href     = currentBlobURL;
    a.download = 'compressed.webm';
    a.click();

    el.video.src           = currentBlobURL;
    el.video.style.display = 'block';

  } catch (err) {
    console.error('Compression failed:', err);
    el.status.innerText = 'Error. Check console.';
  } finally {
    el.convertBtn.disabled = false;
  }
};

loadFFmpeg();
Here’s how you can update your index.html file:
<!DOCTYPE html>
<html lang="en">
<head>
  <meta charset="UTF-8">
  <meta name="viewport" content="width=device-width, initial-scale=1.0">
  <title>Video Compressor</title>
</head>
<body>
  <h1>Video Compressor</h1>
  <p>Upload a video to compress it. The status bar will show the original
     and compressed file sizes when done.</p>

  <p><strong>Note:</strong> Compression re-encodes the entire video, so it can take some time.</p>

  <div id="status">Initializing...</div>

  <!-- File picker accepts video files -->
  <input type="file" id="uploader" accept="video/mp4,video/x-m4v,video/*">

  <!-- Button label reflects the action -->
  <button id="convertBtn" disabled>Compress Video</button>

  <br><br>

  <!-- Output video player -->
  <video id="output" controls
         style="width:100%; max-width:640px; display:none;">
  </video>

  <script type="module" src="/src/main.js"></script>
</body>
</html>
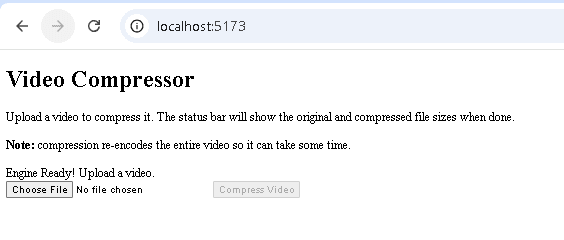
When you run the server and open your HTML page in the browser, it will look like this:
Using ffmpeg.wasm in React
ffmpeg.wasm is the standard choice for ffmpeg js in React applications. Below is a complete React component that lets a user convert a video file in the browser:
import { useState, useRef, useCallback, useEffect } from 'react'
import { FFmpeg } from '@ffmpeg/ffmpeg'
import { fetchFile, toBlobURL } from '@ffmpeg/util'

export default function VideoConverter() {
  // Create a persistent FFmpeg instance that survives component re-renders
  const ffmpegRef = useRef(new FFmpeg())

  // State flags
  const [loaded, setLoaded] = useState(false)
  const [loading, setLoading] = useState(false)
  const [progress, setProgress] = useState(0)
  const [outputURL, setOutputURL] = useState(null)
  const [error, setError] = useState(null)

  // load() loads the ffmpeg.wasm binary into the browser memory
  const load = useCallback(async () => {
    // Guard against double-loading (e.g. React strict mode remount)
    if (ffmpegRef.current.loaded || loading) return

    setLoading(true)
    setError(null)
    const ffmpeg = ffmpegRef.current

    // Update UI with progress events from FFmpeg
    ffmpeg.on('progress', ({ progress }) => {
      setProgress(Math.round(progress * 100))
    })

    const baseURL = 'https://cdn.jsdelivr.net/npm/@ffmpeg/core@0.12.6/dist/esm'

    try {
      // Load the FFmpeg core (WASM + JS loader) from CDN as Blob URLs
      // toBlobURL bypasses CORS restrictions by generating a blob URL
      await ffmpeg.load({
        coreURL: await toBlobURL(`${baseURL}/ffmpeg-core.js`, 'text/javascript'),
        wasmURL: await toBlobURL(`${baseURL}/ffmpeg-core.wasm`, 'application/wasm'),
      })

      setLoaded(true)
    } catch (err) {
      console.error('Failed to load ffmpeg.wasm:', err)
      setError('Failed to load FFmpeg. Please refresh and try again.')
    } finally {
      setLoading(false)
    }
  }, [loading])

  // Automatically load ffmpeg.wasm on mount
  useEffect(() => {
    load()
  }, [load])

  // transcode() performs actual video conversion
  const transcode = useCallback(async (file) => {
    if (!file) return
    const ffmpeg = ffmpegRef.current

    setProgress(0)
    setError(null)

    try {
      // Write the uploaded file into FFmpeg's virtual filesystem
      // fetchFile reads the local file into a Uint8Array
      await ffmpeg.writeFile('input.mp4', await fetchFile(file))

      // Run a conversion command
      await ffmpeg.exec([
        '-i', 'input.mp4',
        '-c:v', 'libvpx-vp9',
        '-crf', '30',
        '-b:v', '0',
        'output.webm'
      ])

      // Read the result from FFmpeg's virtual filesystem
      const data = await ffmpeg.readFile('output.webm')

      // Revoke any previous blob URL to prevent memory leaks
      if (outputURL) URL.revokeObjectURL(outputURL)

      // Create a downloadable URL from the output
      const url = URL.createObjectURL(
        new Blob([data], { type: 'video/webm' })
      )

      setOutputURL(url)
    } catch (err) {
      console.error('Transcode failed:', err)
      setError('Conversion failed. The file may be too large or in an unsupported format.')
    }
  }, [outputURL])

  // Clean up blob URL when the component unmounts
  useEffect(() => {
    return () => {
      if (outputURL) URL.revokeObjectURL(outputURL)
    }
  }, [outputURL])

  return (
    <div>
      {error && <p style={{ color: 'red' }}>{error}</p>}

      {!loaded && (
        <p>{loading ? 'Loading ffmpeg.wasm...' : 'Initializing ffmpeg.wasm...'}</p>
      )}

      {loaded && (
        <>
          <input
            type="file"
            accept="video/*"
            onChange={(e) => transcode(e.target.files[0])}
          />

          {progress > 0 && progress < 100 && <p>Processing: {progress}%</p>}
        </>
      )}

      {outputURL && (
        <video src={outputURL} controls style={{ maxWidth: '100%' }} />
      )}
    </div>
  )
}
This code:
- Uses
useStateto track whether FFmpeg is loaded, whether it’s currently loading, and the progress percentage of transcoding. - Attaches an
ffmpeg.on('progress', …)handler to update progress state as FFmpeg runs. - Uses
useEffectto automatically load FFmpeg on mount. - Revokes blob URLs on cleanup to prevent memory leaks.
- Guards against double-loading with a check on
ffmpegRef.current.loaded.
Common Pitfalls:
- Never call
ffmpeg.load()inside the render function or on every state change. Use a ref (useRef) to keep the FFmpeg instance alive across renders. - Don’t create a
new FFmpeg()inside auseEffectwithout cleanup; you’ll leak memory on remount. - The
load()call is async and takes several seconds. Always show a loading state to the user. - Always revoke previous blob URLs with
URL.revokeObjectURL()before creating new ones, or you’ll leak memory.
Using ffmpeg.wasm in Next.js
ffmpeg.wasm is a browser-only library. When you use it in Next.js, you must ensure the component only runs on the client. To ensure ffmpeg.wasm only loads in the browser, Next.js provides a dynamic import mechanism:
import dynamic from 'next/dynamic';

const FFmpegComponent = dynamic(
  () => import('../components/FFmpegComponent'),
  { ssr: false } // disables server-side rendering for this component
);

export default function Page() {
  return <FFmpegComponent />;
}
ssr: false ensures the component only renders on the client. We can initialize ffmpeg.wasm inside the FFmpegComponent.
Also, make sure to add required headers in next.config.js for cross-origin isolation to use SharedArrayBuffer:
// next.config.js
const nextConfig = {
  async headers() {
    return [
      {
        // Apply to all routes or narrow this to specific paths
        source: '/(.*)',
        headers: [
          { key: 'Cross-Origin-Opener-Policy', value: 'same-origin' },
          { key: 'Cross-Origin-Embedder-Policy', value: 'require-corp' },
        ],
      },
    ];
  },
};

module.exports = nextConfig;
Performance and Browser Limitations
Running FFmpeg in the browser via ffmpeg.wasm comes with performance trade-offs that don’t exist with server-side processing. Here’s what to watch for.
WASM Binary Size
The core .wasm file is around 30 MB. Loading it upfront can significantly delay page rendering. It is recommended to load it only when the user initiates a video action, rather than on page load.
Memory Limits
Browsers impose memory limits on WebAssembly, typically around a 2 GB hard limit, depending on the browser and device. Unlike a Node.js server environment, the browser cannot expand memory dynamically. This results in out-of-memory errors for very large videos.
Not Suitable for Batch Processing
ffmpeg.wasm is designed for lightweight video processing on the client side. For files larger than 500 MB or for batch processing, execution times can become very long, and there is a higher risk of browser crashes or memory errors. For heavy workloads, it is recommended to use FFmpeg on the server side.
SharedArrayBuffer and Cross-Origin Isolation
Multi-threading in ffmpeg.wasm relies on SharedArrayBuffer, which requires cross-origin isolation. That means your server must send Cross-Origin-Opener-Policy: same-origin and Cross-Origin-Embedder-Policy: require-corp.
If you’re using third-party iframes, scripts, or resources on the same page, those resources must also be served with Cross-Origin-Resource-Policy: cross-origin headers, which many CDNs and third-party services do not support.
Safari Limitations
Safari 15.2 and later support SharedArrayBuffer, but many developers have noticed that multi-threaded ffmpeg.wasm can be unstable in the browser. Single-threaded mode works fine, though it is noticeably slower. Make sure to test your specific use case on Safari before using ffmpeg.wasm in a production feature.
Mobile Browser Performance
Mobile devices typically have less CPU and memory than desktops. ffmpeg.wasm can run on mobile, and it works fine for short clips of a few seconds, but processing large files can take too long or even crash the browser.
No File System Access
The browser sandbox means ffmpeg.wasm has no access to the real file system. Everything goes through an in-memory virtual FS. For large files, this means the entire file must be loaded into browser memory, which can cause slow performance and high memory usage.
ffmpeg.wasm vs Server-Side FFmpeg: When to Use Each
Choosing between ffmpeg.wasm and a traditional server-side FFmpeg setup depends on your project’s requirements. You should consider factors like file size, privacy concerns, and processing environment.
Use ffmpeg.wasm when:
- Processing is happening on the client, and you want privacy-sensitive media or data to stay local
- You’re building a demo or prototyping tool
- Files are small (under 500 MB), and you want to process one file at a time
- You want to avoid backend setup entirely
Use server-side FFmpeg when:
- Files are large, or processing takes more than a few seconds
- You need to batch process many files in parallel
- You want consistency and reliability in production
- You need advanced codec support or custom FFmpeg builds
- You’re running in a Node.js, serverless, or containerised environment
The table below shows a quick comparison between ffmpeg.wasm and server-side FFmpeg:
| Factor | ffmpeg.wasm | Server-Side FFmpeg |
|---|---|---|
| Setup | npm install, no server | Requires a server or container |
| Privacy | Files stay on the client side | Files are sent to the server |
| File size | Best for files under 500 MB | Can efficiently process very large files |
| Speed | Slower (browser execution) | Faster (native binary) |
| Multi-threading | Requires SharedArrayBuffer & COOP/COEP headers | Full OS-level threading available |
| Batch processing | Not suitable | Can efficiently process multiple videos simultaneously |
| Codec support | Good (H.264, VP9, MP3, Opus, WebP) | Complete, fully configurable |
| Use cases | Demos, interactive editors, small clips | Batch processing, video hosting, production pipelines |
Beyond ffmpeg.wasm: When to Use a Video API
ffmpeg.wasm is a great tool for quick, in-browser video tasks like trimming clips and converting formats, but it has its limitations. If your product needs to handle large files, batch processing, or automated video creation from templates, relying on ffmpeg.wasm isn’t efficient. Browsers can slow down or even crash, and memory usage also spikes.
While you can use FFmpeg on the server side for such tasks, it can also get challenging for complex workflows or when you need to process hundreds of videos. This is where a video API like Shotstack can be helpful.
Shotstack’s cloud-based video API lets you define your video edits in a JSON timeline, and Shotstack’s servers do all the work, including downloading assets, preprocessing, rendering, encoding, and producing the final video. It lets you scale automatically and build repeatable workflows.
With Shotstack, you can generate videos programmatically, add dynamic content, and render high-quality outputs without worrying about client-side limitations or the complexities of working with FFmpeg on the server-side. Try it free.
FAQs
What is ffmpeg.wasm?
ffmpeg.wasm is a WebAssembly/JavaScript port of FFmpeg that lets you process audio and video files directly in the browser without a server. It compiles FFmpeg’s native code into WASM so it runs inside modern browsers.
How do I install ffmpeg.wasm?
You can install ffmpeg.wasm via npm with this command: npm install @ffmpeg/ffmpeg @ffmpeg/util. For self-hosting the WASM binary, also install @ffmpeg/core.
Does ffmpeg.wasm work in all browsers?
No. It requires browsers that support SharedArrayBuffer under cross-origin isolation. Older browsers or ones without this support will not be able to run ffmpeg.wasm.
Is ffmpeg.wasm suitable for production use?
It can work in production for small, client-side tasks, but performance limitations and cross-origin requirements make it less reliable than native server FFmpeg for large files and heavy workflows.
What video formats does ffmpeg.wasm support?
ffmpeg.wasm supports H.264, H.265, VP8, VP9, MP3 (via LAME), OGG, Opus, and WebP. It also includes support for subtitle rendering via libass and font rendering via FreeType.
Why is ffmpeg.wasm slow in the browser?
WebAssembly runs slower than a native binary, and the browser also imposes memory limits. Without multithreading or with large files, transcoding is significantly slower than server-side FFmpeg.
How do I use ffmpeg.wasm in React?
Install @ffmpeg/ffmpeg, store the instance in a useRef, load it inside a useEffect, and interact with its API. Use a guard to prevent double-loading, and always revoke blob URLs to prevent memory leaks.
How do I enable SharedArrayBuffer for ffmpeg.wasm?
Serve your site with cross-origin isolation headers: Cross-Origin-Opener-Policy: same-origin and Cross-Origin-Embedder-Policy: require-corp. This enables the SharedArrayBuffer support needed by ffmpeg.wasm.
Get started with Shotstack's video editing API in two steps:
- Sign up for free to get your API key.
- Send an API request to create your video:
curl --request POST 'https://api.shotstack.io/v1/render' \
--header 'x-api-key: YOUR_API_KEY' \
--data-raw '{
  "timeline": {
    "tracks": [
      {
        "clips": [
          {
            "asset": {
              "type": "video",
              "src": "https://shotstack-assets.s3.amazonaws.com/footage/beach-overhead.mp4"
            },
            "start": 0,
            "length": "auto"
          }
        ]
      }
    ]
  },
  "output": {
    "format": "mp4",
    "size": {
      "width": 1280,
      "height": 720
    }
  }
}'


Experience Shotstack for yourself.
- Seamless integration
- Dependable high-volume scaling
- Blazing fast rendering
- Save thousands