FFmpeg is a widely used open-source tool for processing video and audio files. You can use it to convert video formats, crop, resize, and compress videos, or even create thumbnails. Developers working on projects that involve video processing often use FFmpeg because it’s efficient and supports hundreds of codecs and formats. Although FFmpeg is a command-line tool, many developers also use it in Node.js — this guide covers how to use FFmpeg in Node.js to automate video processing and transform video content at scale inside serverless functions.
TL;DR
In this tutorial, we’ve provided a step-by-step guide on how to use FFmpeg in Node.js, from installation options to real workflows such as transcoding, audio extraction, resizing, trimming, thumbnail generation, watermarking, and video merging.
If you find using FFmpeg challenging, especially when processing large volumes of video files, you can use a video editing API like Shotstack, which lets you automate video editing via an HTTP API.
Prerequisites
To use FFmpeg in Node.js, you need to have:
Node.js (v14+) installed on your system.
A basic understanding of
async/awaitand the terminal or command line tool.
The async/await syntax lets us handle asynchronous operations without blocking the program flow or the event loop. It makes the code easier to write and maintain, and also improves error handling.
The command-line tool is what we use to install packages, start and stop servers, and run builds.
How to Install FFmpeg in Node.js
There are multiple ways we can set up or install FFmpeg for a Node.js project. Each method is suitable for a different use case. Here we’ll discuss three methods with their use cases.
1. Static Binary (using ffmpeg-static)
This is the easiest approach for most Node.js projects. The ffmpeg-static provides a bundled and precompiled FFmpeg binary for your platform, so you don’t need to install FFmpeg globally. Basically, the binary is bundled inside your project, so you don’t rely on the host system having FFmpeg installed.
Here’s how to install it through the terminal or PowerShell:
npm install ffmpeg-static
This method is great when deploying to serverless environments, such as Vercel and AWS Lambda, or containerized platforms like Docker, especially when you want consistent behavior across machines.
2. System Installed FFmpeg
This method installs FFmpeg directly on your operating system. Your Node app simply calls ffmpeg from the system path.
Here’s how to install it:
macOS (using Homebrew):
brew install ffmpeg
Ubuntu
sudo apt update
sudo apt install ffmpeg
Windows
You can install FFmpeg on Windows either directly from the official site, or you can install it via Chocolatey (a package manager for Windows).
When you download FFmpeg from the official site, you need to add the bin folder to your system PATH manually. If you install it through Chocolatey, it automatically adds FFmpeg to your system PATH. But you first need to install the Chocolatey package manager. You can install it through PowerShell using this command:
iwr https://community.chocolatey.org/install.ps1 \-UseBasicParsing | iex
Here’s how you can verify installation:
choco \-v
Now you can install FFmpeg:
choco install ffmpeg
This method is best for projects where you need advanced codecs, such as H.265, VP9, AV1, and the latest FFmpeg features.
3. WebAssembly (ffmpeg.wasm)
FFmpeg can run as WebAssembly via @ffmpeg/ffmpeg, but it is not recommended for server-side or backend video processing tasks. This method is good for client-side/in-browser processing or demos without server installs.
Here’s how to install it:
npm install @ffmpeg/ffmpeg @ffmpeg/core
The table below shows a quick comparison between the three methods to install FFmpeg for a Node.js project:
| Method | Package | Best for | Pros | Cons |
|---|---|---|---|---|
| Static binary | ffmpeg-static | Serverless, easy deployment | Zero system dependencies, version-locked | Limited codec support |
| System-installed | Manual installation | Full control, all codecs | Complete codec library, customizable | Requires system setup in each environment |
| WebAssembly | ffmpeg.wasm | In-browser processing | Runs in browser, no backend needed | Performance limitations, large bundle size |
Setting Up fluent-ffmpeg
fluent-ffmpeg is a wrapper that makes FFmpeg easier to control from Node. We can use FFmpeg without fluent-ffmpeg, but fluent-ffmpeg makes complex workflows much easier to manage.
Here’s how to install fluent-ffmpeg:
npm install fluent-ffmpeg
We can use the wrapper with both ffmpeg-static or with system install FFmpeg. Below is a simple fluent-ffmpeg tutorial/code example showing how to configure fluent-ffmpeg with ffmpeg-static. It also includes an availability test to verify that ffmpeg-static npm is properly installed and the FFmpeg binary can execute.
// Import dependencies
const ffmpeg \= require('fluent-ffmpeg');
const ffmpegPath \= require('ffmpeg-static');
const { execSync } \= require('child\_process');
// Set the FFmpeg path for fluent-ffmpeg
ffmpeg.setFfmpegPath(ffmpegPath);
console.log('Checking FFmpeg availability...');
console.log('FFmpeg path:', ffmpegPath);
try {
// Run FFmpeg version command synchronously
const version \= execSync(\`"${ffmpegPath}" \-version\`, { encoding: 'utf-8' });
// Extract and display the first line (version info)
const versionLine \= version.split('\\n')\[0\];
console.log('✓ FFmpeg is available\!');
console.log('Version:', versionLine);
console.log('\\nFFmpeg is ready to use.');
} catch (err) {
console.error('FFmpeg not available\!');
console.error('Error:', err.message);
process.exit(1);
}
To run this code, create a file named app.js and put the above code in the file. Then run this on your terminal:
node app.js
If everything is installed correctly, you’ll see an output like this:

This confirms that ffmpeg-static is installed and its FFmpeg binary works. If there is an issue, you’ll see an error “FFmpeg not available!”.
In the availability test above, we’ve used execSync, which works well for quick local testing or experiment scripts. But, we should avoid using execSync inside request handlers or production server code because it blocks the event loop and can degrade performance under load.
For production servers, we can use non‑blocking child process methods, such as child_process.exec() or child_process.execFile().
How to Extract Video Metadata with ffprobe
FFmpeg comes with a supporting tool called ffprobe, which lets us extract metadata, such as duration, codec, resolution, and bitrate, from media files before processing them. This is important for validating inputs and enabling conditional processing based on that metadata.
Here’s a simple code that shows how to use ffprobe through fluent-ffmpeg:
const ffmpeg = require('fluent-ffmpeg');
const ffmpegPath = require('ffmpeg-static');
const ffprobePath = require('ffprobe-static').path;

ffmpeg.setFfmpegPath(ffmpegPath);
ffmpeg.setFfprobePath(ffprobePath);

// Extract metadata from a video file

function getMetadata(inputPath) {
  return new Promise((resolve, reject) => {
    ffmpeg.ffprobe(inputPath, (err, metadata) => {
      if (err) return reject(err);
      resolve(metadata);
    });
  });
}

async function main() {
  try {
    const metadata = await getMetadata('./input.mp4');
    const stream = metadata.streams[0]; // first video stream
    const format = metadata.format;

    console.log('Duration (s):', format.duration);
    console.log('Codec:', stream.codec_name);
    console.log('Resolution:', stream.width + 'x' + stream.height);
    console.log('Bit rate:', format.bit_rate);

    // Conditional processing based on metadata
    if (stream.codec_name !== 'h264') {
      console.log('Non-H.264 source detected. Re-encoding recommended.');
    }
    if (format.duration > 300) {
      console.log('Video exceeds 5 minutes. Consider chunked processing.');
    }
  } catch (err) {
    console.error('ffprobe failed:', err.message);
  }
}

main();
The getMetadata function wraps ffprobe in a Promise so you can use async/await. It returns a metadata object with two key properties: metadata.streams (an array of audio/video stream details) and metadata.format (container-level info like duration and bitrate).
You can use these values to validate the file before processing, or to make conditional decisions, such as skipping re-encoding when the codec is already correct, or routing long videos to a chunked processor.
How to Use FFmpeg in Node.js: Code Examples
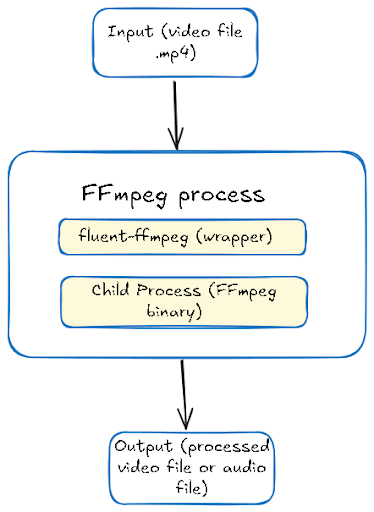
Let’s explore some of the most common node ffmpeg video processing tasks. Each example is a complete code with proper error handling. These code examples follow the FFmpeg in Node.js architecture in the diagram below:
To run these examples, make sure you have a sample mp4 video in your project folder.
Convert Video Formats (MP4 → WebM)
Many times, we need to convert a video from one format to another. For example, we often convert a video into a web-optimized format, such as WebM, because WebM offers better compression than MP4 for web delivery.
Here is a simple code to convert an MP4 video into WebM format through FFmpeg:
// Import dependencies
const ffmpeg = require('fluent-ffmpeg');
const ffmpegPath = require('ffmpeg-static');

// Set the FFmpeg path for fluent-ffmpeg
ffmpeg.setFfmpegPath(ffmpegPath);

// Function to convert a video file to WebM format
async function convertToWebM(inputPath, outputPath) {
  return new Promise((resolve, reject) => {
    ffmpeg(inputPath)
      .output(outputPath)
      .videoCodec('libvpx')
      .audioCodec('libvorbis')
      .on('start', (commandLine) => {
        console.log('FFmpeg command:', commandLine);
      })
      .on('progress', (progress) => {
        // Guard before logging percent
        if (progress && typeof progress.percent === 'number') {
          console.log(`Processing: ${progress.percent.toFixed(2)}% done`);
        }
      })
      .on('end', () => {
        console.log('Conversion completed successfully');
        resolve(outputPath);
      })
      .on('error', (err) => { // Triggered if an error occurs
        console.error('Conversion failed:', err.message);
        reject(err);
      })
      .run(); // Start the FFmpeg process
  });
}

// Run the conversion function and wait for completion using async/await
async function main() {
  try {
    const output = await convertToWebM('./input.mp4', './output.webm');
    console.log('Output saved to:', output);
  } catch (err) { // Handle errors
    console.error('Error:', err);
  }
}

// Run the main function
main();
The code first imports fluent-ffmpeg and ffmpeg-static to use FFmpeg in Node.js. It then sets the FFmpeg Path to ensure fluent-ffmpeg uses the static binary. The convertToWebM Function wraps FFmpeg in a Promise to allow async/await. It:
Takes an input video and output path.
Uses
libvpxfor video andlibvorbisfor audio (WebM-compatible codecs).Logs progress and command details.
Resolves when done or rejects on error.
To run this code, simply create a file with a .js extension, such as convertAsync.js, and put the code in the file. Then, run the following command in your terminal:
node convertAsync.js
You’ll see an output like this in your terminal:

You can see the output file in your project folder.
Extract Audio from Video
The code below extracts audio from a video through the FFmpeg nodejs:
const ffmpeg = require('fluent-ffmpeg');
const ffmpegPath = require('ffmpeg-static');

ffmpeg.setFfmpegPath(ffmpegPath);

async function extractAudio(inputPath, outputPath) {
  return new Promise((resolve, reject) => {
    ffmpeg(inputPath)
      .output(outputPath)
      .noVideo() // Disable video stream
      .audioCodec('libmp3lame') // Use MP3 codec
      .audioBitrate('192k') // Set audio quality
      .on('start', (commandLine) => {
        console.log('Extracting audio...');
      })
      .on('end', () => {
        console.log('Audio extracted successfully');
        resolve(outputPath);
      })
      .on('error', (err) => {
        console.error('Audio extraction failed:', err.message);
        reject(err);
      })
      .run();
  });
}

// Usage with async/await
async function main() {
  try {
    const output = await extractAudio('./input.mp4', './output.mp3');
    console.log('Audio saved to:', output);
  } catch (err) {
    console.error('Error:', err);
  }
}

main();
In this code, the extractAudio function extracts the audio from a video file (MP4) and saves it as MP3. It returns a Promise, so you can use async/await.
To run this code, create a file with a .js extension, for example, audio.js, and put the code in the file. Then, run the following command in the terminal:
node audio.js
You’ll see an output like this:

For a complete guide to audio extraction, see our article on converting video to MP3 with FFmpeg.
Resize/Scale Video
Here’s a simple code to resize a video into multiple resolutions:
const ffmpeg = require('fluent-ffmpeg');
const ffmpegPath = require('ffmpeg-static');

// Set the path to the FFmpeg binary for fluent-ffmpeg to use
ffmpeg.setFfmpegPath(ffmpegPath);

// Function to resize a video
// inputPath: path to input video
// outputPath: path to save resized video
// width: desired width
// height: desired height (if null, aspect ratio is maintained)
async function resizeVideo(inputPath, outputPath, width, height) {
  // Return a Promise so we can use async/await
  return new Promise((resolve, reject) => {
    ffmpeg(inputPath)          // Initialize ffmpeg with input video
      .output(outputPath)      // Set the output file path
      // Set the video size, use '?' to maintain aspect ratio automatically if height is null
      .size(`${width}x${height || '?'}`)
      // Event triggered when ffmpeg starts processing
      .on('start', (commandLine) => {
        console.log(`Resizing to ${width}x${height || 'auto'}...`);
      })
      // Event triggered when resizing completes successfully
      .on('end', () => {
        console.log('Video resized successfully');
        resolve(outputPath);   // Resolve the promise with the output path
      })
      // Event triggered if there's an error during resizing
      .on('error', (err) => {
        console.error('Resize failed:', err.message);
        reject(err);           // Reject the promise with the error
      })
      .run();                  // Start the ffmpeg process
  });
}

// Async function to create multiple resolutions from one input video
async function createMultipleResolutions(inputPath) {
  try {
    // Resize to 720p width (1280), maintain aspect ratio automatically
    const output720p = await resizeVideo(inputPath, './output-720p.mp4', 1280, null);
    console.log('720p video saved to:', output720p);

    // Resize to 480p resolution (854x480)
    const output480p = await resizeVideo(inputPath, './output-480p.mp4', 854, 480);
    console.log('480p video saved to:', output480p);

    console.log('All resolutions created successfully');
  } catch (err) {
    // Catch any errors from the resizing process
    console.error('Error creating resolutions:', err);
  }
}

// Execute the function with input video
createMultipleResolutions('./input.mp4');
The resizeVideo in the code is an async function that returns a Promise, so you can use await when calling it. .size(\${width}x${height || ’?’}`)` sets the new video size.
The createMultipleResolutions function uses async/await to resize the same input video to multiple resolutions sequentially. First, it resizes to 1280px width (720p) while keeping the aspect ratio. Then, it resizes to 480p (854x480 explicitly).
To execute this code, create a file with a .js extension and run it in the terminal. You’ll see an output like this:

You can see the output files in your project directory. For a deeper look at cropping and scaling options, see our guide on cropping and resizing videos with FFmpeg.
How to Generate Video Thumbnails with FFmpeg
Here is a code example to create a thumbnail from a video:
const fs = require('fs');
const ffmpeg = require('fluent-ffmpeg');
const ffmpegPath = require('ffmpeg-static');

// Set the path to the FFmpeg binary for fluent-ffmpeg to use
ffmpeg.setFfmpegPath(ffmpegPath);

// Ensure the output folder exists before generating thumbnails

const OUTPUT_DIR = './thumbnails';
if (!fs.existsSync(OUTPUT_DIR)) fs.mkdirSync(OUTPUT_DIR, { recursive: true });


// Function to generate a thumbnail from a video
// 'input' = video file path, 'second' = timestamp for thumbnail, 'filename' = output image name
async function generateThumbnail(input, second, filename) {
  // Return a Promise so we can use async/await
  return new Promise((resolve, reject) => {
    ffmpeg(input) // Initialize ffmpeg with input video
      .screenshots({
        timestamps: [second], // Time (in seconds) to take the thumbnail
        filename,             // Output filename for the thumbnail
           folder: OUTPUT_DIR,  // explicit output folder
        size: '320x240'       // Thumbnail size
      })
      // Handle errors during processing
      .on('error', (err) => reject(err))
      // Resolve the promise when thumbnail generation is complete
      .on('end', () => resolve(filename));
  });
}

// Main function to run the thumbnail generation
async function main() {
  try {
    // Generate thumbnail at 5 seconds into 'input.mp4' and save as 'thumb-5s.png'
    const thumb = await generateThumbnail('input.mp4', '5', 'thumb-5s.png');
    console.log('Thumbnail created:', thumb); // Log success
  } catch (err) {
    console.error('Thumbnail error:', err); // Log any errors
  }
}

// Execute the main function
main();
The generateThumbnail function takes a video file (input), a timestamp in seconds (second), and a filename for the thumbnail (filename). .screenshots() tells FFmpeg to generate a thumbnail. timestamps: [second] captures frame at that time.
It’s important to always specify the folder option inside .screenshots(). Without it, fluent-ffmpeg defaults to the current working directory, which can be unpredictable depending on how your app is started.
Also, make sure the folder exists before calling the function. If it doesn’t, FFmpeg will exit silently with no output and no error event, which is one of the most common issues with thumbnail generation.
When you run this code, you’ll see an output like this on your terminal:

You can see the thumbnail in your project folder. For more on frame extraction techniques, see our complete guide on extracting frames with FFmpeg.
Trim / Clip Video
Here’s a simple code example to trim a video:
const ffmpeg = require('fluent-ffmpeg');
const ffmpegPath = require('ffmpeg-static');

// Set the path to the FFmpeg binary
ffmpeg.setFfmpegPath(ffmpegPath);

// Function to trim a video segment
async function trimVideo(input, output, start, duration) {
  return new Promise((resolve, reject) => {
    ffmpeg(input)
      .setStartTime(start)     // Start time of the clip
      .setDuration(duration)   // Duration of the clip
      .output(output)          // Output file
      .on('error', (err) => reject(err))  // Handle errors
      .on('end', () => resolve(output))   // Resolve when done
      .run();                  // Execute FFmpeg command
  });
}

// Main function to call trimming with async/await
async function main() {
  try {
    // Trim a 10-second clip starting at 5 seconds
    const clip = await trimVideo('input.mp4', 'clip.mp4', '00:00:05', 10);
    console.log('Trimmed clip saved at:', clip);
  } catch (err) {
    // Catch any errors from FFmpeg
    console.error('Trim failed:', err);
  }
}

// Run the main function
main();
The trimVideo function takes an input video file, an output filename, a start time, and a duration. It then:
Cuts a segment of the video starting at the given time for the given duration.
Returns a Promise so it can be used with
async/await.
The main function calls trimVideo to extract a 10-second clip starting at 5 seconds from input.mp4 and saves it as clip.mp4.
When you run this code, you’ll see an output like this on your terminal:

For more trimming techniques and options, see our guide on how to trim video with FFmpeg.
Add Watermark / Overlay
Here is a code example to add a watermark and a text overlay to a video:
const ffmpeg = require('fluent-ffmpeg');
const ffmpegPath = require('ffmpeg-static');

ffmpeg.setFfmpegPath(ffmpegPath);

// Add image watermark (logo)
async function addImageWatermark(inputPath, watermarkPath, outputPath, position = 'bottomright') {
  return new Promise((resolve, reject) => {
    // Position presets
    const positions = {
      topleft: 'overlay=10:10',
      topright: 'overlay=main_w-overlay_w-10:10',
      bottomleft: 'overlay=10:main_h-overlay_h-10',
      bottomright: 'overlay=main_w-overlay_w-10:main_h-overlay_h-10',
      center: 'overlay=(main_w-overlay_w)/2:(main_h-overlay_h)/2'
    };

    ffmpeg(inputPath)
      .input(watermarkPath) // Watermark image
      .complexFilter([positions[position] || positions.bottomright])
      .output(outputPath)
      .on('start', (commandLine) => {
        console.log('Adding watermark...');
      })
      .on('end', () => {
        console.log('Watermark added successfully');
        resolve(outputPath);
      })
      .on('error', (err) => {
        console.error('Watermark failed:', err.message);
        reject(err);
      })
      .run();
  });
}

// Add text overlay
async function addTextOverlay(inputPath, outputPath, text, fontSize = 24) {
  return new Promise((resolve, reject) => {
    // Text overlay filter (positions text at bottom center)
    const textFilter = `drawtext=text='${text}':fontsize=${fontSize}:fontcolor=white:x=(w-text_w)/2:y=h-th-10:box=1:boxcolor=black@0.5:boxborderw=5`;

    ffmpeg(inputPath)
      .videoFilters(textFilter)
      .output(outputPath)
      .on('start', (commandLine) => {
        console.log('Adding text overlay...');
      })
      .on('end', () => {
        console.log('Text overlay added successfully');
        resolve(outputPath);
      })
      .on('error', (err) => {
        console.error('Text overlay failed:', err.message);
        reject(err);
      })
      .run();
  });
}

// Usage with async/await
async function main() {
  try {
    // Add logo watermark in bottom right
    const watermarked = await addImageWatermark('./input.mp4', './logo.png', './watermarked.mp4', 'bottomright');
    console.log('Watermarked video saved to:', watermarked);

    // Add text overlay
    const titled = await addTextOverlay('./input.mp4', './titled.mp4', '(c) 2026 My Company', 32);
    console.log('Titled video saved to:', titled);
  } catch (err) {
    console.error('Error:', err);
  }
}

main();
In this code, the addImageWatermark function overlays a logo or image on a video. It uses FFmpeg’s overlay filter with preset coordinates. complexFilter applies the watermark at the chosen position.
The addTextOverlay function overlays text on a video. It uses FFmpeg’s drawtext filter and adds a semi-transparent black box behind the text for readability.
To run the code above, make sure you have a PNG image/logo in your project folder. You’ll see an output like this:

One important thing to know here is that the drawtext filter passes text directly into an FFmpeg filter string, which has its own escaping rules. If your text contains single quotes (’), colons (:), backslashes (\), or special characters, the FFmpeg command can break or produce unexpected output.
If your overlay text contains single quotes or any special characters, either escape them or sanitize input before using in drawtext. Here’s an example of how you can escape special characters:
const escapedText \= text.replace(/:/g, '\\\\:').replace(/'/g, "\\\\'");
Merge / Concatenate Videos
Here is a simple code to merge two video files:
const ffmpeg = require('fluent-ffmpeg');
const ffmpegPath = require('ffmpeg-static');
const fs = require('fs');

// Set the path to the FFmpeg binary
ffmpeg.setFfmpegPath(ffmpegPath);

// Function to merge multiple videos listed in a text file
async function mergeVideos(fileList, output) {
  return new Promise((resolve, reject) => {
    ffmpeg()
      .input(fileList)                 // Input is a text file listing videos
      .inputOptions(['-f concat', '-safe 0']) // Use FFmpeg concat demuxer
      .outputOptions('-c copy')        // Merge without re-encoding
      .output(output)                  // Output file
      .on('error', (err) => reject(err))  // Handle errors
      .on('end', () => resolve(output))   // Resolve when done
      .run();                          // Execute FFmpeg command
  });
}

// Main function to prepare the video list and merge
async function main() {
  try {
    // Create a text file listing the videos to merge
    fs.writeFileSync('videos.txt', "file 'a.mp4'\nfile 'b.mp4'");

    // Merge videos
    const merged = await mergeVideos('videos.txt', 'merged.mp4');
    console.log('Merged video saved as:', merged);
  } catch (err) {
    // Catch any errors from FFmpeg or file operations
    console.error('Merge error:', err);
  }
}

// Run the main function
main();
This code creates a text file (videos.txt) listing the video files to merge in order. The mergeVideos function:
Takes the text file with the list of videos and an output filename.
Uses FFmpeg’s concat demuxer (
-f concat -safe 0) to merge without re-encoding (-c copy).Returns a Promise for use with
async/await.
The main function writes the list of videos to videos.txt, calls mergeVideos, and logs the result.
To run this code, make sure you have two MP4 video files named “a.mp4 and b.mp4” in your project folder. You’ll see an output like this:

One important thing to know here is that the “.outputOptions(‘-c copy’)” we’ve used in the code above only works reliably when all input files share the same codec, resolution, and frame rate. If they don’t match, the output will be corrupted, or FFmpeg will throw an error. In that case, you need to re-encode to a common format before merging.
Here’s an example of how you can re-encode to a common format:
.videoCodec('libx264') .audioCodec('aac')
Common Pitfalls & Troubleshooting
Here are some common issues developers usually face when working with ffmpeg nodejs:
Missing Codecs
Sometimes, you get errors like “Unknown encoder ‘libx264’” or “Encoder libmp3lame not found. This happens when using ffmpeg-static, which includes a limited codec set.
If a codec isn’t available, use alternative codecs included in ffmpeg-static. For production systems that require specific codecs, install FFmpeg system-wide instead of using ffmpeg-static.
Memory Limits in Serverless Environments
AWS Lambda or serverless functions can crash with “out of memory” errors during video processing. To solve this issue, implement chunked processing and increase memory allocation
Path Issues on Windows
Sometimes code works on Mac/Linux but fails on Windows with path-related errors. To solve this, use path.resolve() and normalize paths.
FFmpeg exited with code 1
If you get this error, add event listeners for stderr to see why a job failed. Verbose stderr reveals flags/codec issues, so you can fix code accordingly.
Production Considerations
Consider the following in production environments:
FFmpeg can be heavy. Use worker threads or offload to a queue. Processing videos sequentially prevents resource exhaustion.
As your video processing needs grow, you’ll face scaling issues, such as unpredictable processing times. To solve these scaling issues, you need to invest on infrastructure. A more affordable option is to use specialized video APIs
Check out our comprehensive How to use FFmpeg guide as well
Use a Video API Instead
Using FFmpeg provides flexibility and powerful options to process videos. But, as we discussed in the previous section, it can get difficult when you need to scale and process hundreds of videos daily. Working with FFmpeg manually can also get challenging for complex workflows, and you may spend more time debugging FFmpeg than building features.
A video API like Shotstack is an FFmpeg alternative and can make things easier. Shotstack provides a cloud-based video API that lets you send a JSON-based edit timeline, and the Shotstack servers handle all the media processing (downloading assets, preprocessing, rendering, encoding, and producing the final video).
You can use Shotstack to transcode videos, extract audio from videos, merge or stitch multiple videos, add subtitles to videos, convert a video to GIF, and perform many other common editing tasks. This way, you can easily process and transform videos without worrying about installing dependencies, binaries, and scaling. You can find more about the capabilities of Shotstack in the official documentation.
With the Shotstack API, you can automate video editing via HTTP API and easily build templates for bulk processing. We even provide you with a Node.js video editor SDK.
Get started with Shotstack's video editing API in two steps:
- Sign up for free to get your API key.
- Send an API request to create your video:
curl --request POST 'https://api.shotstack.io/v1/render' \
--header 'x-api-key: YOUR_API_KEY' \
--data-raw '{
  "timeline": {
    "tracks": [
      {
        "clips": [
          {
            "asset": {
              "type": "video",
              "src": "https://shotstack-assets.s3.amazonaws.com/footage/beach-overhead.mp4"
            },
            "start": 0,
            "length": "auto"
          }
        ]
      }
    ]
  },
  "output": {
    "format": "mp4",
    "size": {
      "width": 1280,
      "height": 720
    }
  }
}'


Experience Shotstack for yourself.
- Seamless integration
- Dependable high-volume scaling
- Blazing fast rendering
- Save thousands