Shotstack recently announced a new templates endpoint that has been added to the editing API. The endpoint lets developers save templates that can be re-used at a later date. In addition, by using merge fields you can render thousands of variations from a single template.
The endpoint makes it easy to develop applications that use templates designed in the dashboard video editor and simplifies the process of rendering video at scale.
The templates endpoint is available across our SDKs and on our Make and Zapier apps.
How to use the templates endpoint
To showcase the features of the templates endpoint, the tutorial below shows you how to create a template, merge data, and render a video.
We will be creating a video with three elements in our template that will be replaced with data from our merge fields:
You can create a dynamic template in two ways; using the API templates endpoint or using the Shotstack Studio video editor. We’ll take an API first approach and show you how to create templates using JSON and API calls. At the end of the article we show you how to design a template using the online video editor.
Creating a template using the templates endpoint
A video edit in Shotstack is a JSON description of how the assets and elements are arranged and sequenced. A template is simply the edit JSON, with a name. If you are not familiar with using JSON to edit a video, start by having a look at our hello world tutorial.
After preparing the video edit and name you can save the template by sending a POST request to https://api.shotstack.io/{version}/templates. Make sure you change version to stage or v1 to use either the developer sandbox or production.
The template payload uses the following structure:
{
    "name": "My Template", // An easy to remember template name
    "template": {} // The video edit JSON
}
To demonstrate, create a file called template.json and save it with the following JSON:
{
    "name": "Real Estate Listing Video",
    "template": {
        "timeline": {
            "fonts": [
                {
                    "src": "https://templates.shotstack.io/basic/asset/font/manrope-extrabold.ttf"
                },
                {
                    "src": "https://templates.shotstack.io/basic/asset/font/manrope-light.ttf"
                }
            ],
            "background": "#000000",
            "tracks": [
                {
                    "clips": [
                        {
                            "asset": {
                                "type": "html",
                                "html": "<p>{{street}}</p>",
                                "css": "p { font-family: 'Manrope ExtraBold'; color: #f0c20c; font-size: 40px; text-align: left; line-height: 78; }",
                                "width": 320,
                                "height": 200,
                                "position": "bottom"
                            },
                            "start": 1.2,
                            "length": 4.2,
                            "position": "left",
                            "offset": {
                                "x": 0.05,
                                "y": 0.25
                            },
                            "transition": {
                                "in": "slideRight",
                                "out": "slideLeft"
                            }
                        },
                        {
                            "asset": {
                                "type": "html",
                                "html": "<p>{{suburb}}</p>",
                                "css": "p { font-family: 'Manrope Light'; color: #ffffff; font-size: 22px; text-align: left; line-height: 78; }",
                                "width": 320,
                                "height": 66,
                                "position": "top"
                            },
                            "start": 1.3,
                            "length": 3.9,
                            "position": "left",
                            "offset": {
                                "x": 0.05,
                                "y": 0.015
                            },
                            "transition": {
                                "in": "slideRight",
                                "out": "slideLeft"
                            }
                        }
                    ]
                },
                {
                    "clips": [
                        {
                            "asset": {
                                "type": "video",
                                "src": "https://templates.shotstack.io/basic/asset/video/overlay/arrow-sharp/black/content-left-in.mov"
                            },
                            "start": 0,
                            "length": 4.48
                        },
                        {
                            "asset": {
                                "type": "video",
                                "src": "https://templates.shotstack.io/basic/asset/video/overlay/arrow-sharp/black/content-left-out.mov"
                            },
                            "start": 4.52,
                            "length": 2
                        }
                    ]
                },
                {
                    "clips": [
                        {
                            "asset": {
                                "type": "image",
                                "src": "{{image}}"
                            },
                            "start": 0,
                            "length": 6,
                            "effect": "zoomInSlow",
                            "transition": {
                                "in": "fade"
                            }
                        }
                    ]
                }
            ]
        },
        "output": {
            "format": "mp4",
            "resolution": "sd"
        }
    }
}
Adding variable placeholders
Notice that the JSON above has three placeholder variables for street, suburb and image. With Shotstack any JSON value can be a placeholder. To create a placeholder wrap the variable name in curly brackets. This template includes the following placeholders:
{{street}}- a text string for a street name{{suburb}}- a text string for a suburb name{{image}}- a text string for a URL to an image
Later on we will set up merge fields which will find and replace the placeholders with actual data. Using this approach lets us easily create an unlimited number of variations from a single template by only changing the variables.
Saving the template to the API
To save the template send a POST request to https://api.shotstack.io/v1/templates with the template.json file we created. For simplicity we use Curl but you could also use a tool like Postman.
curl -X POST https://api.shotstack.io/stage/templates \
  -H 'Content-Type: application/json' \
  -H 'Accept: application/json' \
  -H 'x-api-key: YOUR_API_KEY'
  -d @template.json
Make sure you replace YOUR_API_KEY with your own API key, in this example we are using the sandbox stage environment.
The API will respond with a response similar to the following:
{
  "success": true,
  "message": "Created",
  "response": {
    "message": "Template Successfully Created",
    "id": "f5493c17-d01f-445c-bb49-535fae65f219"
  }
}
Take note of the merge template id returned in the response, we’ll need it later. In this example: f5493c17-d01f-445c-bb49-535fae65f219.
Creating a template using the Shotstack Studio
You can also use the Shotstack Studio to manage and design video templates. The Shotstack Studio is a web based video editor that allows you to create videos and save them as a re-usable template. The online video editor is available in the dashboard.
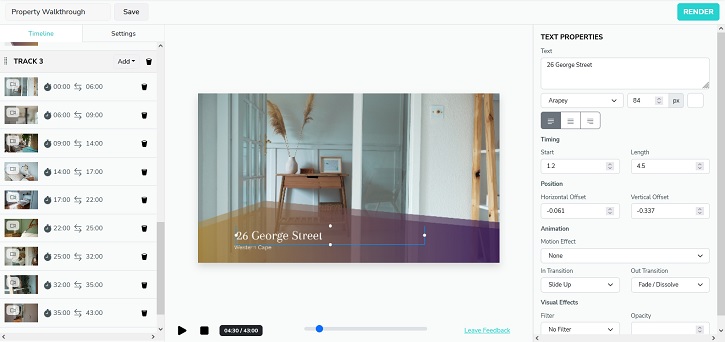
Login to the dashboard and click on Studio. To create a new template click on the Create Template button. This will open the video editor with a blank canvas. Design the template to look the way you want. To add placeholders you will need to switch to the JSON view and manually add them, then save the template.
Once saved the template will be shown in the list page along with the template id which you will need in the next step.
Rendering variations from your template
With the template and placeholders saved, it’s time to start rendering variations of the video using the placeholders and merge fields.
Setting up merge fields and template id
To create a variation form the template we need to set up the JSON payload which includes the id we received in the previous steps. We also need to set up the merge fields which will replace our placeholders; {{street}}, {{suburb}} and {{image}}. Merge fields are an array of find/replace key value pairs.
Create a file called merge.json and save it with the JSON below:
{
  "id": "f5493c17-d01f-445c-bb49-535fae65f219",
  "merge": [
    {
        "find": "street",
        "replace": "19 BONNET AVENUE"
    },
    {
        "find": "suburb",
        "replace": "COMO NSW 2223"
    },
    {
        "find": "image",
        "replace": "https://shotstack-assets.s3.ap-southeast-2.amazonaws.com/images/realestate1.jpg"
    }
  ]
}
Now send a POST request to https://api.shotstack.io/{version}/templates/render using the merge.json file. Remember to replace version with either v1 or stage in the URL and the appropriate API key.
curl -X POST https://api.shotstack.io/stage/templates/render \
  -H 'Content-Type: application/json' \
  -H 'Accept: application/json' \
  -H 'x-api-key: YOUR_API_KEY'
  -d @merge.json
You should receive a response similar to below, indicating that your video has been successfully queued for rendering:
{
    "success": true,
    "message": "Created",
    "response": {
        "message": "Render Successfully Queued",
        "id": "3e092919-ab42-4a73-adcf-2eb728272481"
    }
}
The video will take a few seconds to render. You can check the progress using the following Curl request:
curl -X GET \
  -H "Content-Type: application/json" \
  -H "x-api-key: YOUR_API_KEY" \
  https://api.shotstack.io/stage/render/3e092919-ab42-4a73-adcf-2eb728272481
Use your own API key, correct stage and render ID from the previous response.
When the video is ready, the response will include a status of done and include the URL of the video file. The rendered video will include the text and image added in our merge fields, like below:
In this guide we created a template with placeholder, sent it for rendering along with merge fields and generated a single video. The templates endpoint can be used an be used to build a wide range of video generating apps. By combining forms, databases or other APIs you can quickly create thousands of variations from a template and a data source.
We look forward to seeing how you use it.
Get started with Shotstack's video editing API in two steps:
- Sign up for free to get your API key.
- Send an API request to create your video:
curl --request POST 'https://api.shotstack.io/v1/render' \
--header 'x-api-key: YOUR_API_KEY' \
--data-raw '{
  "timeline": {
    "tracks": [
      {
        "clips": [
          {
            "asset": {
              "type": "video",
              "src": "https://shotstack-assets.s3.amazonaws.com/footage/beach-overhead.mp4"
            },
            "start": 0,
            "length": "auto"
          }
        ]
      }
    ]
  },
  "output": {
    "format": "mp4",
    "size": {
      "width": 1280,
      "height": 720
    }
  }
}'


Experience Shotstack for yourself.
- Seamless integration
- Dependable high-volume scaling
- Blazing fast rendering
- Save thousands

