Getting a rendered video back from a plain Telegram or WhatsApp message is possible with a single OpenClaw skill. No dashboard, no video editor, no manual API calls. Just a message in and a video URL out. This tutorial builds that skill from scratch using the Shotstack API.
OpenClaw is an autonomous AI agent that runs on your machine (or in the cloud), acting as a 24/7 personal digital assistant for agentic video editing and other workflows. The agent can execute tasks via large language models (LLMs), using messaging platforms like WhatsApp, Telegram, and Discord as its main user interface. To instruct the OpenClaw agent on what to do and how to use the various tools available to it, you use Skills.
An OpenClaw skill is a folder containing a SKILL.md file and optional code that allows an AI agent to perform real-world actions like calling APIs or automating workflows. In this tutorial, we’ll create a fully working OpenClaw skill that generates videos on demand using the Shotstack API, and break down how it works so you can customize it. If you want to understand the underlying pipeline architecture first, read how an agentic video editing pipeline works.
TL;DR
This tutorial builds a working OpenClaw skill that generates videos on demand from a Telegram or WhatsApp message. Here is what to know upfront:
- An OpenClaw skill is a SKILL.md file plus optional scripts. The agent reads it to know when and how to act.
- This skill supports two video types: promo (product videos) and general (announcements, event videos).
- The render script calls the Shotstack API and polls until the video is ready, then returns a URL.
- You need Node.js, a Shotstack API key, and OpenClaw running with a chat channel configured.
- Staging renders are free and watermarked. Swap the URL to go to production.
How OpenClaw Skills Work
Before writing a single line of code, it helps to understand how OpenClaw skills work. Three facts cover everything you need to know:
- A skill is a directory containing a SKILL.md file. That file has YAML frontmatter at the top (name, description, and optional metadata) and a markdown body. You write instructions in markdown, telling the agent how to perform a specific task. Skills can also bundle scripts, templates, and reference materials.
my-skill/
├── SKILL.md          # Required: instructions + metadata
├── scripts/          # Optional: executable code
├── references/       # Optional: documentation
└── assets/           # Optional: templates, resources
The agent reads SKILL.md to decide when to use the skill and what to do. At startup, agents load only the name and description of each available skill, just enough to know when it might be relevant. When OpenClaw’s agent receives a message, it looks at the name and description of every eligible skill and decides whether that particular task is something that skill handles. If yes, it reads the markdown body for step-by-step instructions.
Skills can call external APIs via supporting scripts. SKILL.md is an instruction manual, not executable code. Optionally, your script can execute bundled code or reference files to complete its task. In our case, the actual work (the HTTP request to Shotstack, the polling loop, returning the URL) lives in a companion script (
render.js). The SKILL.md instructs the agent to run that script, passing it the right inputs.
Here is how a request for a video flows from your phone to the OpenClaw agent, to Shotstack, until a rendered video URL is sent back to your phone:
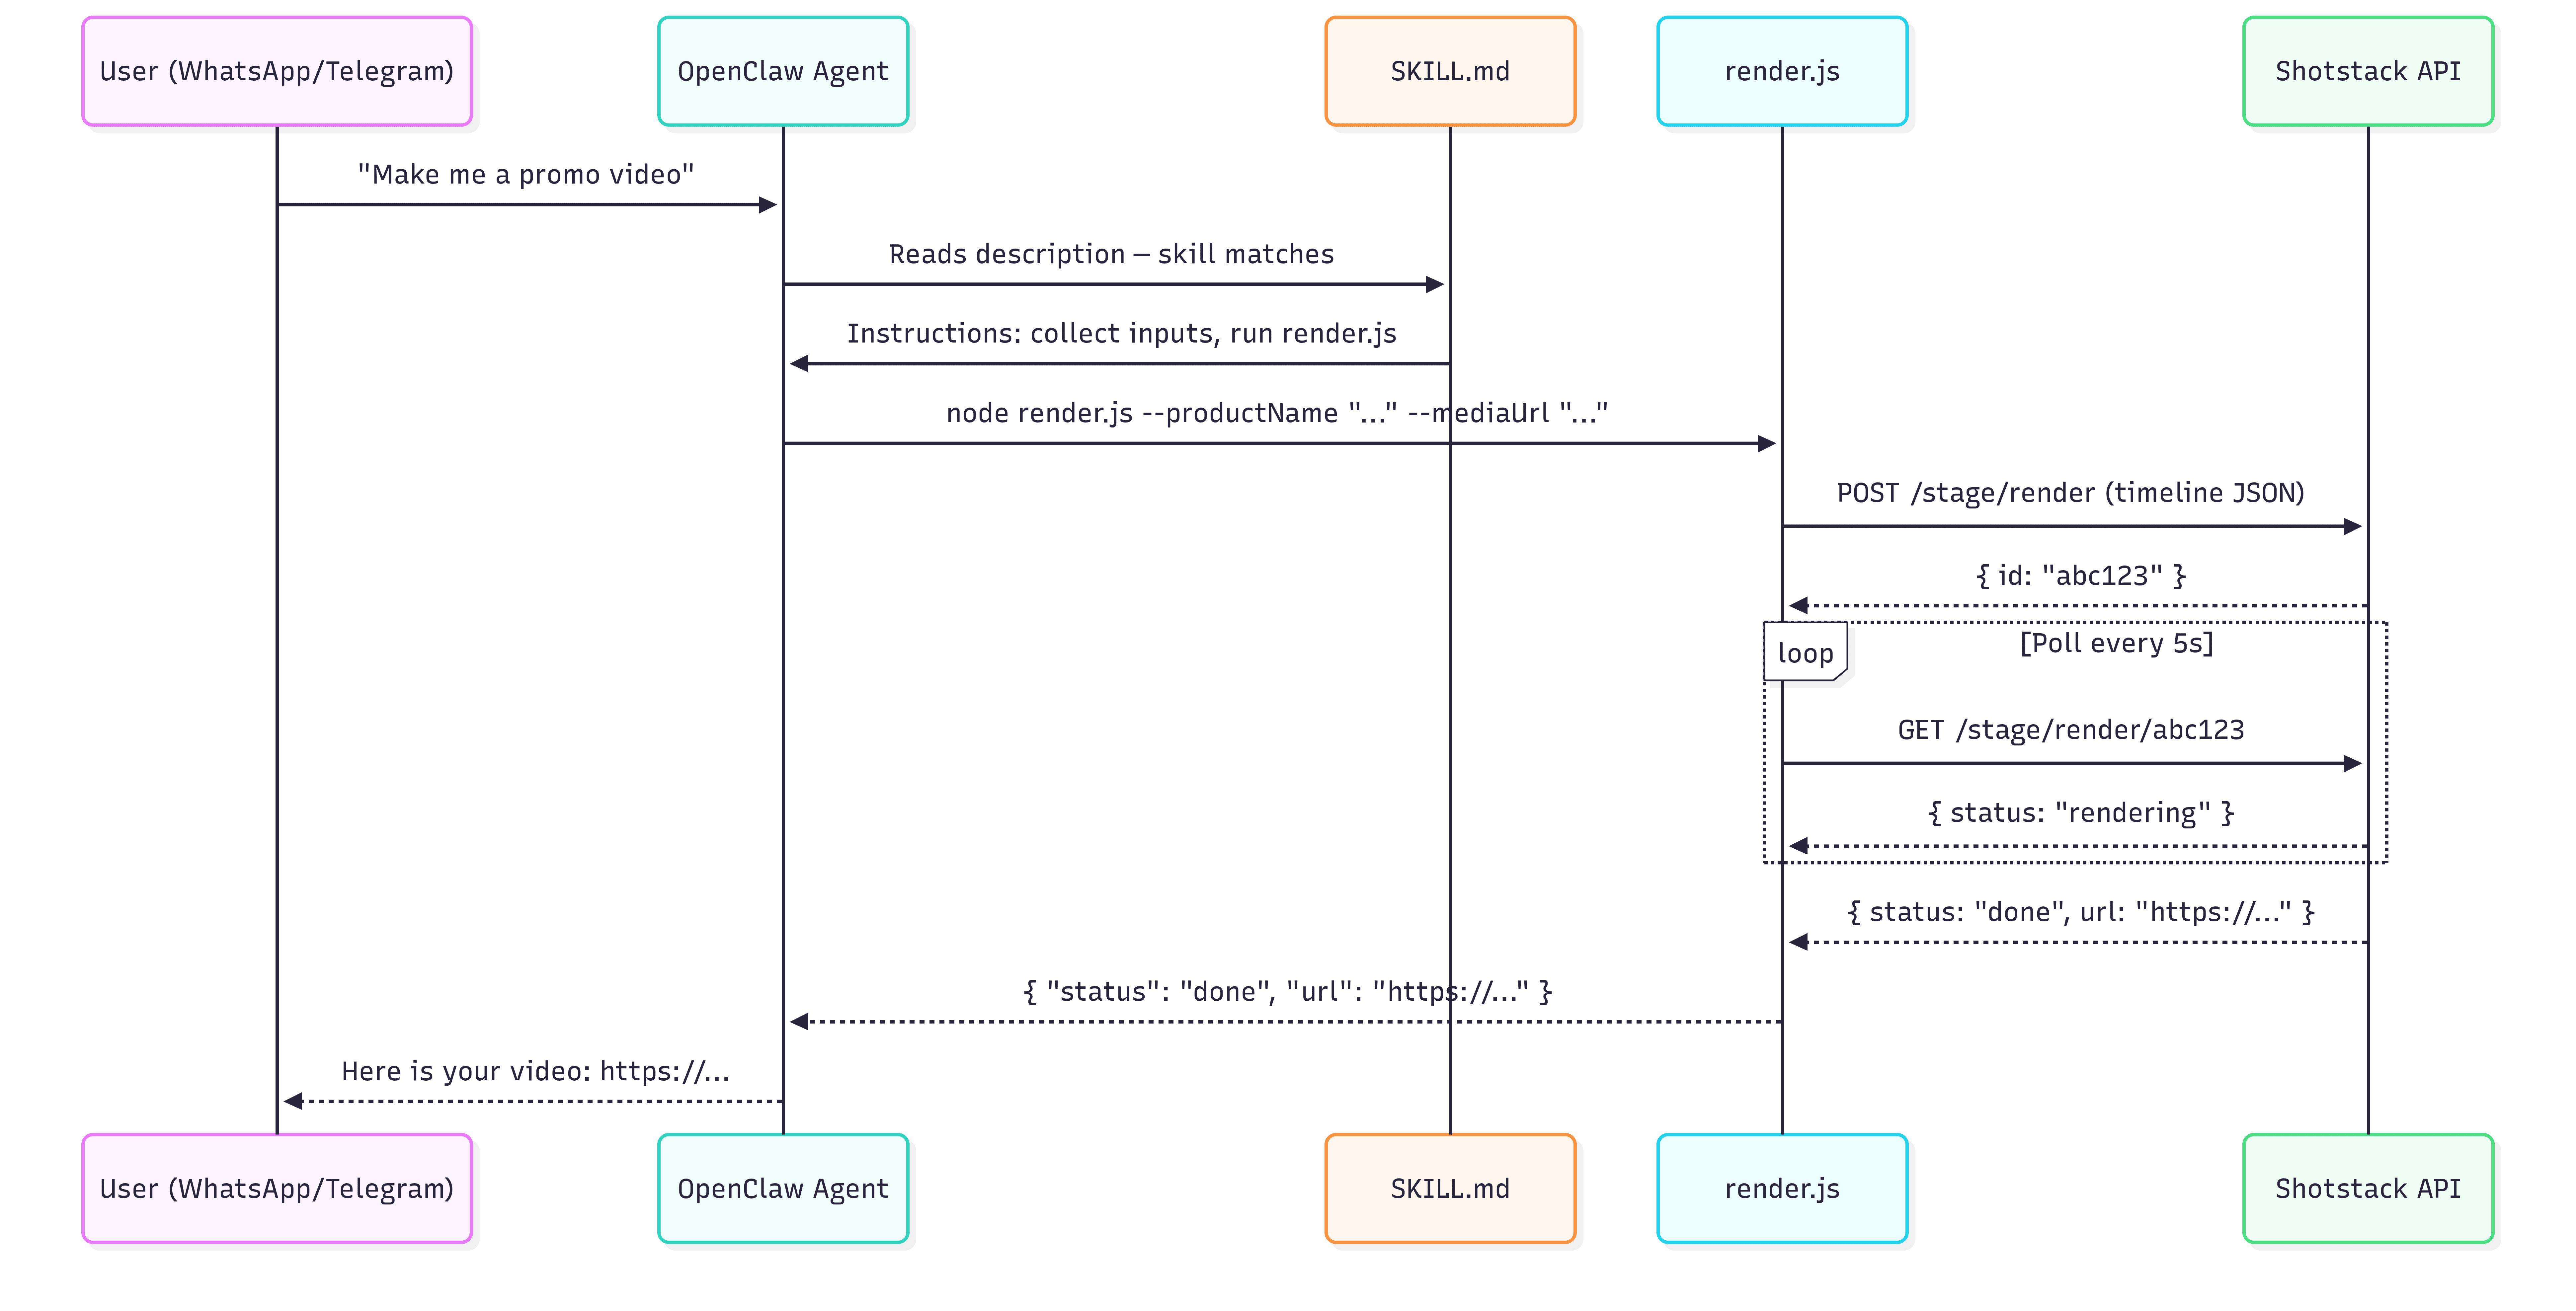
For a deeper look at how agent loops and tool calls work in code, see how to build an AI video agent.
Prerequisites
Before building the skill, ensure the following requirements have been met:
| Requirement | Notes |
|---|---|
| OpenClaw installed and running | Check OpenClaw docs for installation instructions |
| An AI model key | OpenClaw uses large language models. During setup, you will need to provide an API key for your model |
| Set up an OpenClaw chat channel | We’ll use Telegram, but you can set up other chat providers |
| Shotstack API key | Sign up free at shotstack.io for a sandbox key |
| Node.js 24+ is recommended for OpenClaw | Check with node --version |
A note on API environments: Shotstack provides two environments. The staging endpoint (
https://api.shotstack.io/stage/render) is free for development and adds a watermark to rendered videos. The production endpoint (https://api.shotstack.io/v1/render) requires a paid plan and produces clean output. This tutorial uses staging throughout; swap the URL when you go live.
Creating the SKILL.md File
File Structure
Create a folder called shotstack-video in OpenClaw’s managed skills directory ~/.openclaw/skills/. If your skill is going to use several scripts and resources, you can place these in various folders to better arrange the files, but since our skill will only use one script file (render.js), we place this directly in the skill folder:
~/.openclaw/skills/
└── shotstack-video/
    ├── SKILL.md
    └── render.js
Skills placed in ~/.openclaw/skills/ are available across all your OpenClaw sessions. If you only want the skill active in a specific project, place the folder inside <your-project>/skills/ instead.
OpenClaw loads skills from these sources:
- Extra skill folders: configured with
skills.load.extraDirs - Bundled skills: shipped with the install (npm package or OpenClaw.app)
- Managed/local skills:
~/.openclaw/skills - Personal agent skills:
~/.agents/skills - Project agent skills:
<workspace>/.agents/skills - Workspace skills:
<workspace>/skills
If a skill name conflicts, the precedence is: <workspace>/skills (highest) → <workspace>/.agents/skills → ~/.agents/skills → ~/.openclaw/skills → bundled skills → skills.load.extraDirs (lowest)
How to Write the SKILL.md File
Create SKILL.md with the following content:
---
name: shotstack-video
version: 1.0.0
description: Generate, create, render, or produce a video using the Shotstack API. Use this skill when the user asks to create a video or render footage to an MP4. Collects the required inputs (product name, display text, product image, etc.) then runs render.js to call the Shotstack Edit API and return a playable video URL.
metadata:
  openclaw:
    requires:
      bins: ['node']
      env: ['SHOTSTACK_API_KEY']
---

## When to Use

Use this skill whenever the user asks to generate, render, create, produce, or make a video. Also use it for phrases like "animate this", "make a clip", "turn this into a video", or "render an MP4".

## Inputs to Collect

Before running the script, gather the following from the user (ask if not provided):

- **videoType** — The type of video the user wants to create that will determine the template used. Possible options are "promo" and "general". If the user uses phrases like "promo video", "product launch", "promotional video", "product announcement", then set it to "promo", otherwise set it to "general". If you are not confident whether the request is "promo" or "general", ask the user to clarify instead of assuming.

If the videoType is "promo" then ensure you gather the following from the user:

- **productName** — The name of the product
- **cta** — The Call to Action that will be used in the promo video (e.g. "Order Now" or "Buy Now")
- **productFeature** — A short description of the product
- **productImage** — A URL of an image of the product

If the videoType is "general" then ensure you gather the following from the user:

- **displayText** — Text that the user wants displayed in the video
- **imageUrl** — A publicly accessible image URL to use as the background
- **musicUrl** — URL to music to be used in the video
- **duration** — The duration in seconds of the rendered video.

After you have gathered all the info, send a message to the user to confirm the values, and allow the user to make corrections. Display the collected inputs in a structured list. If the user confirms the information, then you can proceed. Do not run the script until the user explicitly confirms.

### Validation Rules

- The duration must be a number greater than 0 (e.g. 5, 10, 30). Reject values like "ten", 0, or negative numbers.
- imageUrl, productImage, and musicUrl must:
  - start with "http://" or "https://"
  - not be local file paths (e.g. file://, /home/, C:\)
  - not be empty
- productName, cta, displayText must be non-empty strings (not blank or only whitespace)

### Validation Step

Before running the script:

- Check all inputs against the validation rules
- If any input is invalid:
  - Do NOT proceed
  - Explain the issue clearly
  - Ask the user to correct it
- Only proceed when all inputs are valid and confirmed

## How to Run

1. If the videoType was set to "promo", then run render.js, passing the following inputs as arguments. Ensure all arguments are properly escaped before passing to the shell (escape quotes and special characters in user input before passing to the shell to prevent breaking the command).

```
node ~/.openclaw/skills/shotstack-video/render.js \
 --videoType "promo" \
 --productName "{{productName}}" \
 --cta "{{cta}}" \
 --productFeature "{{productFeature}}" \
 --productImage "{{productImage}}"
```

Otherwise, if the videoType was set to "general" then run render.js with the following inputs. Ensure all arguments are properly escaped before passing to the shell (escape quotes and special characters in user input before passing to the shell to prevent breaking the command).

```
node ~/.openclaw/skills/shotstack-video/render.js \
 --videoType "general" \
 --displayText "{{displayText}}" \
 --imageUrl "{{imageUrl}}" \
 --musicUrl "{{musicUrl}}" \
 --duration {{duration}}
```

2. The script will print a JSON object to stdout. Parse it:
   - On success: `{ "status": "done", "url": "https://..." }` — return the URL to the user.
   - On failure: `{ "status": "failed", "error": "..." }` — report the error to the user and ask if they want to correct inputs and retry.
What Each Part of the Frontmatter Does
| Field | Purpose |
|---|---|
name | The identifier OpenClaw uses to track and display the skill. Keep it short and lowercase. |
description | What the agent reads when deciding whether to invoke the skill. List trigger verbs and required inputs. The more specific, the less likely the agent invokes the skill by mistake. |
metadata.openclaw.requires.bins | CLI tools that must be on PATH before the skill is marked eligible. Here: node. |
metadata.openclaw.requires.env | Environment variables that must be set. Here: SHOTSTACK_API_KEY. If missing, the skill is silently excluded from the agent’s context. |
If a requirement is not met, the skill drops out silently — openclaw skills list --eligible will show you why. For a full list of the supported fields check this document.
Trigger Phrases
The description is what triggers this skill automatically. But it helps to know what natural language prompts will reliably fire it. Here are five that work:
- “Make me a product launch video for the product ‘Pixel Camera’”
- “Generate a video with the text ‘Hello World’”
- “Render an MP4 from this image: https://example.com/photo.jpg”
- “Create an animated clip with this image: https://example.com/photo.jpg as the background, display the text ‘Summer Sale’, and overlay with this song: https://example.com/music.mp3”
- “Turn this image: https://example.com/picture.jpg into a 15 second video that displays the text ‘Hello World!’”
The API Integration
Our skill instructs the agent to run a script. Let’s create this next. We’ll use Node (here is the Python equivalent).
Our script won’t require installing external dependencies, but if you create a skill that does, you can either:
- Navigate into the skill folder and manually install the dependencies listed in a
package.jsonfile withnpm install. - Add a setup step to the SKILL.md file instructing the agent to install the dependency. E.g. you can add the following after the “When to Use” section of SKILL.md:
## Setup (First Run Only)

Install dependencies, by running `npm install` inside the directory: `~/.openclaw/skills/shotstack-video/`
For the script that will make requests to the Shotstack API, create a render.js inside our skill’s folder and add the following code to it:
#!/usr/bin/env node

// =====================
// Config
// =====================
const API_KEY = process.env.SHOTSTACK_API_KEY;
const BASE_URL = 'https://api.shotstack.io/edit/stage';

const PROMO_TEMPLATE_ID = '59746dc3-fee6-48e9-979d-ed307f7496e3';
const GENERAL_TEMPLATE_ID = '612121e2-b18f-4931-a1e8-f5565523123c';

// =====================
// Utils
// =====================
function getArg(name) {
  const index = process.argv.indexOf(`--${name}`);
  if (index !== -1 && process.argv[index + 1]) {
    return process.argv[index + 1];
  }
  return null;
}

function isValidUrl(url) {
  return (
    typeof url === 'string' &&
    (url.startsWith('http://') || url.startsWith('https://'))
  );
}

function isNonEmptyString(value) {
  return typeof value === 'string' && value.trim().length > 0;
}

function sleep(ms) {
  return new Promise((resolve) => setTimeout(resolve, ms));
}

// =====================
// Validation
// =====================
function validatePromo({ productName, cta, productFeature, productImage }) {
  if (!isNonEmptyString(productName)) {
    throw new Error('Invalid productName: must be a non-empty string');
  }
  if (!isNonEmptyString(cta)) {
    throw new Error('Invalid cta: must be a non-empty string');
  }
  if (!isNonEmptyString(productFeature)) {
    throw new Error('Invalid productFeature: must be a non-empty string');
  }
  if (!isValidUrl(productImage)) {
    throw new Error('Invalid productImage: must be a valid URL (http/https)');
  }
}

function validateGeneral({ displayText, imageUrl, musicUrl, duration }) {
  if (!isNonEmptyString(displayText)) {
    throw new Error('Invalid displayText: must be a non-empty string');
  }
  if (!isValidUrl(imageUrl)) {
    throw new Error('Invalid imageUrl: must be a valid URL (http/https)');
  }
  if (!isValidUrl(musicUrl)) {
    throw new Error('Invalid musicUrl: must be a valid URL (http/https)');
  }
  if (!Number.isInteger(duration) || duration <= 0) {
    throw new Error('Invalid duration: must be a number greater than 0');
  }
}

// =====================
// API Calls
// =====================
async function createRender(body) {
  const res = await fetch(`${BASE_URL}/templates/render`, {
    method: 'POST',
    headers: {
      'Content-Type': 'application/json',
      'x-api-key': API_KEY,
    },
    body: JSON.stringify(body),
  });

  if (!res.ok) {
    const text = await res.text();
    throw new Error(`Render request failed (${res.status}): ${text}`);
  }

  const data = await res.json();

  if (!data?.response?.id) {
    throw new Error('Invalid response from Shotstack (missing render id)');
  }

  return data.response.id;
}

async function getRenderStatus(renderId) {
  const res = await fetch(`${BASE_URL}/render/${renderId}`, {
    method: 'GET',
    headers: {
      'Content-Type': 'application/json',
      'x-api-key': API_KEY,
    },
  });

  if (!res.ok) {
    const text = await res.text();
    throw new Error(`Status request failed (${res.status}): ${text}`);
  }

  const data = await res.json();

  if (!data?.response) {
    throw new Error('Invalid status response from Shotstack');
  }

  return data.response;
}

async function pollRender(renderId) {
  const MAX_ATTEMPTS = 60;
  const DELAY = 2000;

  for (let i = 0; i < MAX_ATTEMPTS; i++) {
    const status = await getRenderStatus(renderId);

    if (status.status === 'done') {
      return status.url;
    }

    if (status.status === 'failed') {
      throw new Error(
        `Render failed on Shotstack: ${status.error || 'unknown error'}`,
      );
    }

    await sleep(DELAY);
  }

  throw new Error('Render timed out');
}

// =====================
// Main
// =====================
async function main() {
  try {
    const videoType = getArg('videoType');

    if (!videoType) {
      throw new Error('Missing required argument: --videoType');
    }

    let body;

    if (videoType === 'promo') {
      const productName = getArg('productName');
      const cta = getArg('cta');
      const productFeature = getArg('productFeature');
      const productImage = getArg('productImage');

      validatePromo({ productName, cta, productFeature, productImage });

      body = {
        id: PROMO_TEMPLATE_ID,
        merge: [
          { find: 'PRODUCT_NAME', replace: productName },
          { find: 'CTA', replace: cta },
          { find: 'PRODUCT_FEATURE', replace: productFeature },
          { find: 'PRODUCT_IMAGE', replace: productImage },
        ],
      };
    } else if (videoType === 'general') {
      const displayText = getArg('displayText');
      const imageUrl = getArg('imageUrl');
      const musicUrl = getArg('musicUrl');
      const durationRaw = getArg('duration');

      const duration = parseInt(durationRaw, 10);

      validateGeneral({ displayText, imageUrl, musicUrl, duration });

      body = {
        id: GENERAL_TEMPLATE_ID,
        merge: [
          { find: 'DISPLAY_TEXT', replace: displayText },
          { find: 'IMAGE_URL', replace: imageUrl },
          { find: 'MUSIC_URL', replace: musicUrl },
          { find: 'DURATION', replace: String(duration) },
        ],
      };
    } else {
      throw new Error(`Invalid videoType: ${videoType}`);
    }

    // 1. Create render
    const renderId = await createRender(body);

    // 2. Poll until complete
    const url = await pollRender(renderId);

    // 3. Return success
    console.log(
      JSON.stringify({
        status: 'done',
        url,
      }),
    );
  } catch (err) {
    console.log(
      JSON.stringify({
        status: 'failed',
        error: err.message,
      }),
    );
  }
}

main();
In the code above, we have two templates that we plan on repeatedly using to render videos. The videos are customized by swapping out the various assets. One template will be to create short product announcement videos that display the product image, its name and a Call to Action like “Buy Now” or “Order Now”. The other template will be used to create videos with a background image, music playing and some text displayed. You can view the templates JSON code here if you want to recreate the templates on your own account (then paste in your template IDs in your script).
Based on the user prompt, and the instructions in the skill file, the OpenClaw agent will know which template should be called and the input to pass to the script.
Installing and Using the OpenClaw Skill
Once your skill files are in place and your API key is set, OpenClaw picks up the skill automatically. Here is how to verify it and send your first render request.
Set it in an environment variable:
export SHOTSTACK_API_KEY=your_key_here
With everything set up, verify that OpenClaw has picked up the skill:
# List all eligible skills
openclaw skills list --eligible

# Inspect your specific skill and check for missing requirements
openclaw skills info shotstack-video
openclaw skills check shotstack-video
If shotstack-video does not appear in the eligible list, run openclaw skills list --verbose to see why. The most common reasons are a missing SHOTSTACK_API_KEY environment variable or Node not found on PATH. Fix the missing requirement, and because OpenClaw hot-reloads skill folders by default, the skill will become eligible without restarting the gateway.
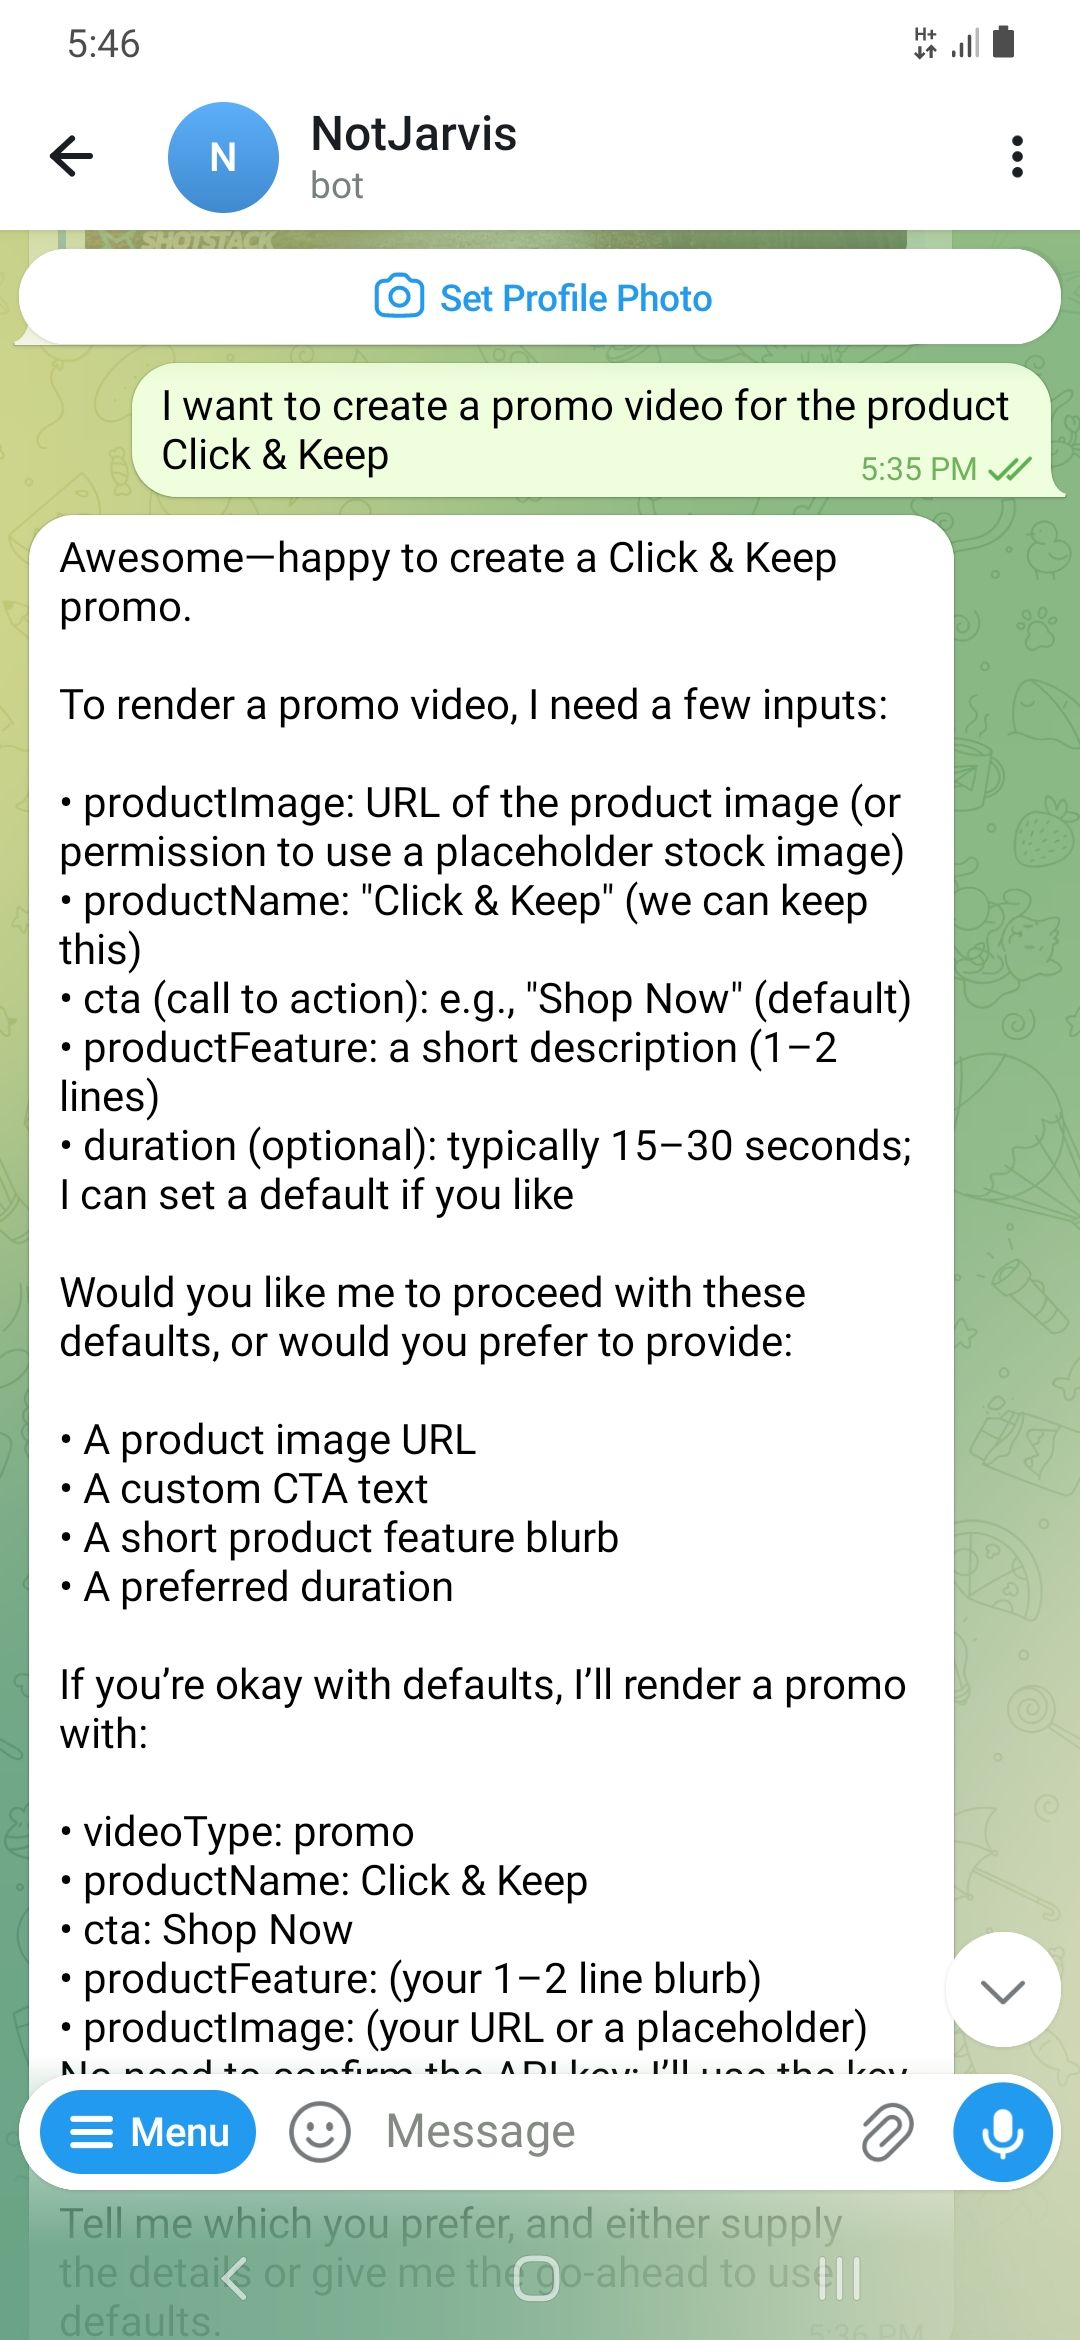
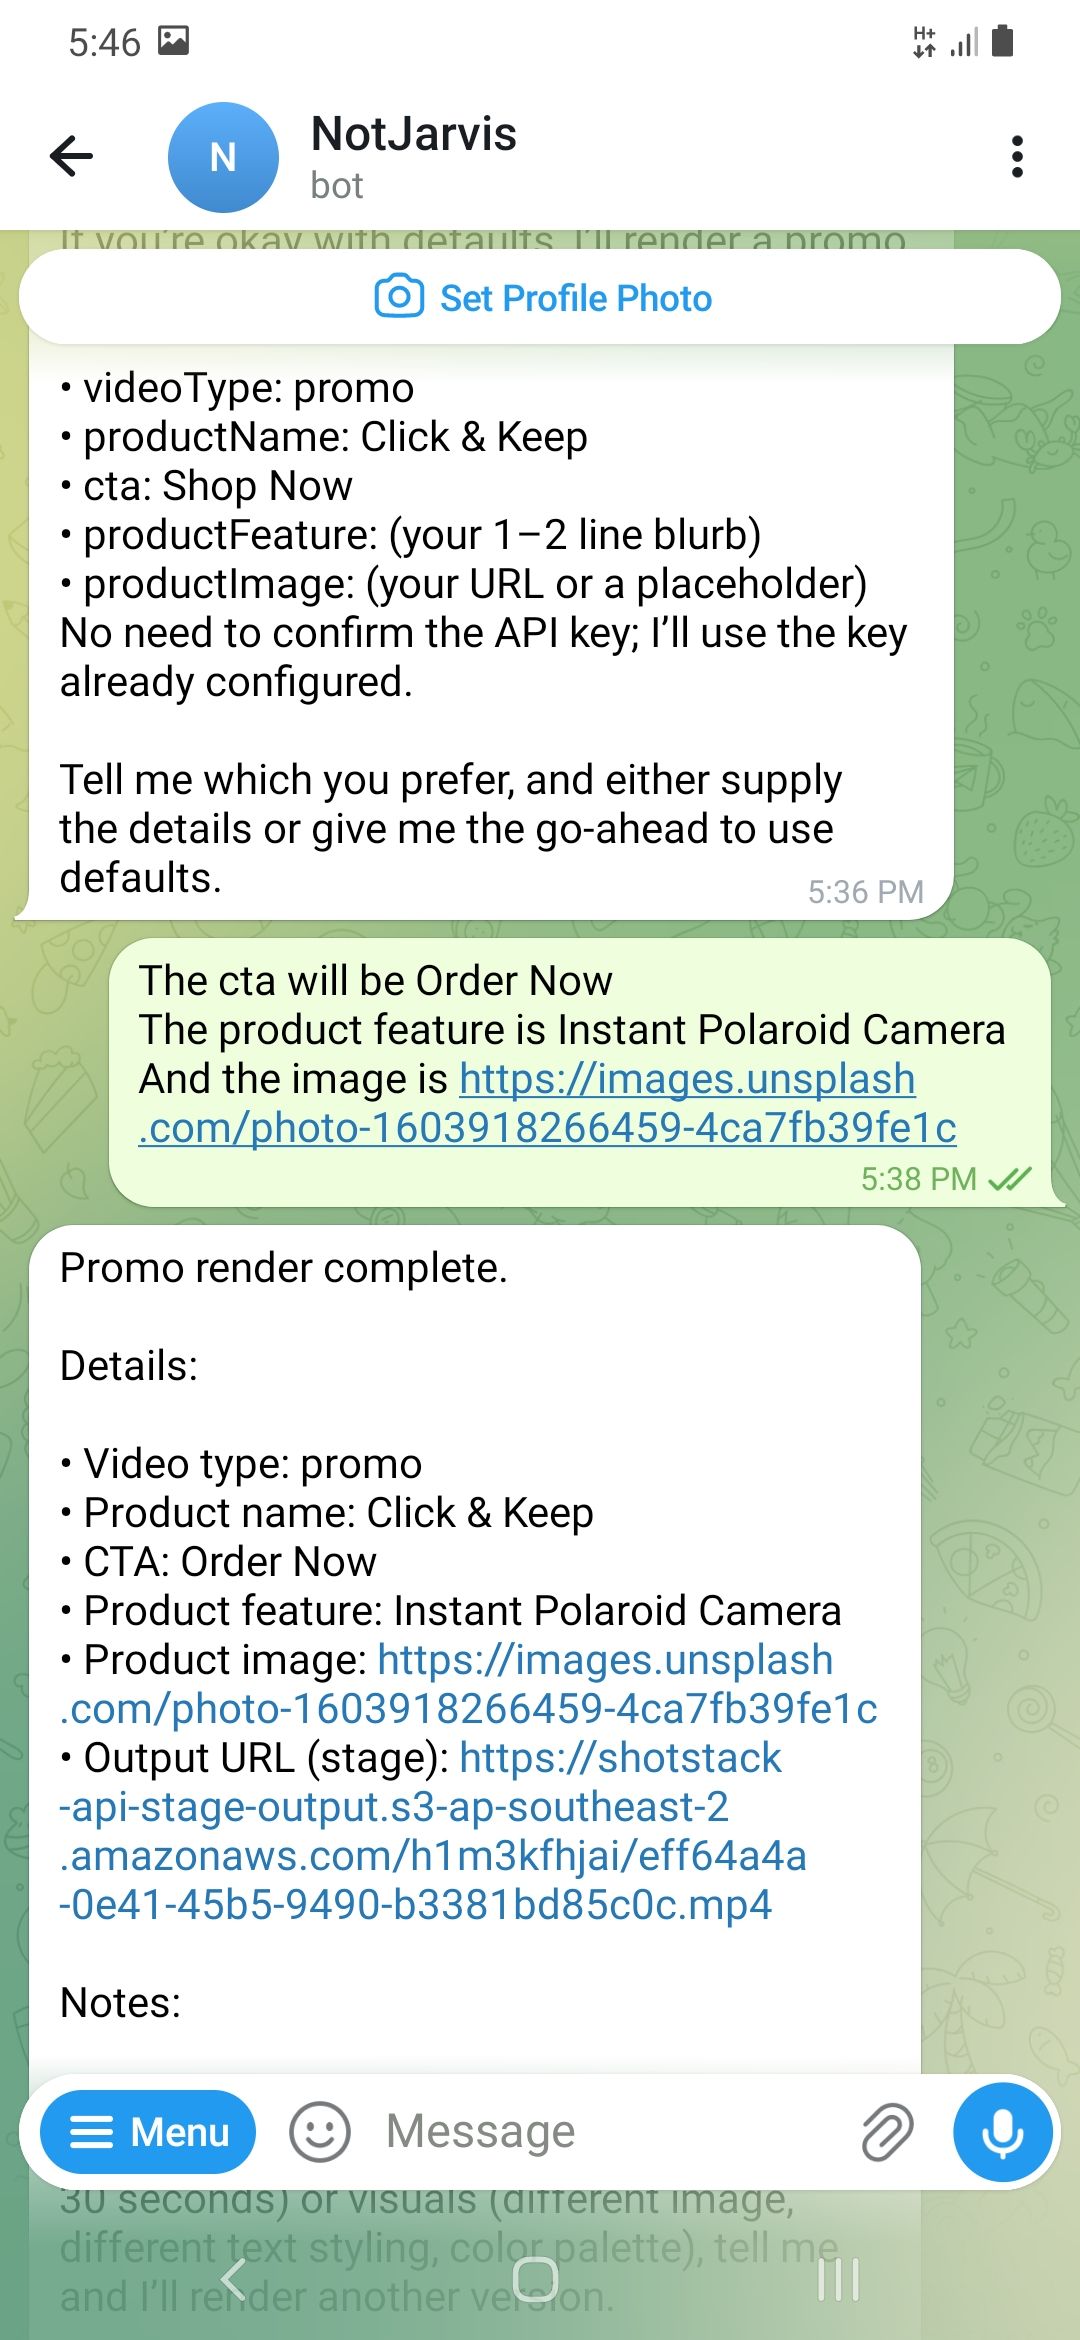
Once the skill shows as eligible, open your Telegram or WhatsApp chat with the bot and send a prompt:
Turn this image: https://shotstack-assets.s3.amazonaws.com/images/woods1.jpg into a 15 second video that displays the text 'Hello World!'
The agent will know the type of video you want and ask for any missing merge fields if your message didn’t contain all the required inputs. It will then call the render.js script and return a URL to you when the render is done. Paste it in your browser to confirm the video rendered correctly.
What to Customize Next
The skill built in this tutorial is a starting point. Here are the most useful extensions, from flexible templates to social posting.
Customizable templates: Instead of having specific templates that the OpenClaw skill uses, you can have the user pass in a template id, and the various merge fields required to render a video with that template. Your agent will have to call a script that fetches template data from Shotstack to determine what input fields to expect from the user before calling the render API. This script shows how you can get a template’s merge fields. Check the templates documentation for further details on how to work with templates.
Accept user-supplied media: You can send files to OpenClaw via the messaging app you use, and the OpenClaw skill can then send this to the Shotstack API to be pre-processed by the Ingest API and then finally be used in a rendered video.
Schedule renders: You can add a scheduling instruction to your OpenClaw SKILL.md, e.g. “schedule for 9am” and hook into OpenClaw’s cron skill.
Auto-post to social: You can chain a social posting skill to consume the returned URL and post it on social media.
Permanently storing rendered videos: Videos rendered by Shotstack are stored for 24 hours before being deleted. You can either extend your skill’s capability to download the rendered video to the computer, or you can use Shotstack’s Destinations and specify a 3rd party platform that the API can send your videos to.
If you want to go further with Shotstack, explore how the rendering layer fits into a production pipeline. Start building for free. No credit card required.
Frequently Asked Questions
How do I install OpenClaw skills?
To install an OpenClaw skill, create a folder containing a SKILL.md file (and any supporting scripts like render.js), then place it in one of OpenClaw’s recognized skill directories.
The most common location is:
~/.openclaw/skills/
Once added, OpenClaw will automatically detect and load the skill. You can verify it’s available by running:
openclaw skills list --eligible
If everything is set up correctly, your OpenClaw skill will be ready to use immediately via your connected chat interface (e.g. Telegram or WhatsApp).
Where do OpenClaw skills live?
OpenClaw skills can live in several locations depending on how you want to scope them:
Global (available everywhere):
~/.openclaw/skills/
Project-specific:
<your-project>/skills/
Agent-specific:
~/.agents/skills/
Workspace-specific:
<workspace>/.agents/skills/
If multiple skills share the same name, OpenClaw uses a priority system where project-level skills override global ones.
Why is my OpenClaw skill not showing up?
If your OpenClaw skill isn’t appearing, it’s usually due to missing requirements. Common causes include:
- Missing environment variables (e.g. SHOTSTACK_API_KEY)
- Required binaries not available (e.g. Node.js not on your PATH)
- Invalid or malformed SKILL.md file
- Incorrect folder placement
To debug, run:
openclaw skills check <skill-name>

# or:

openclaw skills list --verbose
These commands will show exactly why the skill is not eligible. Once the issue is fixed, OpenClaw will automatically load the skill without needing a restart.
Do OpenClaw skills require coding?
Not always. At the simplest level, an OpenClaw skill can be just a SKILL.md file with natural language instructions telling the agent what to do.
However, for more advanced use cases, like calling APIs, automating workflows, or generating videos, you will typically include a script (e.g. JavaScript or Python) that performs the actual execution.
This tutorial demonstrates the latter, where a script is used to call the Shotstack API and return a generated video URL.
Are OpenClaw skills safe to use?
Not inherently. Since anyone can upload a skill to ClawHub, community skills carry real risk. A 2026 security audit of the OpenClaw ecosystem found that 36.82% of community skills had vulnerabilities and 12% were confirmed malware. The ClawHavoc campaign in early 2026 planted over 335 credential-stealing skills in the marketplace.
Always review the code before installing any community skill. To limit exposure:
- Do not install untrusted skills on your main machine
- If a skill needs email access, create a dedicated address rather than granting access to your primary account
- Add guardrails to your SKILL.md files so the agent cannot take major actions without explicit confirmation
What’s the difference between a skill and an MCP server?
A skill is a SKILL.md text file that tells your agent how to do a workflow. An MCP server is a running process that gives the agent actual tool capabilities through the Model Context Protocol. Some OpenClaw skills have evolved to wrap underlying Model Context Protocol (MCP) servers, acting as a secure, structured interface between the AI agent and external tools. This gives developers and users a way to use the rapid expansion of MCP servers while benefiting from the orchestration and management of the OpenClaw platform.
Why not build this as an MCP server instead of a native OpenClaw skill?
While OpenClaw can integrate with MCP-style tools, native skills are currently the simplest and most widely used approach. MCP servers typically run as separate processes and may require a bridge layer, which adds some overhead and complexity.
For a straightforward workflow like video generation with Shotstack, a native skill using SKILL.md and a local script is easier to implement, faster to iterate on, and more than sufficient in terms of performance.
Get started with Shotstack's video editing API in two steps:
- Sign up for free to get your API key.
- Send an API request to create your video:
curl --request POST 'https://api.shotstack.io/v1/render' \
--header 'x-api-key: YOUR_API_KEY' \
--data-raw '{
  "timeline": {
    "tracks": [
      {
        "clips": [
          {
            "asset": {
              "type": "video",
              "src": "https://shotstack-assets.s3.amazonaws.com/footage/beach-overhead.mp4"
            },
            "start": 0,
            "length": "auto"
          }
        ]
      }
    ]
  },
  "output": {
    "format": "mp4",
    "size": {
      "width": 1280,
      "height": 720
    }
  }
}'


Experience Shotstack for yourself.
- Seamless integration
- Dependable high-volume scaling
- Blazing fast rendering
- Save thousands


