In our previous Hello World tutorial we introduced you to building simple videos using the Shotstack API and cURL. For this tutorial we’ll be using Postman to demonstrate how you can start creating and testing JSON templates to create videos. If you want to go through the basics once again, you can revisit the cURL article.
About Postman
Postman is one of the most popular tools used by millions of developers, marketers and designers all over the world to create and save both simple and complex API requests, as well as read their responses.
Postman can be used for designing, documenting and testing your own API. It is also invaluable when it comes to integrating with 3rd party API’s such as Shotstack, allowing you to send payloads, in this case a video edit, without having to write any code or set up a server. It is also very easy to modify the JSON and test various editing parameters.
You can download the Postman app from the website or you can register and use the web client.
Prerequisites
- Shotstack API key - You can register without a credit card and start using our API for free. After registration, retrieve your API key from the dashboard.
- Postman Software (version 8+)
Don’t worry if you decide to use the web client, the UI is almost the same across both web app and desktop app and the steps for the tutorial are the same.
Setting up the render request
When you open Postman for the first time you will see the home screen dashboard. While there are many features, for now we’ll be working with simple requests using a workspace and a request tab.
We’ll need a new tab to create our first request. You can add it to your current workspace by clicking on Create New in the Start with something new panel. If you already use Postman you may already see your existing collections and tabs.
Click on the + sign next to the Overview, or any other open tabs. You can also close Overview - we don’t need it.

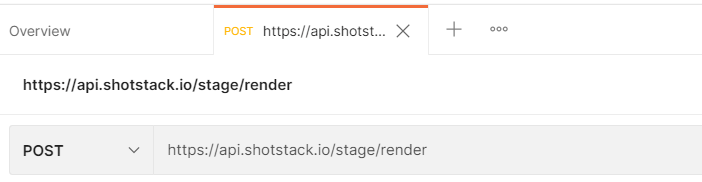
We now have the main window we’ll be using to post the Edit to the API for rendering. We’re going to switch the default request method from GET to POST.
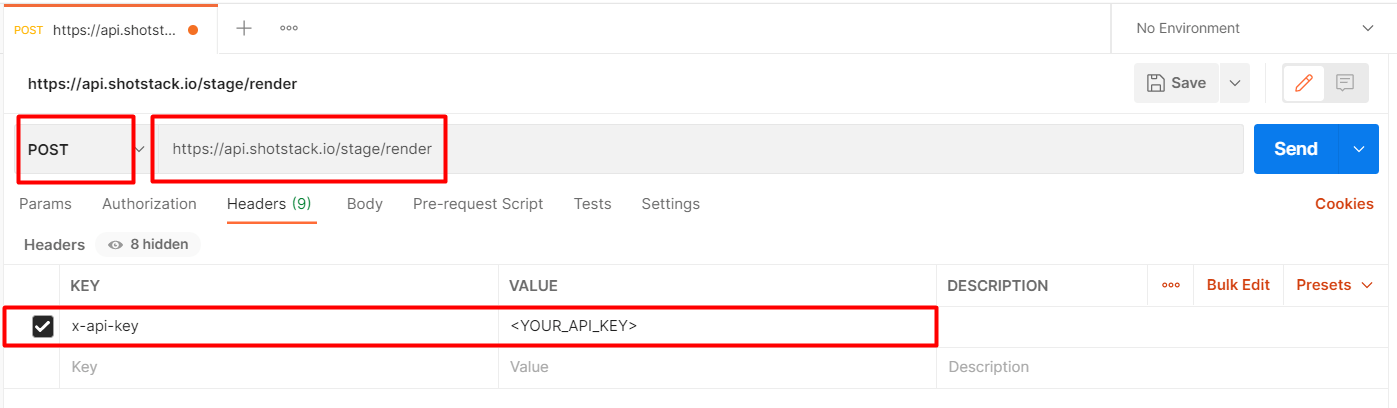
We need to enter the request URL for the Shotstack API render endpoint. For this tutorial we’ll be working with the staging environment https://api.shotstack.io/stage/render.
In order to authenticate your calls with the API, you need to pass the stage (sandbox) API key from the dashboard in the Headers sub tab as a new key/value parameter. In the key field you can type x-api-key and in the value paste your api key.
Adding the JSON video edit template
The last step is to add the video edit configuration data to the body of the request. All render requests to the Shotstack API are described using JSON following the API documentation.
{
  "timeline": {
    "soundtrack": {
      "src": "https://shotstack-assets.s3-ap-southeast-2.amazonaws.com/music/freepd/motions.mp3",
      "effect": "fadeOut"
    },
    "background": "#000000",
    "tracks": [
      {
        "clips": [
          {
            "asset": {
              "type": "title",
              "text": "Hello World",
              "style": "future",
              "position": "left",
              "size": "x-small"
            },
            "start": 4,
            "length": 11,
            "transition": {
              "in": "fade",
              "out": "fade"
            },
            "effect": "zoomIn"
          }
        ]
      },
      {
        "clips": [
          {
            "asset": {
              "type": "video",
              "src": "https://shotstack-assets.s3-ap-southeast-2.amazonaws.com/footage/earth.mp4",
              "trim": 5
            },
            "start": 0,
            "length": 15,
            "transition": {
              "in": "fade",
              "out": "fade"
            }
          }
        ]
      }
    ]
  },
  "output": {
    "format": "mp4",
    "resolution": "sd"
  }
}
You can copy the JSON above to the Body sub tab. We’ll also choose the raw data format and the JSON type from the drop-down list so Postman can enable syntax highlighting as well as appending the relevant headers to our request (Content-Type: application/json).
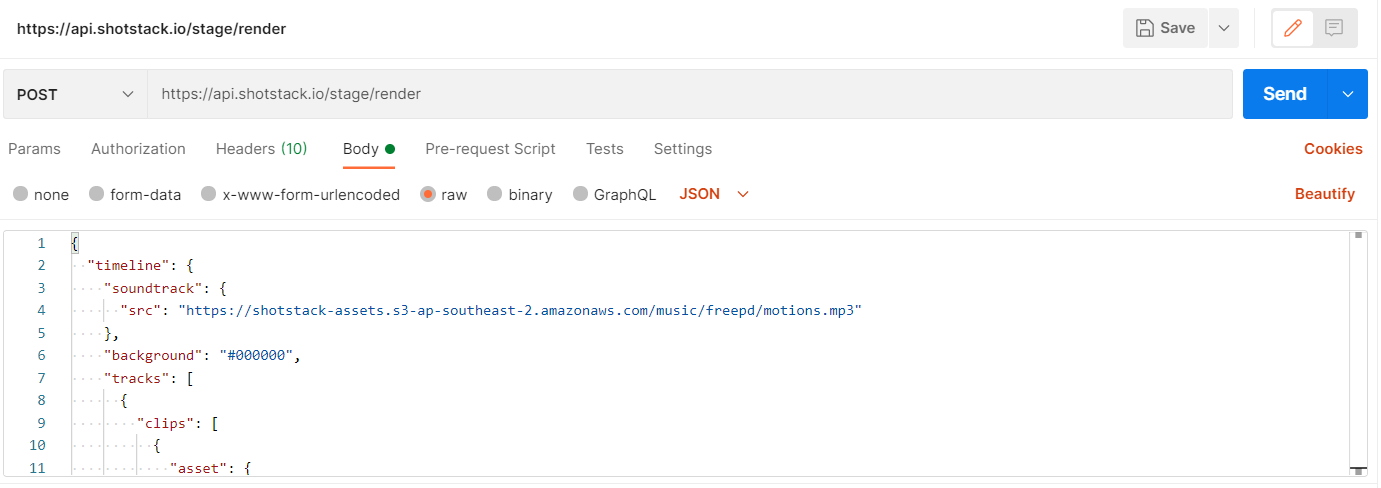
In this JSON template we have added a soundtrack (motions.mp3), a video asset (earth.mp4) and a Hello World title. The video asset is positioned below the title asset using a track. This makes sure that the text is rendered on top of the video file and not hidden underneath.
Submitting the render
All the details are now added to the request, so you can click on Send.
You will notice the Response section changed its contents: 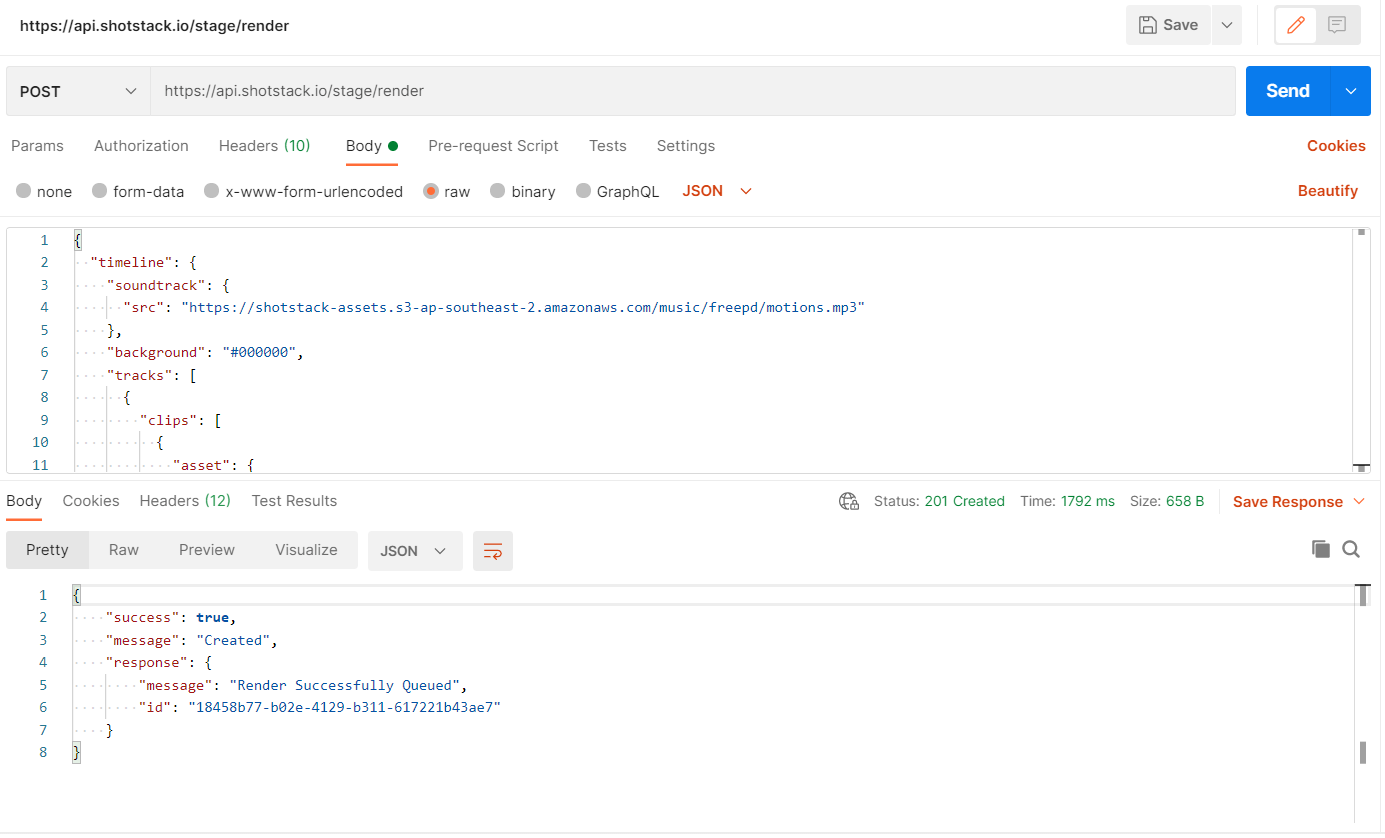
The Pretty visualization format is selected by default which formats the data based on the Content-Type response header. The response contains the id generated by the API for our video.
Checking the render status
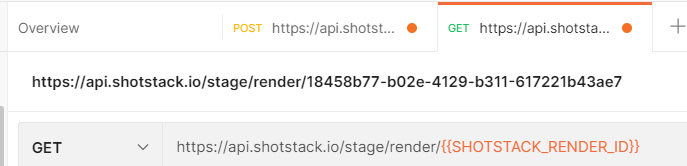
We will need a new tab for a request to check the status of our video based on the id retrieved in this process. Copy the id value as we’ll need it in our next step.
Create a new request by clicking on the + sign next to your current request tab title:
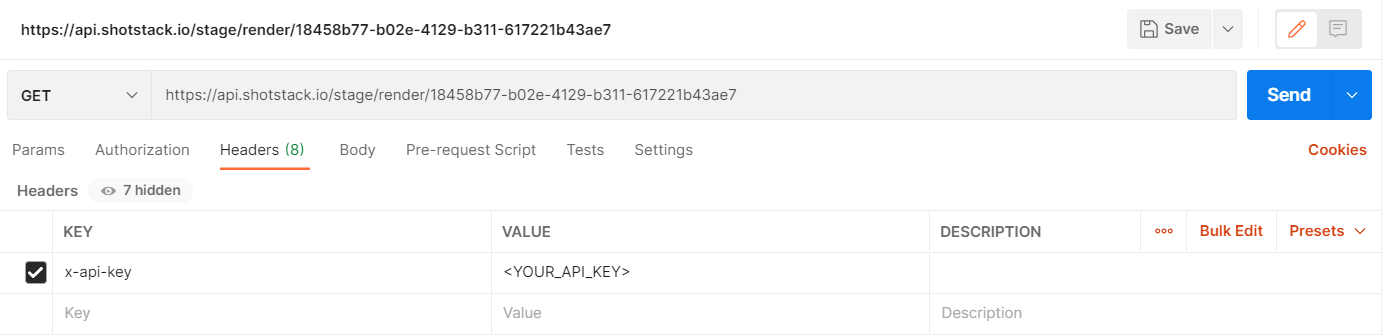
We’ll now issue a GET request to the render/<id> endpoint https://api.shotstack.io/stage/render/<id>, make sure you replace <id> with the id returned by the previous API call:
i.e. https://api.shotstack.io/stage/render/18458b77-b02e-4129-b311-617221b43ae7.
Again, for security and privacy, we’ll need to authenticate our request using the x-api-key header with our API key.
Once the id and header key are set you can click Send.
The video rendering should only take a few seconds, but if you issue the request before the rendering is done you will get the following response:
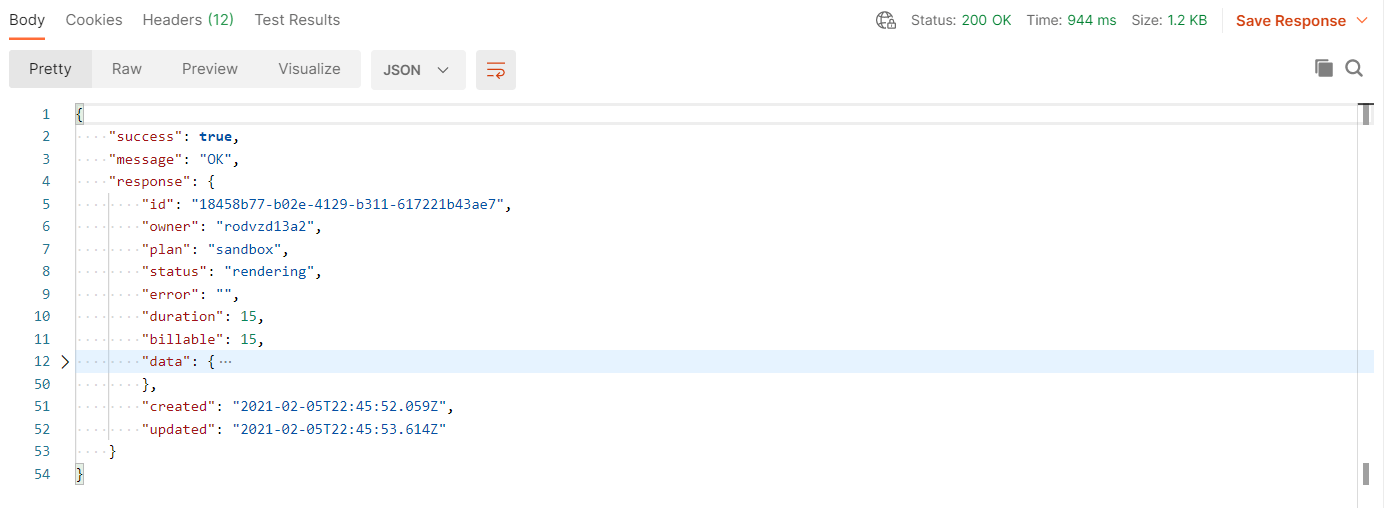 Note the status field is set to
 rendering. Other statuses include queued, fetching and saving.
Once the video is processed, the response contains the updated status as done as well as the url field where you can access your video.
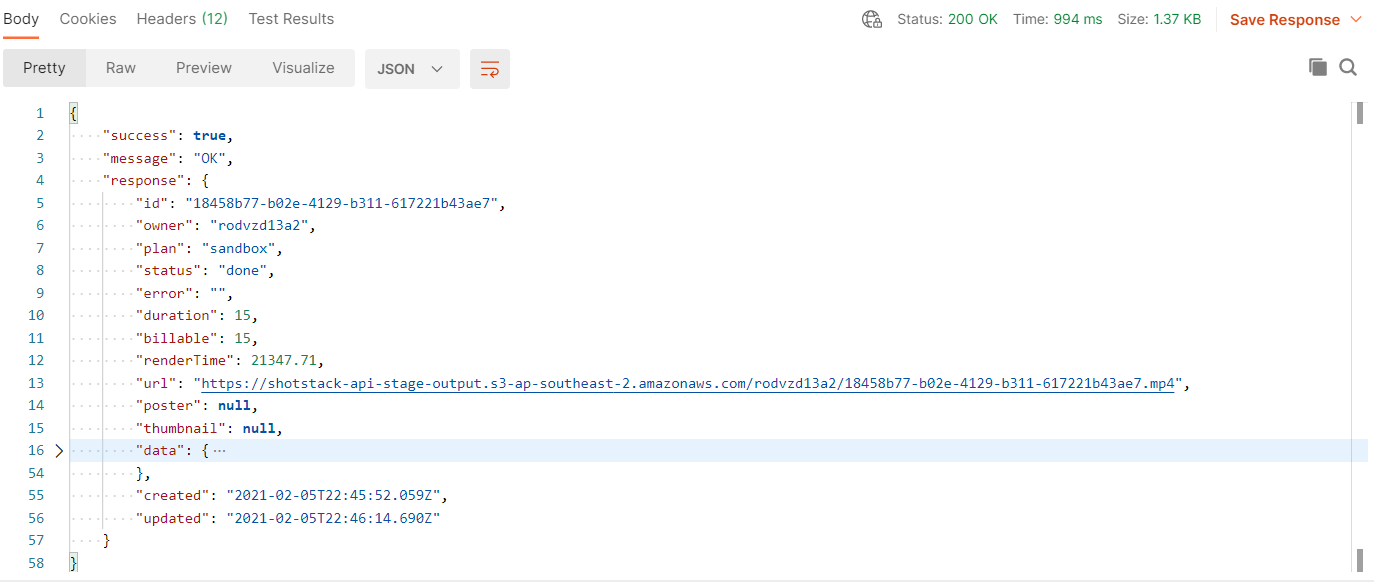
You can click on the video url to open it in Postman, click Send and view the video, or you can copy and paste it to your browser and watch it that way.
Automating the status ID
The last feature we’d like to demo in this tutorial is automation. In order to get rid of manually copying & pasting the render id from the render response, we’ll use variables which allow you to share values between multiple requests.
In the status request, GET tab, replace the URL with the value https://api.shotstack.io/stage/render/\{\{SHOTSTACK_RENDER_ID\}\}. We are now using a global variable, {{SHOTSTACK_RENDER_ID}}, which we will populate in the next step.
Move back to the POST render request tab, select the Tests sub tab and paste the following script:
pm.globals.set("SHOTSTACK_RENDER_ID", pm.response.json().response.id);
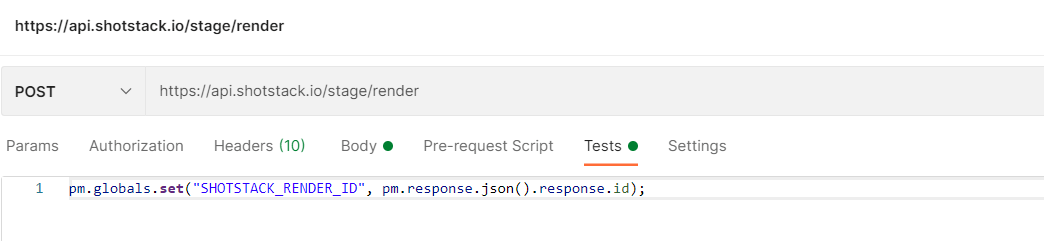
Now, whenever a response is received the id value will be automatically written to the SHOTSTACK_RENDER_ID global variable and can be read by the GET status request. Give it a try - click on Send to queue a video for processing and then navigate to the status request tab and click on Send to get the response. You no longer need to copy and paste the id from the response.
Conclusion
This guide should give you a basic understanding of how you can prepare and test JSON video templates without writing any code or running any servers or scripts. In fact, this is the same technique we use to manage, design and test hundreds of different video templates and demo files.
If you would like to try some more templates, why not have a look at our GitHub JSON examples project and see what is possible. Once you feel comfortable delve in to the API Reference documentation to see what else is possible.
Get started with Shotstack's video editing API in two steps:
- Sign up for free to get your API key.
- Send an API request to create your video:
curl --request POST 'https://api.shotstack.io/v1/render' \
--header 'x-api-key: YOUR_API_KEY' \
--data-raw '{
  "timeline": {
    "tracks": [
      {
        "clips": [
          {
            "asset": {
              "type": "video",
              "src": "https://shotstack-assets.s3.amazonaws.com/footage/beach-overhead.mp4"
            },
            "start": 0,
            "length": "auto"
          }
        ]
      }
    ]
  },
  "output": {
    "format": "mp4",
    "size": {
      "width": 1280,
      "height": 720
    }
  }
}'


Experience Shotstack for yourself.
- Seamless integration
- Dependable high-volume scaling
- Blazing fast rendering
- Save thousands