Animated GIF's are a fun way to convert videos into light-weight, short visual media. Often used for memes and humour, GIF's have become a popular method of communication and cultural expression.
Converting an MP4 to GIF is fairly easy with free tools and meme generators available online. But what if you want to convert MP4 files to GIF in bulk or build your own meme generator? How about automating the conversion process or integrating a GIF feature in your next application or workflow?
In this guide we'll show you how to convert an MP4 to GIF using Python so you can do all the awesome things mentioned above. Plus it's more fun and a good learning experience doing it programmatically.
The Shotstack API and SDK
Shotstack provides a cloud based video editing API. Rendering videos is resource intensive and it can take hours to edit and generate videos at scale. Shotstack's infrastructure makes it possible to concurrently render multiple media files like video, audio, and GIFs in minutes.
We will also be using the Shotstack video editing Python SDK for this tutorial. The SDK requires Python 3.
You can sign up for a free developer account to get your Shotstack API key.
Install and configure the Shotstack SDK
If you want to skip ahead you can find the source code for this guide in our GitHub repository. Otherwise follow the steps below to install dependencies and set up your API key.
First of all, install the the Shotstack Python SDK from the command line:
pip install shotstack_sdkYou may need to use pip3 depending on how your environment is configured.
Then, set your API key as an environment variable (Linux/Mac):
export SHOTSTACK_KEY=your_key_hereor, if using Windows (make sure to add the SHOTSTACK_KEY to the path):
set SHOTSTACK_KEY=your_key_hereReplace your_key_here with your provided sandbox API key which is free for testing and development.
Create a Python script to convert MP4 to GIF
Create a file for the script in your favorite IDE or text editor. You can call it whatever you like, but for this tutorial we created a file called mp4-to-gif.py. Open the file and begin editing.
Import the required modules
Let's import the required modules for the project. We need to import modules from the Shotstack SDK to edit and render our video plus a couple of built in modules:
import shotstack_sdk as shotstack
import os
import sys

from shotstack_sdk.api import edit_api
from shotstack_sdk.model.clip import Clip
from shotstack_sdk.model.track import Track
from shotstack_sdk.model.timeline import Timeline
from shotstack_sdk.model.output import Output
from shotstack_sdk.model.edit import Edit
from shotstack_sdk.model.video_asset import VideoAsset
Configuring the API client
Next, add the following, which sets up the API client with the API URL and key, this should use the API key added to your environment variables. If you want, you can hard code the API key here but we recommend environment variables.
host = "https://api.shotstack.io/stage"
configuration = shotstack.Configuration(host = host)
configuration.api_key['DeveloperKey'] = os.getenv('SHOTSTACK_KEY')

with shotstack.ApiClient(configuration) as api_client:
    api_instance = edit_api.EditApi(api_client)
Setting up the video clip
We will convert the following Christian Bale American Psycho meme video hosted on Imgflip at the URL https://i.imgflip.com/66o1m8.mp4. The video needs to be hosted online and accessible via a public or signed URL. You can replace it with your own video url from any online source.
Add the following code to create a VideoAsset using the video URL:
video_asset = VideoAsset(
    src = "https://i.imgflip.com/66o1m8.mp4"
)
Next create a Clip. A clip is container for different types of assets, including the VideoAsset. We can configure different properties like length (duration to play for) and start time (when on the timeline the clip will play from). For our clip we use the video_asset we just created, a start of 0 seconds and a length of 3 seconds:
video_clip = Clip(
    asset = video_asset,
    start = 0.0,
    length = 3.0
)
Adding the video clip to the timeline
The Shotstack API follows many of the principles of desktop editing software such as a timeline and tracks. Let's create a timeline, which contains a track, and the track will contain our video clip. Tracks on the timeline allow us to layer clips on top of each other.
Below we add our video_clip to the Track clips array, and then add our track to the array of tracks of the Timeline:
track = Track(clips=[video_clip])

timeline = Timeline(
    background = "#000000",
    tracks = [track]
)
Configuring the final edit and output
We configure the output format and add the timeline and output to create an edit.
We set the output format to gif, which will convert the file from the mp4 format to an animated gif. By setting repeat to True the gif will loop continuously. We also use a very low frames per second (fps) value and low resolution. These setting help us optimize the file size and rendering time of the gif.
output = Output(
    format = "gif",
    fps = 12.0,
    resolution = "preview",
    repeat = True
)

edit = Edit(
    timeline = timeline,
    output = output
)
Sending the edit for rendering via the API
Finally, we send the edit for processing and rendering using the API. The Shotstack SDK takes care of converting our objects to JSON, adding our key to the request header, and POSTing everything to the API.
try:
    api_response = api_instance.post_render(edit)

    message = api_response['response']['message']
    id = api_response['response']['id']

    print(f"{message}\n")
    print(f">> render id: {id}")
except Exception as e:
    print(f"Unable to resolve API call: {e}")
Final code
The final script is below with a few additional checks and balances:
import shotstack_sdk as shotstack
import os
import sys

from shotstack_sdk.api               import edit_api
from shotstack_sdk.model.clip        import Clip
from shotstack_sdk.model.track       import Track
from shotstack_sdk.model.timeline    import Timeline
from shotstack_sdk.model.output      import Output
from shotstack_sdk.model.edit        import Edit
from shotstack_sdk.model.video_asset import VideoAsset
from shotstack_sdk.model.shotstack_destination import ShotstackDestination

if __name__ == "__main__":
    host = "https://api.shotstack.io/stage"

    if os.getenv("SHOTSTACK_HOST") is not None:
        host =  os.getenv("SHOTSTACK_HOST")

    configuration = shotstack.Configuration(host = host)

    if os.getenv("SHOTSTACK_KEY") is None:
        sys.exit("API Key is required. Set using: export SHOTSTACK_KEY=your_key_here")

    configuration.api_key['DeveloperKey'] = os.getenv("SHOTSTACK_KEY")

    with shotstack.ApiClient(configuration) as api_client:
        api_instance = edit_api.EditApi(api_client)

        video_asset = VideoAsset(
            src = "https://i.imgflip.com/66o1m8.mp4"
        )

        video_clip = Clip(
            asset = video_asset,
            start = 0.0,
            length= 3.0
        )

        track = Track(clips=[video_clip])

        timeline = Timeline(
            background = "#000000",
            tracks     = [track]
        )
        output = Output(
            format      = "gif",
            fps         = 12.0,
            resolution = "preview",
            repeat      = True
        )

        edit = Edit(
            timeline = timeline,
            output   = output
        )

        try:
            api_response = api_instance.post_render(edit)

            message = api_response['response']['message']
            id = api_response['response']['id']

            print(f"{message}\n")
            print(f">> render id: {id}")
        except Exception as e:
            print(f"Unable to resolve API call: {e}")
Running the script
Use the python command to run the script.
python mp4-to-gif.pyYou may need to use python3 instead of python depending on your configuration.
If the render request is successful, the API will return the render id which we can use to retrieve the status of the render.
Checking the render status and output URL
To check the status we need another script which will call the API render status endpoint. Create a file called status.py and paste the following code:
import sys
import os
import shotstack_sdk as shotstack

from shotstack_sdk.api import edit_api

if __name__ == "__main__":
    host = "https://api.shotstack.io/stage"
    configuration = shotstack.Configuration(host = host)
    configuration.api_key['DeveloperKey'] = os.getenv("SHOTSTACK_KEY")

    with shotstack.ApiClient(configuration) as api_client:
        api_instance = edit_api.EditApi(api_client)
        api_response = api_instance.get_render(sys.argv[1], data=False, merged=True)
        status = api_response['response']['status']

        print(f"Status: {status}")

        if status == "done":
            url = api_response['response']['url']
            print(f">> Asset URL: {url}")
Then run the script using
python status.py {renderId}Replace {renderId} with the ID returned from the mp4-to-gif.py script.
Re-run the status.py script every couple of seconds until the status is done and a URL is returned. If something goes wrong the status will show as failed.
The final rendered gif is the ready to be hosted or transferred to your application:

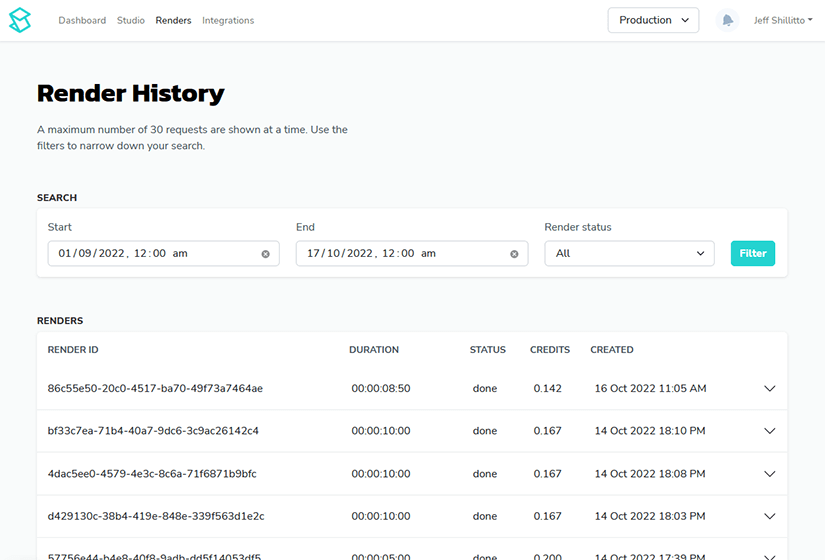
Accessing your rendered videos using the dashboard
You can view your rendered videos using the dashboard under Renders. Videos are deleted after 24 hours but are available by default in the Shotstack hosting service. You can also send rendered videos to S3 or Mux.
Final thoughts
This tutorial should have given you a basic understanding of how to programmatically convert an mp4 video to an animated gif using Python and the Shotstack video editing API. As a next step you could add other assets like text and images to create a fully automated meme experience.
Of course, this article only scratches the surface of what is possible with the Shotstack API. You can create automated video editing process for different video use cases like real estate, automotive, promotional videos, sports highlights and more.
Get started with Shotstack's video editing API in two steps:
- Sign up for free to get your API key.
- Send an API request to create your video:
curl --request POST 'https://api.shotstack.io/v1/render' \
--header 'x-api-key: YOUR_API_KEY' \
--data-raw '{
  "timeline": {
    "tracks": [
      {
        "clips": [
          {
            "asset": {
              "type": "video",
              "src": "https://shotstack-assets.s3.amazonaws.com/footage/beach-overhead.mp4"
            },
            "start": 0,
            "length": "auto"
          }
        ]
      }
    ]
  },
  "output": {
    "format": "mp4",
    "size": {
      "width": 1280,
      "height": 720
    }
  }
}'


Experience Shotstack for yourself.
- Seamless integration
- Dependable high-volume scaling
- Blazing fast rendering
- Save thousands


