The process of adding an intro and outro to a video, as well as adding podcast episode overlay data such as episode number and title, can be time-consuming and tedious. In this tutorial, we will show you how to automate this process using the Airtable API and the Shotstack API.
The Airtable API allows us to query a database for the necessary information to generate the overlays, such as the episode number and title. The Shotstack API then takes this data and generates the final video. By using Node.js as the application language, we can easily integrate these technologies to create a powerful video generation application.
By following the steps outlined in this tutorial you will learn the following:
- Set up an Airtable database to store podcast episode information
- Use the Airtable API to query the database and retrieve episode data
- Integrate the Shotstack Node SDK into a Node.js application
- Use the Shotstack Node SDK to generate videos with intro/outro and podcast episode overlays
By the end of this tutorial you will have built an application that automatically generates videos that look like this:
Create the project structure
First, let’s create the directory where we will build the automated video generator, create a Node.js project, and install the required dependencies.
Open a terminal window and create a new directory called podcasts:
mkdir podcasts
Navigate into the directory:
cd podcasts
Create a new Node.js project with default settings:
npm init -y
Then install the project dependencies:
npm install airtable shotstack-sdk
The following dependencies are required:
- airtable: the official Airtable JavaScript library. Use this to retrieve and update records stored in the Airtable Base table.
- shotstack-sdk: the Node.js SDK for Shotstack. Use this SDK to render a video for each record found in the Airtable Base table.
Store the podcast data in Airtable
Create a file named podcasts.csv in the project root, then copy and save the following CSV data:
Episode,Title,Audio URL,Waveform URL,Video URL
1,Media Automation,https://shotstack-assets.s3.amazonaws.com/templates/podcast/audio/intro-1.mp3,https://shotstack-assets.s3.amazonaws.com/templates/podcast/waveform/intro-1.mp4
2,Automated Advertising,https://shotstack-assets.s3.amazonaws.com/templates/podcast/audio/intro-2.mp3,https://shotstack-assets.s3.amazonaws.com/templates/podcast/waveform/intro-2.mp4
3,Automated Entertainment,https://shotstack-assets.s3.amazonaws.com/templates/podcast/audio/intro-3.mp3,https://shotstack-assets.s3.amazonaws.com/templates/podcast/waveform/intro-3.mp4
4,Automated Social Media,https://shotstack-assets.s3.amazonaws.com/templates/podcast/audio/intro-4.mp3,https://shotstack-assets.s3.amazonaws.com/templates/podcast/waveform/intro-4.mp4
5,Automated Media Production,https://shotstack-assets.s3.amazonaws.com/templates/podcast/audio/intro-5.mp3,https://shotstack-assets.s3.amazonaws.com/templates/podcast/waveform/intro-5.mp4
6,Automated Media Analysis,https://shotstack-assets.s3.amazonaws.com/templates/podcast/audio/intro-6.mp3,https://shotstack-assets.s3.amazonaws.com/templates/podcast/waveform/intro-6.mp4
7,Automated Media Consumption,https://shotstack-assets.s3.amazonaws.com/templates/podcast/audio/intro-7.mp3,https://shotstack-assets.s3.amazonaws.com/templates/podcast/waveform/intro-7.mp4
8,Automated Media Distribution,https://shotstack-assets.s3.amazonaws.com/templates/podcast/audio/intro-8.mp3,https://shotstack-assets.s3.amazonaws.com/templates/podcast/waveform/intro-8.mp4
9,Automated Content Creation,https://shotstack-assets.s3.amazonaws.com/templates/podcast/audio/intro-9.mp3,https://shotstack-assets.s3.amazonaws.com/templates/podcast/waveform/intro-9.mp4
10,Automated Media Creation,https://shotstack-assets.s3.amazonaws.com/templates/podcast/audio/intro-10.mp3,https://shotstack-assets.s3.amazonaws.com/templates/podcast/waveform/intro-10.mp4
11,Automated Content Moderation,https://shotstack-assets.s3.amazonaws.com/templates/podcast/audio/intro-11.mp3,https://shotstack-assets.s3.amazonaws.com/templates/podcast/waveform/intro-11.mp4
12,Automated Media Tracking,https://shotstack-assets.s3.amazonaws.com/templates/podcast/audio/intro-12.mp3,https://shotstack-assets.s3.amazonaws.com/templates/podcast/waveform/intro-12.mp4
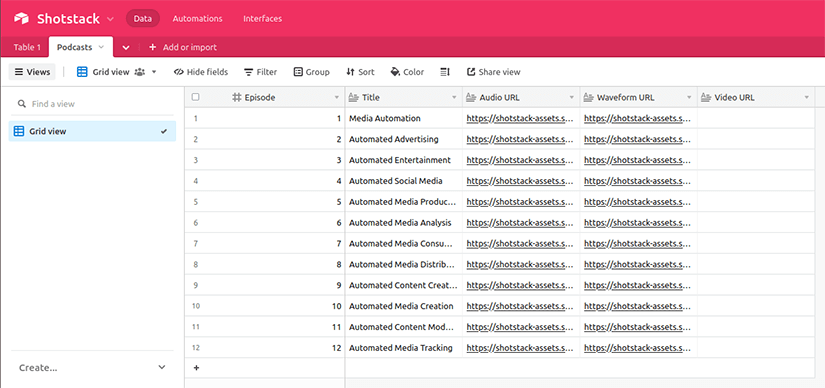
The sample data is a list of podcasts with 12 records. Each record has an Episode number, Title, Audio URL, Waveform URL, and an empty Video URL field.
Create a workspace
After saving the CSV file, navigate to Airtable, and create or sign in to your account.
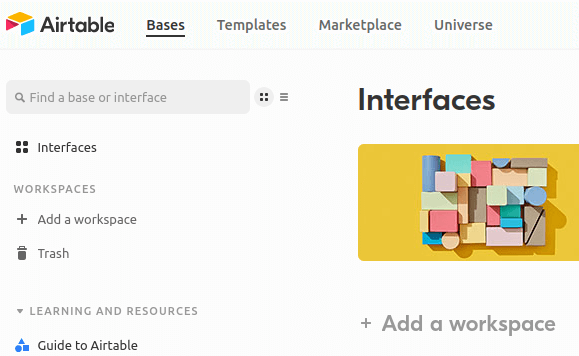
Click on Add a workspace to create a new workspace named Shotstack.
Add a base
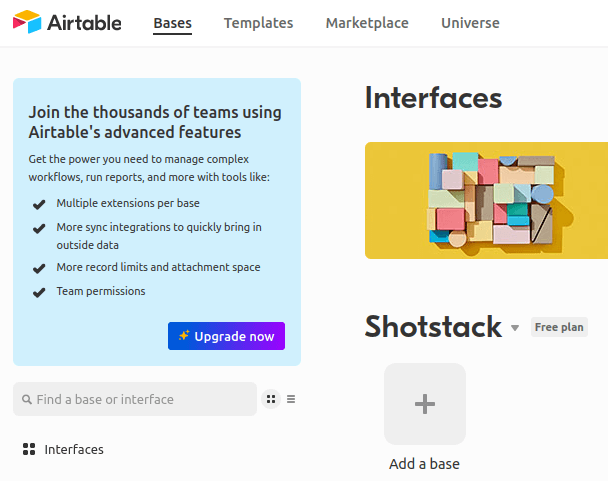
Once the workspace is created, click Add a base. A new page is displayed with the title Untitled Base. Rename the base to Shotstack.
Import the podcasts data
The Base contains a default table (Table 1) which can be ignored. Instead click on Add or import, then click on CSV file, choose the podcasts.csv file we prepared earlier and then choose Create a new table to import to.

Rename the table
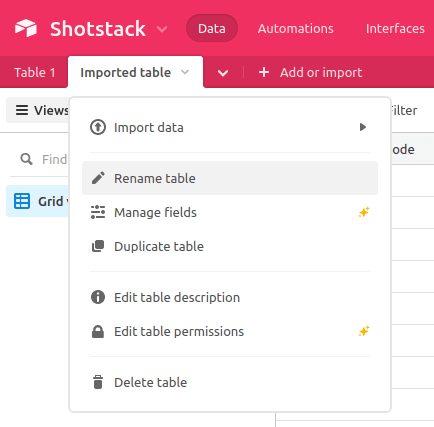
Once the data is imported, rename the table from Imported table to Podcasts using the dropdown menu:
Your base and Podcasts table should now look like this:
Get the base ID
To use the newly created Podcasts table via the Airtable API we need the Base ID. The Base ID is the first segment of URL on the base page and looks like this:
https://airtable.com/app37fKU9RInYBOP1/tblqLLekpM0t6gP9s/viw120bOzMc7Ii0UJ
In this example the base id is app37fKU9RInYBOP1. Take a note of the base ID as we will need it later in our script.
Retrieve the Airtable API key
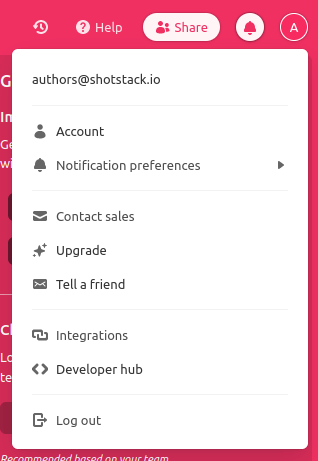
From the Airtable dashboard click on the profile icon in the top right corner and select Account:
Scroll down to the API section, you will see a deprecation notice. For simplicity we are going to continue using the old API key instead of the new token. Click Use Api key instead. You will see a new field appear containing the key. Copy the key value and save it for later.

Retrieve the Shotstack API key
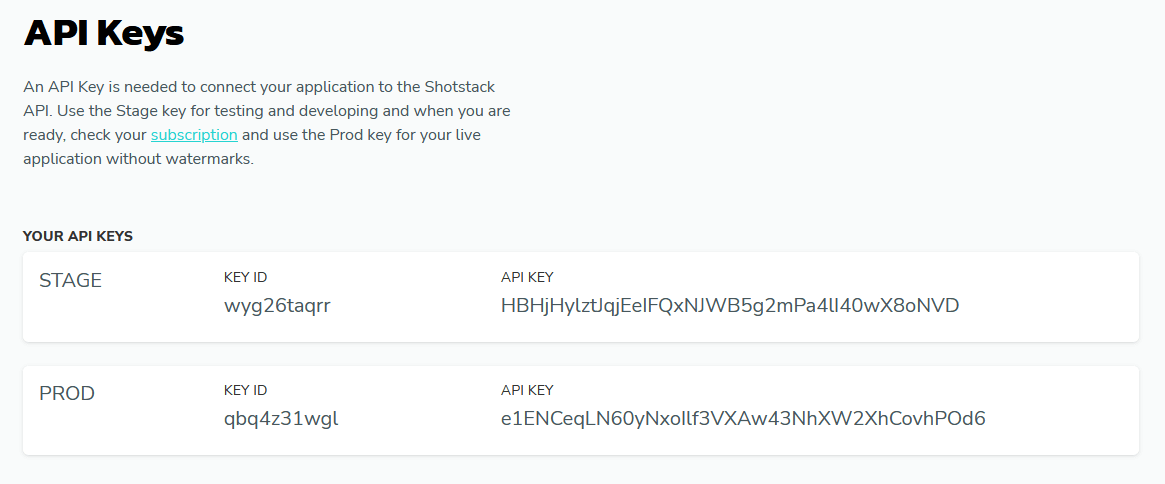
Sign up or log in to the Shotstack dashboard. Click on your username and select API keys in the dropdown menu:

Copy the Stage API key and save it for later.
Prepare the podcast video template
Shotstack uses JSON to instruct the Shotstack API how the video should look.
Create a file in the root directory called template.json, then copy and paste the following JSON and save the file:
{
"timeline": {
"soundtrack": {
"src": "https://shotstack-ingest-api-v1-sources.s3.ap-southeast-2.amazonaws.com/wzr6y0wtti/zzyauwfn-2e3l-sh06-4rf7-2qagol0pgckz/source.mpga",
"effect": "fadeOut"
},
"fonts": [
{
"src": "https://shotstack-ingest-api-v1-sources.s3.ap-southeast-2.amazonaws.com/wzr6y0wtti/zzyaufam-15ro-xd1c-n1nk-18oaws3nuvxe/source.ttf"
}
],
"background": "#000000",
"cache": false,
"tracks": [
{
"clips": [
{
"asset": {
"type": "html",
"html": "<p data-html-type=\"text\">ROBOTS GONE WILD</p>",
"css": "p { color: #ffffff; font-size: 32px; font-family: Montserrat SemiBold; text-align: center; }",
"width": 550,
"height": 46
},
"start": 8.16,
"length": 14.49,
"fit": "none",
"scale": 1,
"offset": {
"x": 0,
"y": 0.419
},
"position": "center"
}
]
},
{
"clips": [
{
"asset": {
"type": "html",
"html": "<p data-html-type=\"text\">Find us on</p>",
"css": "p { color: #ffffff; font-size: 24px; font-family: Montserrat Thin; text-align: center; }",
"width": 300,
"height": 46
},
"fit": "none",
"scale": 1,
"offset": {
"x": 0,
"y": -0.29
},
"position": "center",
"transition": {
"in": "fadeFast",
"out": "fadeFast"
},
"length": 6.84,
"start": 8.16
}
]
},
{
"clips": [
{
"asset": {
"type": "image",
"src": "https://shotstack-ingest-api-v1-sources.s3.ap-southeast-2.amazonaws.com/wzr6y0wtti/zzyaufub-0jha-ri3t-10nt-0fe02t0cmqgl/source.png"
},
"offset": {
"x": 0,
"y": -0.395
},
"position": "center",
"scale": 0.1,
"length": 2,
"transition": {
"in": "fadeFast",
"out": "fadeFast"
},
"fit": "crop",
"start": 9
},
{
"asset": {
"type": "image",
"src": "https://shotstack-ingest-api-v1-sources.s3.ap-southeast-2.amazonaws.com/wzr6y0wtti/zzyauftu-1doy-4s0f-osxa-3tqgvt2qtt5j/source.png"
},
"offset": {
"x": 0,
"y": -0.395
},
"position": "center",
"fit": "crop",
"transition": {
"in": "fadeFast",
"out": "fadeFast"
},
"scale": 0.09,
"length": 2,
"start": 11
},
{
"asset": {
"type": "image",
"src": "https://shotstack-ingest-api-v1-sources.s3.ap-southeast-2.amazonaws.com/wzr6y0wtti/zzyaufsw-10th-jw1s-xpqr-4zhitf2zmeic/source.jpeg"
},
"length": 2,
"fit": "crop",
"offset": {
"x": 0,
"y": -0.395
},
"position": "center",
"scale": 0.1,
"transition": {
"in": "fadeFast",
"out": "fadeFast"
},
"start": 13
}
]
},
{
"clips": [
{
"asset": {
"type": "html",
"html": "<p data-html-type=\"text\">Episode {{ episode }}</p>",
"css": "p { color: #ffffff; font-size: 32px; font-family: Montserrat Thin; text-align: center; }",
"width": 529,
"height": 53
},
"transition": {
"in": "fade",
"out": "fade"
},
"fit": "none",
"scale": 1,
"offset": {
"x": 0,
"y": 0.332
},
"position": "center",
"length": 19,
"start": 5.5
}
]
},
{
"clips": [
{
"asset": {
"type": "html",
"html": "<p data-html-type=\"text\">{{ title }}</p>",
"css": "p { color: #ffffff; font-size: 32px; font-family: Montserrat Thin; text-align: center; }",
"width": 590,
"height": 46
},
"transition": {
"in": "fade",
"out": "fade"
},
"length": 19,
"start": 5.5,
"fit": "none",
"scale": 1,
"offset": {
"x": 0,
"y": 0.257
},
"position": "center"
}
]
},
{
"clips": [
{
"asset": {
"type": "video",
"src": "https://shotstack-ingest-api-v1-sources.s3.ap-southeast-2.amazonaws.com/wzr6y0wtti/zzyav1ho-1uln-6v2z-gxu4-1qrtsh2gslhg/source.mp4"
},
"start": 0,
"offset": {
"x": 0.021,
"y": 0
},
"position": "center",
"transition": {
"out": "fade"
},
"fit": "crop",
"scale": 1,
"length": 6
},
{
"asset": {
"type": "video",
"src": "https://shotstack-ingest-api-v1-sources.s3.ap-southeast-2.amazonaws.com/wzr6y0wtti/zzyav1ho-1uln-6v2z-gxu4-1qrtsh2gslhg/source.mp4",
"trim": 3.6
},
"offset": {
"x": 0,
"y": 0
},
"position": "center",
"length": 2.4,
"start": "{{ outroStart }}",
"transition": {
"in": "fade"
}
}
]
},
{
"clips": [
{
"asset": {
"type": "video",
"src": "{{ waveform }}",
"volume": 0
},
"offset": {
"x": 0,
"y": 0
},
"position": "center",
"length": "{{ length }}",
"fit": "crop",
"scale": 1,
"transition": {
"in": "fade",
"out": "fade"
},
"start": 5.5
}
]
},
{
"clips": [
{
"asset": {
"type": "audio",
"src": "{{ audio }}",
"volume": 1
},
"length": "{{ length }}",
"start": 5.5
}
]
}
]
},
"output": {
"format": "mp4",
"size": {
"width": 720,
"height": 720
}
},
"merge": [
{
"find": "audio",
"replace": "https://shotstack-assets.s3.amazonaws.com/templates/podcast/audio/intro-1.mp3"
},
{
"find": "video",
"replace": "https://shotstack-assets.s3.amazonaws.com/templates/podcast/waveform/intro-1.mp4"
},
{
"find": "episode",
"replace": "1"
},
{
"find": "title",
"replace": "Media Automation"
},
{
"find": "length",
"replace": 19
},
{
"find": "outroStart",
"replace": 24
}
]
}
The template contains merge fields which we we will use to replace placeholders with the data from Airtable. The template includes sample data for the merge fields which will be overwritten for each video we create.
We will take the Episode, Title, Waveform URL and Audio URL fields of each record, merge them with the template and render a video.
As our audio is variable in length we need to ensure that the timing on the video is correct. We do this by using the probe endpoint to calculate the length and outroStart.
Create the Node.js application script
With Airtable set up, our keys ready and template saved, we need a script to tie it all together and generate our podcast videos.
In your project root directory create a file named app.js and add the following code:
const Airtable = require("airtable");
const Shotstack = require('shotstack-sdk');
const fs = require('fs');

const AIRTABLE_API_KEY = 'keyju67Hjal8xJ0Iu'; // Replace with your own Airtable API key
const AIRTABLE_BASE_ID = 'app37fKU9RInYBOP1'; // Replace with your own Airtable base ID
const AIRTABLE_TABLE = 'Podcasts'; // Replace with your own Airtable table name
const SHOTSTACK_API_KEY = 'HBHjHylztJqjEeIFQxNJWB5g2mPa4lI40wX8oNVD'; // Replace with your own Shotstack (stage) API key
const SHOTSTACK_URL = 'https://api.shotstack.io/stage'; // The Shotstack API stage URL

// Configure Airtable API
const airtable = new Airtable({ apiKey: AIRTABLE_API_KEY });
const base = airtable.base(AIRTABLE_BASE_ID);
const table = base.table(AIRTABLE_TABLE);

// Configure Shotstack API
const defaultClient = Shotstack.ApiClient.instance;
defaultClient.basePath = SHOTSTACK_URL;

const DeveloperKey = defaultClient.authentications["DeveloperKey"];
DeveloperKey.apiKey = SHOTSTACK_API_KEY;

// Gets the list of podcasts from Airtable and creates an array of objects
const getPodcastsFromAirtable = async () => {
  const records = await table.select().all();

  return records.map((record) => {
    return {
      id: record.id,
      ...record.fields,
    }
  });
};

// Prepares the template with merge fields and sends a render request to Shotstack
const sendShotstackRenderRequest = async (podcast) => {
  const template = JSON.parse(
    fs.readFileSync("template.json", { encoding: "utf-8" })
  );

  const api = new Shotstack.EditApi();

  const probe = await api.probe(podcast['Audio URL']);
  const duration = probe.response.metadata.streams[0].duration;

  const edit = new Shotstack.Edit();
  edit
    .setTimeline(template.timeline)
    .setOutput(template.output)
    .setMerge(getMergeFields(podcast, duration));

  const render = await api.postRender(edit);

  if (render.response.error) {
    console.error(render.response.error);
    return;
  }

  console.log(`Rendering ${podcast.Title} (id: ${render.response.id})`);

  return render.response.id;
};

// Prepares the merge fields for the template with the data from Airtable and the placeholder to replace
const getMergeFields = (podcast, duration) => {
  const mergeEpisodeField = new Shotstack.MergeField();
  mergeEpisodeField
    .setFind('episode')
    .setReplace(String(podcast.Episode));

  const mergeTitleField = new Shotstack.MergeField();
  mergeTitleField
    .setFind('title')
    .setReplace(podcast.Title);

  const mergeWaveformField = new Shotstack.MergeField();
  mergeWaveformField
    .setFind('waveform')
    .setReplace(podcast['Waveform URL']);

  const mergeAudioField = new Shotstack.MergeField();
  mergeAudioField
    .setFind('audio')
    .setReplace(podcast['Audio URL']);

  const mergeLengthField = new Shotstack.MergeField();
  mergeLengthField
    .setFind('length')
    .setReplace(parseFloat(duration));

  const mergeOutroStartField = new Shotstack.MergeField();
  mergeOutroStartField
    .setFind('outroStart')
    .setReplace(parseFloat(duration) + 5);

  return [
    mergeEpisodeField,
    mergeTitleField,
    mergeWaveformField,
    mergeAudioField,
    mergeLengthField,
    mergeOutroStartField
  ];
};

// Polls the status of the render request and returns the video URL when it's ready
const getRenderStatus = async (renderId) => {
  return new Promise((resolve, reject) => {
    const api = new Shotstack.EditApi();

    const interval = setInterval(async () => {
      const render = await api.getRender(renderId);

      if (render.response.status === 'done') {
        clearInterval(interval);
        resolve(render.response.url);
      } else if (render.response.status === 'failed') {
        reject(render.response.error);
      }
    }, 3000);
  });
};

// Updates the Airtable podcast record with the rendered video URL
const updateAirtableVideoUrl = (recordId, videoUrl) => {
  table.update(recordId, { 'Video URL': videoUrl }, (error, record) => {
    if (error) {
      console.error(error);
      return;
    }

    console.log(`Updated ${record.get('Title')} with video URL: ${videoUrl}`);
  });
};

// Main function - an IIFE function that runs the whole script
(async () => {
  const podcasts = await getPodcastsFromAirtable();

  podcasts.forEach(async (podcast) => {
    const renderId = await sendShotstackRenderRequest(podcast);

    if (renderId) {
      const videoUrl = await getRenderStatus(renderId);
      updateAirtableVideoUrl(podcast.id, videoUrl);
    }
  });
})();
The script is quite long, with a number of functions, so we will go through the main functions and logic of the script to help explain how it works.
If you want to skip the details and try the script straight away, you can test it using:
node app.js
Setup and configuration
The first section of the script imports our dependencies for the Airtable and Shotstack API’s. The keys and ids we created at the start of the article are used to configure the API clients ready to use throughout the script.
Fetch the podcast records from Airtable
The getPodcastsFromAirtable function uses the airtable library to fetch the podcast records. The records are parsed and the relevant data is extracted; the id and fields:
const getPodcastsFromAirtable = async () => {
  const records = await table.select().all();

  return records.map((record) => {
    return {
      id: record.id,
      ...record.fields,
    }
  });
};
Prepare the edit JSON and send to to Shotstack
The sendShotstackRenderRequest reads the template.json file and loads the JSON template.
The Audio URL value from Airtable is then inspected using the probe endpoint to get the video duration.
The merge fields are prepared by calling the getMergeFields function and the final edit is prepared and sent to Shotstack using api.postRender.
const sendShotstackRenderRequest = async (podcast) => {
  const template = JSON.parse(
    fs.readFileSync("template.json", { encoding: "utf-8" })
  );

  const api = new Shotstack.EditApi();

  const probe = await api.probe(podcast['Audio URL']);
  const duration = probe.response.metadata.streams[0].duration;

  const edit = new Shotstack.Edit();
  edit
    .setTimeline(template.timeline)
    .setOutput(template.output)
    .setMerge(getMergeFields(podcast, duration));

  const render = await api.postRender(edit);

  if (render.response.error) {
    console.error(render.response.error);
    return;
  }

  console.log(`Rendering ${podcast.Title} (id: ${render.response.id})`);

  return render.response.id;
};
Preparing the merge fields
The getMergeFields is a simple helper function that sets up placeholders to find in the JSON file and the values to replace them with.
For example the following lines find the placeholder title and replace it with the value of podcast.title:
const mergeTitleField = new Shotstack.MergeField();
mergeTitleField
  .setFind('title')
  .setReplace(podcast.Title);
Check the render status
Each video is rendered asynchronously and can take between 15 to 20 seconds. To check the status of the render the getRenderStatus uses setInterval to check the progress of the render. It returns a promise so that we can await the response. When the status equals done the promise is resolved and our script can continue.
const getRenderStatus = async (renderId) => {
  return new Promise((resolve, reject) => {
    const api = new Shotstack.EditApi();

    const interval = setInterval(async () => {
      const render = await api.getRender(renderId);

      if (render.response.status === 'done') {
        clearInterval(interval);
        resolve(render.response.url);
      } else if (render.response.status === 'failed') {
        reject(render.response.error);
      }
    }, 3000);
  });
};
Update Airtable with the Shotstack video URL
The final function updateAirtableVideoUrl takes the rendered video URL and updates the podcast record in Airtable:
const updateAirtableVideoUrl = (recordId, videoUrl) => {
  table.update(recordId, { 'Video URL': videoUrl }, (error, record) => {
    if (error) {
      console.error(error);
      return;
    }

    console.log(`Updated ${record.get('Title')} with video URL: ${videoUrl}`);
  });
};
Finally, everything is executed using a Immediately Invoked Function Expression (IIFE) that fetches the podcasts from Airtable, loops through the records, generates a video for each one and updates Airtable with the video URL:
(async () => {
  const podcasts = await getPodcastsFromAirtable();

  podcasts.forEach(async (podcast) => {
    const renderId = await sendShotstackRenderRequest(podcast);

    if (renderId) {
      const videoUrl = await getRenderStatus(renderId);
      updateAirtableVideoUrl(podcast.id, videoUrl);
    }
  });
})();
Run the script
With everything set up, run the script:
node app.js
You should see an output similar to below. First the video JSON edits are sent to Shotstack and then after about 15 to 20 seconds, the videos are rendered and you will see a message saying Airtable was updated.
Rendering Automated Media Consumption (id: 4cd373e7-fb42-4370-b7e6-518ba0182546)
Rendering Automated Media Tracking (id: 8cb8c644-aadf-47fa-b08c-897cab83342e)
Rendering Automated Advertising (id: 1858f793-4293-4322-a44a-11a9426650ec)
Rendering Automated Content Creation (id: 8ca99c20-51dc-414a-97d5-26c6c3044b2a)
Rendering Automated Media Creation (id: c4db36ab-73d6-431a-8eab-531250019076)
Rendering Automated Media Analysis (id: b4c22bd0-47aa-4244-8b09-f016c70759ea)
Rendering Automated Content Moderation (id: 22e78b2b-4abe-46f7-8d3b-3ce97c0db6b1)
Rendering Automated Entertainment (id: 0264521c-2ecd-4c6d-8bea-034da8a1465b)
Rendering Automated Social Media (id: 0714a4e3-b099-4b0b-8a6b-3d12690d1836)
Rendering Automated Media Distribution (id: e1771112-bcc1-4f52-9a70-64710caafb92)
Rendering Automated Media Production (id: c488dd9b-5adf-41e3-8c63-167d18091fd4)
Rendering Media Automation (id: 6fa9cf09-50ff-45da-a4a8-eaddb6a2f1d2)
Updated Automated Media Consumption with video URL: https://shotstack-api-stage-output.s3-ap-southeast-2.amazonaws.com/zysxdnk0f1/4cd373e7-fb42-4370-b7e6-518ba0182546.mp4
Updated Automated Media Tracking with video URL: https://shotstack-api-stage-output.s3-ap-southeast-2.amazonaws.com/zysxdnk0f1/8cb8c644-aadf-47fa-b08c-897cab83342e.mp4
Updated Automated Advertising with video URL: https://shotstack-api-stage-output.s3-ap-southeast-2.amazonaws.com/zysxdnk0f1/1858f793-4293-4322-a44a-11a9426650ec.mp4
Updated Automated Media Analysis with video URL: https://shotstack-api-stage-output.s3-ap-southeast-2.amazonaws.com/zysxdnk0f1/b4c22bd0-47aa-4244-8b09-f016c70759ea.mp4
Updated Automated Entertainment with video URL: https://shotstack-api-stage-output.s3-ap-southeast-2.amazonaws.com/zysxdnk0f1/0264521c-2ecd-4c6d-8bea-034da8a1465b.mp4
Updated Automated Social Media with video URL: https://shotstack-api-stage-output.s3-ap-southeast-2.amazonaws.com/zysxdnk0f1/0714a4e3-b099-4b0b-8a6b-3d12690d1836.mp4
Updated Automated Media Creation with video URL: https://shotstack-api-stage-output.s3-ap-southeast-2.amazonaws.com/zysxdnk0f1/c4db36ab-73d6-431a-8eab-531250019076.mp4
Updated Automated Media Distribution with video URL: https://shotstack-api-stage-output.s3-ap-southeast-2.amazonaws.com/zysxdnk0f1/e1771112-bcc1-4f52-9a70-64710caafb92.mp4
Updated Automated Media Production with video URL: https://shotstack-api-stage-output.s3-ap-southeast-2.amazonaws.com/zysxdnk0f1/c488dd9b-5adf-41e3-8c63-167d18091fd4.mp4
Updated Media Automation with video URL: https://shotstack-api-stage-output.s3-ap-southeast-2.amazonaws.com/zysxdnk0f1/6fa9cf09-50ff-45da-a4a8-eaddb6a2f1d2.mp4
Updated Automated Content Creation with video URL: https://shotstack-api-stage-output.s3-ap-southeast-2.amazonaws.com/zysxdnk0f1/8ca99c20-51dc-414a-97d5-26c6c3044b2a.mp4
Updated Automated Content Moderation with video URL: https://shotstack-api-stage-output.s3-ap-southeast-2.amazonaws.com/zysxdnk0f1/22e78b2b-4abe-46f7-8d3b-3ce97c0db6b1.mp4
If you log back in to Airtable and check the Podcasts table you will see the records now contain a URL in the Video URL column:

Conclusion
In this tutorial, you learned how to automate the process of adding an intro and outro to a video, as well as adding podcast episode overlay data such as episode number and title, using the Airtable API and the Shotstack API.
By using Node.js, you were able to integrate these technologies to create a powerful video generation application. By following the steps outlined in this tutorial, you built your own application that automatically generated videos with intro/outro and podcast episode overlays.
For more information on how to use these APIs please read the Airtable API Documentation and the Shotstack API documentation.
Get started with Shotstack's video editing API in two steps:
- Sign up for free to get your API key.
- Send an API request to create your video:
curl --request POST 'https://api.shotstack.io/v1/render' \
--header 'x-api-key: YOUR_API_KEY' \
--data-raw '{
  "timeline": {
    "tracks": [
      {
        "clips": [
          {
            "asset": {
              "type": "video",
              "src": "https://shotstack-assets.s3.amazonaws.com/footage/beach-overhead.mp4"
            },
            "start": 0,
            "length": "auto"
          }
        ]
      }
    ]
  },
  "output": {
    "format": "mp4",
    "size": {
      "width": 1280,
      "height": 720
    }
  }
}'


Experience Shotstack for yourself.
- Seamless integration
- Dependable high-volume scaling
- Blazing fast rendering
- Save thousands


