Slideshow videos are a creative approach to transforming monotonous images into exciting video content. Companies often use it for different marketing channels like social media, digital ads, personalized video marketing, etc. It has never been more crucial to have distinctive methods of connecting with clients, especially in sectors like automotive where competition is fierce. Using slideshow videos can be a fast and effective way for businesses to utilize the marketing channels like TikTok and YouTube.
Although it's simple to create slideshow videos using video editing tools, most don't offer a scalable approach. Particularly for industries like automotive where there can be hundreds of vehicles in stock at one time. Manually generating videos for each inventory is not efficient. Luckily, we now have the required tools to automate this production process.
This guide will show you to build a workflow that will automatically generate engaging automotive slideshow videos from vehicle photos and details using Zapier, Google Sheets, and the Shotstack API. We can use this workflow to automate content production for any other industry and use cases as well.
How will this work
We will be using Zapier, a tool that allows us to build automation workflows by integrating multiple apps and APIs, all without needing to write any code. You will need to upgrade to a Professional plan to publish this workflow.
In summary, we will:
- create a Google Sheet that includes rows of vehicle inventory information
- design a reusable video template with merge fields in the Shotstack dashboard
- design a Zapier workflow that will connect Google Sheets and Shotstack API to automatically generate videos
Before we get started sign up to Zapier, Google Sheets, and the Shotstack API.
The Shotstack API
Shotstack provides a cloud based video editing API. The API first approach makes it seamless to build apps, integrate APIs, and develop workflows to automate media production.
Understanding the Shotstack architecture
The Shotstack API uses JSON to describe how the video should be edited. The API uses code but adheres to many of the same concepts as desktop editing applications, including timeline, tracks, and clips.
We can add different assets like images, videos, titles, HTML, audio, and Luma assets. Assets can be added to the timeline using their publicly accessible URLs. Shotstack makes it easy to build reusable templates with merge fields. The merge fields are placeholders that use the merge parameter which provides an array of key/value pairs that can be used to find and replace the placeholder value.
Visit Shotstack documentation to learn about architecture guidelines.
Designing your video template
For this tutorial, we will use the following automotive slideshow video template.
The following code is the JSON version of the above video template. In this template, we have the following placeholders as merge fields:
- Vehicle_Year
- Vehicle_Make
- Vehicle_Model
- Vehicle_Description
- First_image
- Vehicle_Engine_Type
- Vehicle_kms
- Second_image
- Third_image
- Vehicle_Price
- Vehicle_Price_Disclaimer
- Vehicle_Price_Method
The values will be matched from our Google Sheets and automatically replaced to generate slideshow videos for each vehicle. To use this template, copy the following JSON:
{
"timeline": {
"soundtrack": {
"src": "https://shotstack-assets.s3.ap-southeast-2.amazonaws.com/music/unminus/kring.mp3",
"effect": "fadeOut"
},
"background": "#000000",
"cache": false,
"tracks": [
{
"clips": [
{
"asset": {
"type": "html",
"html": "<p data-html-type=\"text\">{{Vehicle_Year}}</p>",
"css": "p { color: #ffffff; font-size: 100px; font-family: Montserrat ExtraBold; text-align: left; }",
"width": 844,
"height": 180
},
"start": 0,
"length": 4,
"fit": "none",
"scale": 1,
"offset": {
"x": -0.239,
"y": -0.139
},
"position": "center",
"transition": {
"in": "slideUp",
"out": "slideDown"
}
}
]
},
{
"clips": [
{
"asset": {
"type": "html",
"html": "<p data-html-type=\"text\">{{Vehicle_Make}}</p>",
"css": "p { color: #ffffff; font-size: 80px; font-family: Montserrat ExtraBold; text-align: left }",
"width": 1031,
"height": 114
},
"fit": "none",
"scale": 1,
"offset": {
"x": -0.191,
"y": -0.218
},
"position": "center",
"transition": {
"in": "slideUp",
"out": "slideDown"
},
"start": 0.5,
"length": 3.5
}
]
},
{
"clips": [
{
"asset": {
"type": "html",
"html": "<p data-html-type=\"text\">{{Vehicle_Model}}</p>",
"css": "p { color: #ffffff; font-size: 80px; font-family: Montserrat SemiBold; text-align: left; }",
"width": 1019,
"height": 77
},
"fit": "none",
"scale": 1,
"offset": {
"x": -0.191,
"y": -0.294
},
"position": "center",
"start": 1,
"length": 3,
"transition": {
"out": "slideDown",
"in": "slideUp"
}
},
{
"asset": {
"type": "html",
"html": "<p data-html-type=\"text\">{{Vehicle_Description}}</p>",
"css": "p { color: #ffffff; font-size: 40px; font-family: Montserrat SemiBold; text-align: left; }",
"width": 1648,
"height": 90
},
"fit": "none",
"scale": 1,
"offset": {
"x": -0.024,
"y": -0.365
},
"position": "center",
"transition": {
"out": "slideDown",
"in": "slideUp"
},
"start": 1.2,
"length": 2.8
}
]
},
{
"clips": [
{
"asset": {
"type": "image",
"src": "{{First_image}}"
},
"start": 0,
"length": 5,
"effect": "zoomIn",
"transition": {
"in": "fade",
"out": "fade"
},
"offset": {
"x": 0.002,
"y": -0.024
},
"position": "center",
"fit": "crop",
"opacity": 0.4
}
]
},
{
"clips": [
{
"asset": {
"type": "html",
"html": "<p data-html-type=\"text\">{{Vehicle_Engine_Type}}</p>",
"css": "p { color: #ffffff; font-size: 40px; font-family: Montserrat SemiBold; text-align: left }",
"width": 620,
"height": 72
},
"length": 5,
"start": 5,
"transition": {
"out": "slideDown",
"in": "slideUp"
},
"fit": "none",
"scale": 1,
"offset": {
"x": -0.266,
"y": -0.032
},
"position": "center"
},
{
"asset": {
"type": "html",
"html": "<p data-html-type=\"text\">{{Vehicle_kms}}</p>",
"css": "p { color: #ffffff; font-size: 70px; font-family: Montserrat ExtraBold; text-align: left; }",
"width": 600,
"height": 109
},
"length": 5,
"start": 5,
"transition": {
"out": "slideDown",
"in": "slideUp"
},
"fit": "none",
"scale": 1,
"offset": {
"x": -0.276,
"y": 0.027
},
"position": "center"
}
]
},
{
"clips": [
{
"asset": {
"type": "image",
"src": "https://drive.google.com/uc?export=download&id=1ngVkdeoD7RDvk3FA5cIU07l1_V84xS5t"
},
"length": 5,
"start": 5,
"offset": {
"x": -0.49,
"y": -0.004
},
"position": "center",
"scale": 0.07,
"transition": {
"in": "carouselDown",
"out": "slideDown"
}
}
]
},
{
"clips": [
{
"asset": {
"type": "image",
"src": "{{First_image}}"
},
"start": 5.7,
"length": 4.3,
"offset": {
"x": 0.2,
"y": 0
},
"position": "center",
"scale": 0.479,
"transition": {
"in": "slideLeft",
"out": "slideRight"
},
"fit": "crop"
}
]
},
{
"clips": [
{
"asset": {
"type": "image",
"src": "{{Second_image}}"
},
"position": "center",
"offset": {
"x": 0,
"y": 0
},
"transition": {
"in": "fade",
"out": "fade"
},
"start": 4,
"length": 6,
"scale": 1,
"opacity": 0.4,
"fit": "crop"
}
]
},
{
"clips": [
{
"asset": {
"type": "image",
"src": "{{Third_image}}"
},
"effect": "zoomIn",
"offset": {
"x": 0,
"y": 0
},
"position": "center",
"fit": "crop",
"scale": 1,
"transition": {
"in": "fade",
"out": "fade"
},
"start": 9,
"length": 3
}
]
},
{
"clips": [
{
"asset": {
"type": "image",
"src": "https://drive.google.com/uc?export=download&id=1ngVkdeoD7RDvk3FA5cIU07l1_V84xS5t"
},
"length": 5.5,
"start": 11.5,
"offset": {
"x": -0.492,
"y": -0.007
},
"position": "center",
"transition": {
"in": "carouselDown",
"out": "slideDown"
},
"scale": 0.07
}
]
},
{
"clips": [
{
"asset": {
"type": "image",
"src": "{{First_Image}}"
},
"start": 11,
"length": 7,
"effect": "zoomIn",
"offset": {
"x": 0,
"y": 0
},
"position": "center",
"transition": {
"in": "fade",
"out": "fade"
},
"fit": "crop",
"scale": 1
}
]
},
{
"clips": [
{
"asset": {
"type": "image",
"src": "{{Second_Image}}"
},
"start": 17,
"length": 4,
"effect": "zoomIn",
"offset": {
"x": 0,
"y": 0
},
"position": "center",
"transition": {
"in": "fade",
"out": "fade"
}
}
]
},
{
"clips": [
{
"asset": {
"type": "image",
"src": "{{Third_Image}}"
},
"start": 20,
"length": 6,
"effect": "zoomIn",
"offset": {
"x": 0,
"y": 0
},
"position": "center",
"transition": {
"in": "fade",
"out": "fade"
}
}
]
},
{
"clips": [
{
"asset": {
"type": "html",
"html": "<p data-html-type=\"text\">{{Vehicle_Price}}</p>",
"css": "p { color: #ffffff; font-size: 120px; font-family: Montserrat ExtraBold; text-align: center; }",
"width": 1311,
"height": 180
},
"start": 28,
"length": 3,
"transition": {
"out": "slideUp",
"in": "slideDown"
},
"fit": "none",
"scale": 1,
"offset": {
"x": -0.029,
"y": -0.005
},
"position": "center"
},
{
"asset": {
"type": "html",
"html": "<p data-html-type=\"text\">{{Vehicle_Price_Disclaimer}}</p>",
"css": "p { color: #ffffff; font-size: 36px; font-family: Montserrat SemiBold; text-align: left; }",
"width": 883,
"height": 93
},
"transition": {
"out": "slideUp",
"in": "slideDown"
},
"start": 28,
"length": 3,
"fit": "none",
"scale": 1,
"offset": {
"x": 0.223,
"y": -0.134
},
"position": "center"
},
{
"asset": {
"type": "html",
"html": "<p data-html-type=\"text\">{{Vehicle_Price_Method}}</p>",
"css": "p { color: #ffffff; font-size: 50px; font-family: Montserrat ExtraBold; text-align: left; }",
"width": 672,
"height": 107
},
"start": 28,
"length": 3,
"fit": "none",
"scale": 1,
"offset": {
"x": 0.164,
"y": -0.087
},
"position": "center",
"transition": {
"in": "slideDown",
"out": "slideUp"
}
}
]
},
{
"clips": [
{
"asset": {
"type": "image",
"src": "{{Dealer_logo}}"
},
"start": 30.8,
"length": 5.2,
"fit": "none",
"offset": {
"x": 0,
"y": 0
},
"transition": {
"in": "slideUp"
},
"position": "center",
"scale": 0.5
},
{
"asset": {
"type": "html",
"html": "<p data-html-type=\"text\">{{Dealer_website}}</p>",
"css": "p { color: #ffffff; font-size: 50px; font-family: Montserrat SemiBold; text-align: center; }",
"width": 1025,
"height": 167
},
"length": 5,
"offset": {
"x": 0.006,
"y": -0.178
},
"start": 31,
"transition": {
"in": "slideUp"
},
"fit": "none",
"scale": 1,
"position": "center"
}
]
},
{
"clips": [
{
"asset": {
"type": "image",
"src": "{{First_Image}}"
},
"start": 25,
"length": 8,
"effect": "zoomIn",
"transition": {
"out": "fade"
},
"offset": {
"x": 0,
"y": 0
},
"position": "center",
"fit": "crop",
"scale": 1,
"opacity": 0.4
}
]
}
]
},
"output": {
"format": "mp4",
"size": {
"width": 1920,
"height": 1080
}
}
}Let's log in to our Shotstack account and navigate to our dashboard. We need to create a new template to use the above JSON we copied. So let's click Studio and then Create Template button. It will open the online video editor interface. As we already have our video design in JSON, we simply need to paste it in the JSON field.
To do that, we need to toggle to the JSON editor by clicking the toggle JSON button in the left bottom corner. Once switched, just paste the copied JSON in the JSON field. Then, let's rename the template and save it by clicking Save.
Setting up the Google Sheets
Let's set up the Google Sheets with vehicle details. You can copy the following setup:
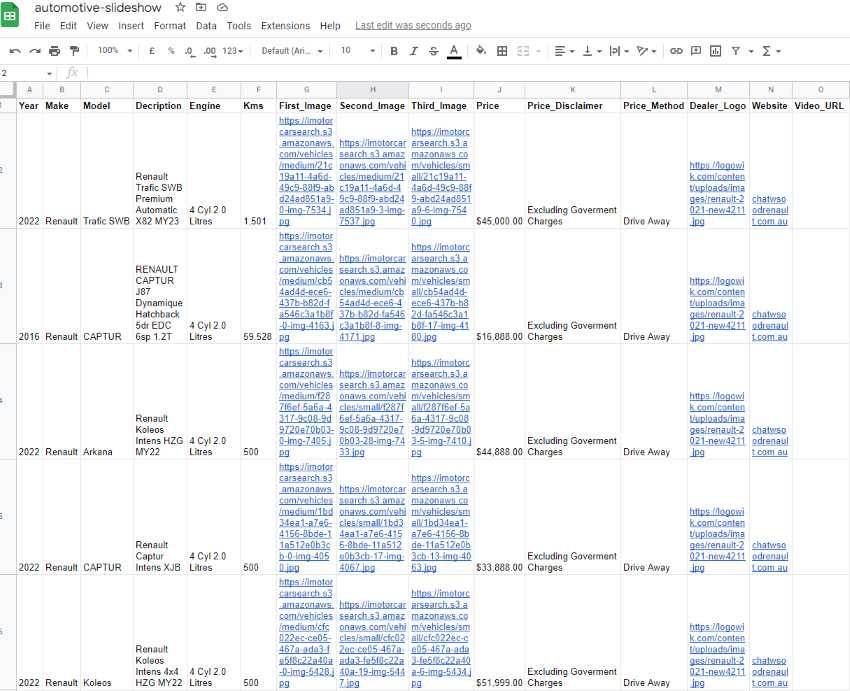
Duplicate this sheet if you don't want to create one. Make sure the assets like images, videos, and audio are publicly accessible via the URL.
Setting up the Zapier workflow
Let's set up our Zapier workflow as shown below.
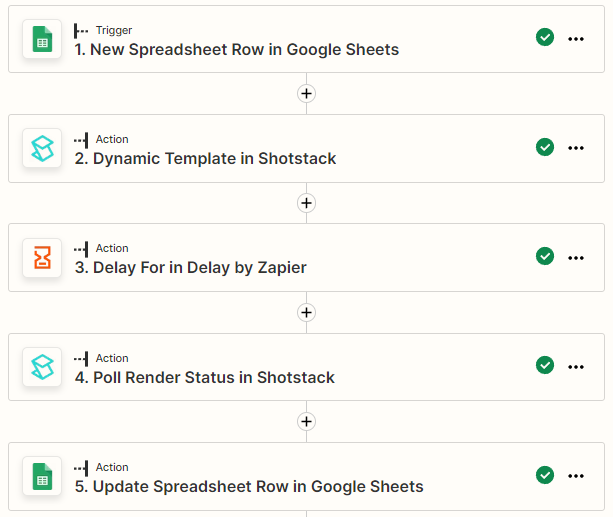
How will this workflow work:
- The Google Sheets New Spreadsheet Rows module sees if a new row added. Once a new row is added, it passes the row data to the next step for render.
- The Shotstack Create from Dynamic Template module receives data and renders video using the automotive video the template we created above.
- The Zapier Delay module waits for the render to complete.
- The Shotstack Poll Render Status module fetches the rendered video URL using the
Response IDgenerated from step 2. - Finally, the Google Sheets Update A Row module updates the sheet with the video URL in the Video_URL coloumn.
Creating a new Zap
Zapier calls workflows Zaps. To create a new workflow, click the Create Zap button.

Setting up the Google Sheets New Spreadsheet Row step
Let's add the Google Sheets New Spreadsheet Row step. Select Google Sheets from the search bar and select New Spreadsheet Row in the Event. Then choose your Google account. You will need to authenticate your access to your Google account if you are using Zapier for the first time. Next, select the correct sheet and click Continue.
Let's also test the connection by clicking the Test trigger button. If the connection is successful, you will see the sheet data like shown below.
Setting up the Shotstack account inside Zapier
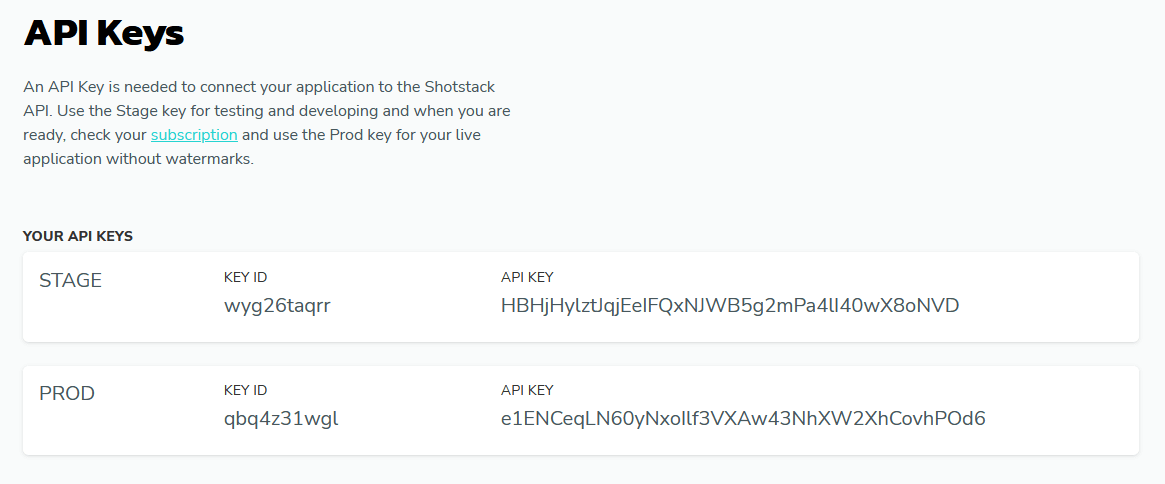
Similar to authenticating your Google account, we need to authenticate our Shotstack account. Shotstack provides two separate working environment with separate API keys:
- Sandbox API key for testing
- Production API key for live projects
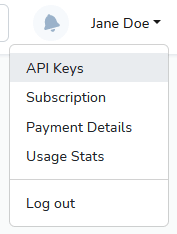
For this tutorial, we will use the Sandbox environment. To get your Sandbox API key, go to your Shotstack dashboard. Then click on your account name on the top right corner and click the API Keys from the dropdown menu.
Copy the Sandbox API key.
Next, let's set up the Shotstack Create from Dynamic Template module. Click on the add sign button under the Google Sheet module. Then search for Shotstack and under the Event dropdown menu, select Dynamic Template event.
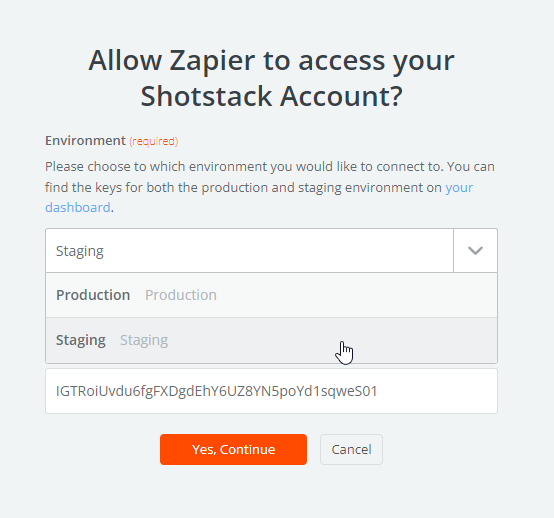
Once you click the sign-in button, it will prompt a new window to authenticate with your Shotstack account. Select Sandbox environment in the dropdown menu. Paste the API key copied earlier in the API key field.
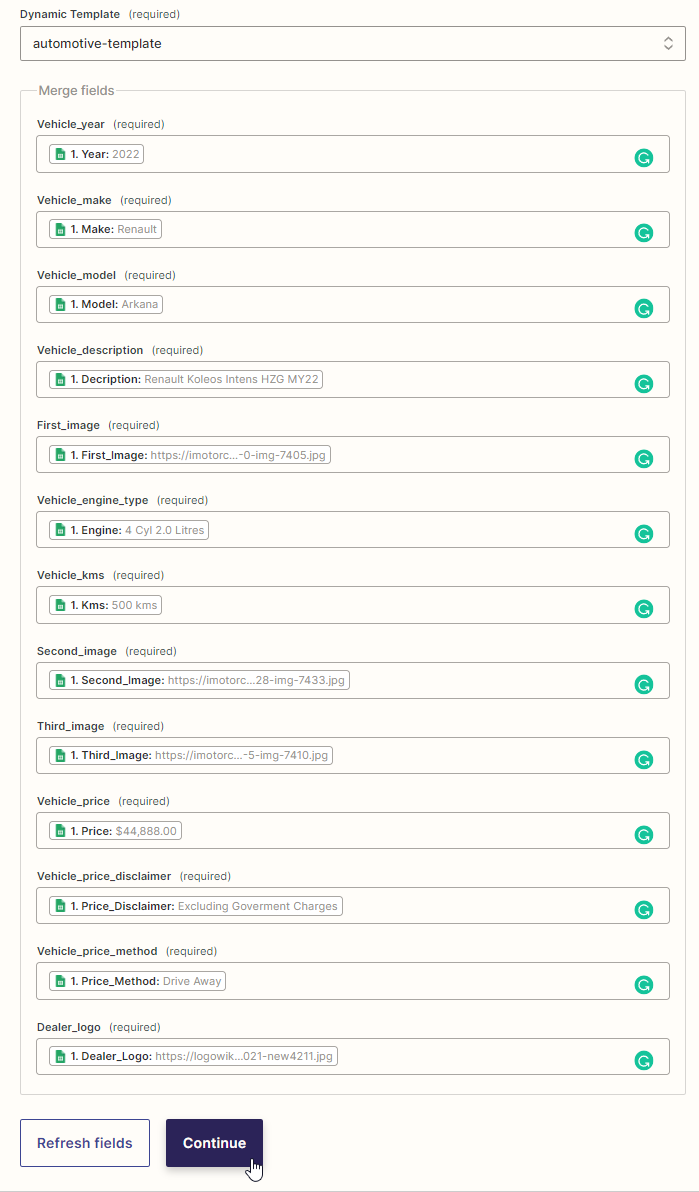
Setting up the Shotstack Create from the Dynamic Template module
The Shotstack Create from Dynamic Template module uses the TemplateRender API request type to render saved templates. It uses the unique template id to identify templates.
Let's match the data from Google Sheets with the merge fields in the template. If you're using the automotive JSON video template from the above, then you should have the same Merge fields as below. Match the Sheet headers with the correct merge field placeholders as shown below.
Let's test to see if the render works by clicking Test Trigger. If the render is successful, then you will get a similar response as shown below. The id value is the render ID, which we will use to get the video URL in the next step.
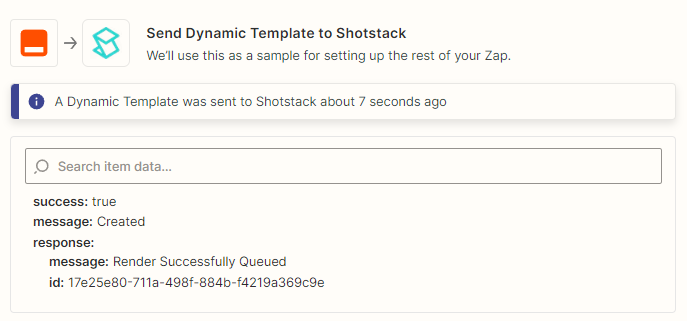
If the render is unsuccessful, then it will return an error response.
Setting up the Zapier Delay module
Rendering videos are resource intensive. Thankfully, with Shotstack's cloud infrastructure, it is possible to concurrently render multiple videos in minutes.
Normally it takes about a minute to finish rendering videos of this length and complexity. Let's add the Zapier Delay module. Set the Event to Delay For and click continue. Then Time value to 1 and the unit to minutes.
Setting up Shotstack Poll Render Status module
Shotstack Poll Render Status module uses the Response ID returned from the Create from Dynamic Template module to get the rendering status, public video URL, and other details.
Let's add the Poll render Status module and select the Response ID returned from as shown below:
Setting up the Google Sheets Update Spreadsheet Rows module
Finally, it's time to add the video URL returned from render status in the Google Sheet. Let's add the Google Sheets Update Spreadsheet Rows module. Select the correct spreadsheet.

Next, let's add row numbers from the New Spreadsheet Rows module in the Row number field. In the Video_URL field, add URL returned from the previous step.
We can also access our renders via the Shotstack dashboard. All the rendered videos are under the Renders tab in the Shotstack dashboard.
Further, you can also automate export destinations like social media pages, video-sharing platforms, file storage drives, and more.
Publishing the workflow
Click Publish to publish this workflow. Once you publish this workflow, it will automatically generate videos as new rows are created. You can also schedule it to run routinely.
Final thoughts
There you have it, a fully automated workflow that automatically generates automotive slideshow videos. This is just one example of video automation and can be used for any industry or use case. This should give us an idea of how powerful video automation solutions can be.
We can even build an app using no-code tools and integrating multiple platforms. If we want to learn more about media automation, then check out our other learning resources.
Get started with Shotstack's video editing API in two steps:
- Sign up for free to get your API key.
- Send an API request to create your video:
curl --request POST 'https://api.shotstack.io/v1/render' \
--header 'x-api-key: YOUR_API_KEY' \
--data-raw '{
  "timeline": {
    "tracks": [
      {
        "clips": [
          {
            "asset": {
              "type": "video",
              "src": "https://shotstack-assets.s3.amazonaws.com/footage/beach-overhead.mp4"
            },
            "start": 0,
            "length": "auto"
          }
        ]
      }
    ]
  },
  "output": {
    "format": "mp4",
    "size": {
      "width": 1280,
      "height": 720
    }
  }
}'


Experience Shotstack for yourself.
- Seamless integration
- Dependable high-volume scaling
- Blazing fast rendering
- Save thousands


