The Shotstack API lets you place clips anywhere within the viewport. We call the editable area of a video the viewport.
You control placement within the viewport by setting the position and offset properties of a clip. Each clip contains an asset type.
The JSON examples below can be submitted to the API using cURL or Postman.
Default clip position
By default, clips are positioned in the centre of the viewport. The JSON below will place a logo in the center of a png image file:
{
  "timeline": {
    "tracks": [
      {
        "clips": [
          {
            "asset": {
              "type": "image",
              "src": "https://shotstack-assets.s3-ap-southeast-2.amazonaws.com/branding/logo-reverse.png"
            },
            "start": 0,
            "length": 1,
            "fit": "none"
          }
        ]
      }
    ]
  },
  "output": {
    "format": "png",
    "resolution": "sd"
  }
}
Note the fit property is set to none. This constrains the image to it's original size without stretching it. The output format is png which creates an image. The resolution is sd which is 1024px x 576px. The same approach is used for editing images or videos.
The following image file is generated:

Setting the clips origin position
You can place each clip at one of 9 predefined origin points within the viewport. The origin is set using the position property of the clip and its value can be one of the following:
| Value | Description |
|---|---|
top | top center |
topRight | top right corner |
right | right center |
bottomRight | bottom right corner |
bottom | bottom center |
bottomLeft | bottom left corner |
left | left center |
topLeft | top left corner |
center | center (default) |
The JSON below places the logo in the top right corner. Notice that the clips position is set using "position": "topRight".
{
  "timeline": {
    "tracks": [
      {
        "clips": [
          {
            "asset": {
              "type": "image",
              "src": "https://shotstack-assets.s3-ap-southeast-2.amazonaws.com/branding/logo-reverse.png"
            },
            "start": 0,
            "length": 1,
            "fit": "none",
            "position": "topRight"
          }
        ]
      }
    ]
  },
  "output": {
    "format": "png",
    "resolution": "sd"
  }
}
The resulting image is shown below:

The logo is placed flush against the edges of the image. While sometimes this may be desireable, in this example it doesn't look good. It will look better with some padding away from the edge. To do that, you will need to understand how offsets work.
Offsetting clips
To move clips around the viewport we use an offset. An offset lets you move a clip along the horizontal X and vertical Y axis. Clips are moved away from the origin position.
Offsets are relative to the viewport width and height, and can be a number between -1 and 1. For example; setting an X offset of 0.25 will move a clip quarter the width (25%) of the viewport, to the right. The JSON below shows how this works:
{
  "timeline": {
    "tracks": [
      {
        "clips": [
          {
            "asset": {
              "type": "image",
              "src": "https://shotstack-assets.s3-ap-southeast-2.amazonaws.com/branding/logo-reverse.png"
            },
            "start": 0,
            "length": 1,
            "fit": "none",
            "offset": {
              "x": 0.25
            }
          }
        ]
      }
    ]
  },
  "output": {
    "format": "png",
    "resolution": "sd"
  }
}
The output image with the logo shifted 25% from the center to the right:

Calculating offsets from absolute pixel values
Offsets in Shotstack are relative so they scale when you change the resolution of your output.
For example; set an offset of 0.1 in an SD video, when you change the resolution to HD, the relative distance remains the same.
Sometimes you may want to position an element absolutely, i.e. by an exact distance in pixels.
You can convert an absolute pixel value by dividing the distance to move the clip, by the width or height of the viewport.
To move a clip right by 50 pixels in an HD video (1280px x 720px) you would use the following calculation:
50 / 1280 = 0.0390You would set the offset using:
"offset": {
  "x": 0.0390
}
To move a clip down 50 pixels use the following calculation:
-50 / 720 = -0.0694Notice the use of negative -50 to move the clip down the vertical y axis.
The offset would be set using:
"offset": {
  "y": -0.0694
}
Offsetting our logo away from the edge
In a previous example we used "position": "topRight" to place a logo in the top right corner of the viewport. We now have all the knowledge we need to pad the logo from the edge.
To add 20px padding to the top and left for our SD video (1024px x 576px) use the following calculations:
-20 / 1024 = -0.0195 // x axis
-20 / 576 = -0.0347  // y axis
The offset will be:
"offset": {
  "x": -0.0195,
  "y": -0.0347
}
Our final JSON with the logo positioned top right with 20 pixels padding is shown below:
{
  "timeline": {
    "tracks": [
      {
        "clips": [
          {
            "asset": {
              "type": "image",
              "src": "https://shotstack-assets.s3-ap-southeast-2.amazonaws.com/branding/logo-reverse.png"
            },
            "start": 0,
            "length": 1,
            "fit": "none",
            "position": "topRight",
            "offset": {
              "x": -0.0195,
              "y": -0.0347
            }
          }
        ]
      }
    ]
  },
  "output": {
    "format": "png",
    "resolution": "sd"
  }
}
The final output is shown below:

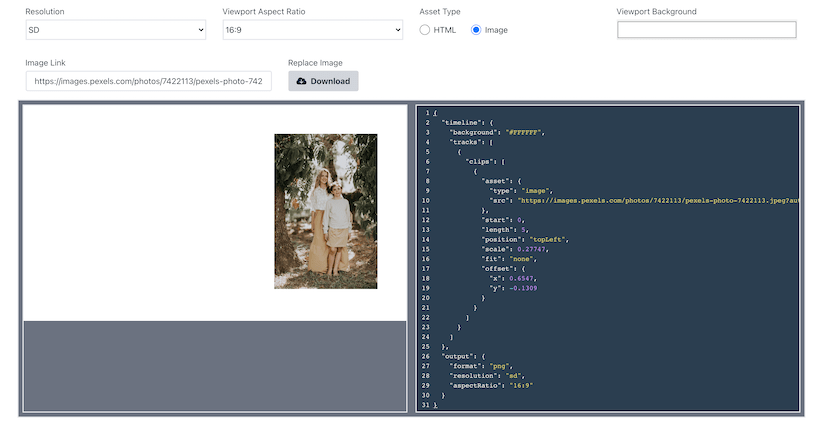
Positioning tool
You should now have a much better understanding of how to position your assets. Positioning elements using JSON can still take a lot trial and error. That's why we developed a positioning tool that helps you calculate the correct offsets.
Get started with Shotstack's video editing API in two steps:
- Sign up for free to get your API key.
- Send an API request to create your video:
curl --request POST 'https://api.shotstack.io/v1/render' \
--header 'x-api-key: YOUR_API_KEY' \
--data-raw '{
  "timeline": {
    "tracks": [
      {
        "clips": [
          {
            "asset": {
              "type": "video",
              "src": "https://shotstack-assets.s3.amazonaws.com/footage/beach-overhead.mp4"
            },
            "start": 0,
            "length": "auto"
          }
        ]
      }
    ]
  },
  "output": {
    "format": "mp4",
    "size": {
      "width": 1280,
      "height": 720
    }
  }
}'


Experience Shotstack for yourself.
- Seamless integration
- Dependable high-volume scaling
- Blazing fast rendering
- Save thousands


