Programmatic video editing is a powerful process, particularly for use cases like automated media production. Learning to trim videos using code is a good start. This article will teach you to trim videos using Python and the Shotstack video editing API. You should be able to trim videos using code at the end of this tutorial.
This guide has 2 parts:
- Trim a single video
- Trim multiple videos using a list
The Shotstack API and SDK
Shotstack provides a cloud based video editing API. Editing videos at scale is resource-intensive and can take hours. With Shotstack’s cloud based video editing API you can build and scale media applications with ease.
This guide will be using the Shotstack video editing Python SDK for this tutorial. Python 3 and above is required for the SDK.
Install and configure the Shotstack SDK
Firstly, install the Shotstack Python SDK from the command line:
pip install shotstack_sdk
You may need to use pip3 depending on how your environment is configured.
Then, set your API key as an environment variable (Linux/Mac):
export SHOTSTACK_KEY=your_key_here
or, if using Windows (make sure to add the SHOTSTACK_KEY to the path):
set SHOTSTACK_KEY=your_key_here
Replace your_key_here with your provided sandbox API key from your Shotstack dashboard.
How to trim a single video using Python?
Create a Python file called trim-video.py and save it. Open the file and begin editing.
Import the required modules
Next, import the required modules for the project. You need to import modules from the Shotstack SDK to edit and render the video plus a couple of built-in modules:
import shotstack_sdk as shotstack
import os
import sys

from shotstack_sdk.model.clip import Clip
from shotstack_sdk.api import edit_api
from shotstack_sdk.model.track import Track
from shotstack_sdk.model.timeline import Timeline
from shotstack_sdk.model.output import Output
from shotstack_sdk.model.edit import Edit
from shotstack_sdk.model.video_asset import VideoAsset
Configure the API client
Next, add the following, which sets up the API client with the API URL and key, this should use the API key added to your environment variables. If you want, you can hard code the API key here but we recommend using environment variables.
host = "https://api.shotstack.io/stage"
configuration = shotstack.Configuration(host = host)
configuration.api_key['DeveloperKey'] = os.getenv('SHOTSTACK_KEY')

with shotstack.ApiClient(configuration) as api_client:
    api_instance = edit_api.EditApi(api_client)
The Shotstack timeline architecture
The Shotstack API follows many of the principles of desktop editing software such as the use of a timeline, tracks, and clips. A timeline is like a container for multiple tracks and a track is a container for multiple clips. A Clip includes a specific type of asset that plays over time.
Set up the video clip
The following skateboard video will be used in this tutorial but you can replace it with your own video URL from any online source. The video needs to be hosted online and accessible via a public or signed URL.
Trim the video clip
The skateboard video is 27.0 seconds long. Let’s trim to the part where the skateboarder jumps over the table. To trim the video from the start, you need to add the trim property value in seconds for a video asset. Videos will start from the in-trim point.
The skateboarder makes the jump at 5.0 and lands at 10.0 seconds. So, let’s trim the first 3.0. Add the following code to create a VideoAsset using the video URL and trim it by 3.0 seconds:
video_asset = VideoAsset(
    src = "https://d1uej6xx5jo4cd.cloudfront.net/skater.hd.mp4",
    trim = 3.0
)
Next, create a Clip. This Clip will be named video_clip that will have the VideoAsset you created earlier. You need to trim the part after the skateboarder lands, which is at 10.0 seconds. To trim the end of the video after the skateboarder lands, you can reduce the length of the video_clip to 8.0 seconds. This will trim the original video after 11.0 seconds.
video_clip = Clip(
    asset = video_asset,
    start = 0.0,
    length = 8.0
)
Add the video clip to the timeline
Now, you need to add the video_clip on the track and the track on the timeline to prepare the edit for render.
track = Track(clips=[video_clip])

timeline = Timeline(
    background = "#000000",
    tracks = [track]
)
Configure the final edit and output
Next, you will need to configure the output. Set the output format to mp4, video resolution to hd which generates a video of 1280px x 720px @ 25fps.
You can also configure other properties like thumbnail to generate a thumbnail from a specific point on the timeline, destinations to set export destinations, and more.
output = Output(
    format = "mp4",
    resolution = "hd"
)

edit = Edit(
    timeline = timeline,
    output   = output
)
Send the edit for rendering via the API
Finally, send the edit for processing and rendering using the API. The Shotstack SDK takes care of converting our objects to JSON, adding our key to the request header, and POSTing everything to the API. Add the following script that sends the render and returns response messages:
try:
    api_response = api_instance.post_render(edit)

    message = api_response['response']['message']
    id = api_response['response']['id']

    print(f">> render id: {id}")
except Exception as e:
    print(f"Unable to resolve API call: {e}")
Completed script
You can see the full Python script below:
import shotstack_sdk as shotstack
import os
import sys

from shotstack_sdk.api import edit_api
from shotstack_sdk.model.clip import Clip
from shotstack_sdk.model.track import Track
from shotstack_sdk.model.timeline import Timeline
from shotstack_sdk.model.output import Output
from shotstack_sdk.model.edit import Edit
from shotstack_sdk.model.video_asset import VideoAsset

if __name__ == "__main__":
    host = "https://api.shotstack.io/stage"

    configuration = shotstack.Configuration(host = host)

    configuration.api_key['DeveloperKey'] = os.getenv("SHOTSTACK_KEY")

    with shotstack.ApiClient(configuration) as api_client:
        api_instance = edit_api.EditApi(api_client)

        video_asset = VideoAsset(
            src = "https://d1uej6xx5jo4cd.cloudfront.net/skater.hd.mp4",
            trim = 3.0
        )

        video_clip = Clip(
            asset = video_asset,
            start = 0.0,
            length = 8.0
        )

        track = Track(clips=[video_clip])

        timeline = Timeline(
            background = "#000000",
            tracks = [track]
        )

        output = Output(
            format = "mp4",
            resolution  = "hd"
        )

        edit = Edit(
            timeline = timeline,
            output = output
        )

        try:
            api_response = api_instance.post_render(edit)

            message = api_response['response']['message']
            id = api_response['response']['id']

            print(f"{message}\n")
            print(f">> render id: {id}")
        except Exception as e:
            print(f"Unable to resolve API call: {e}")
Run the script
Use the following python command to run the script:
python trim-video.py
You may need to use python3 instead of python depending on your configuration.
If the render request is successful, the API will return the render id which we can use to retrieve the status of the render.
Check the render status and output URL
You can use the get_render method with your render ID to get the render status. To use check the render status, create a file called status.py and paste the following code:
import sys
import os
import shotstack_sdk as shotstack

from shotstack_sdk.api import edit_api

if __name__ == "__main__":
    host = "https://api.shotstack.io/stage"
    configuration = shotstack.Configuration(host = host)
    configuration.api_key['DeveloperKey'] = os.getenv("SHOTSTACK_KEY")

    with shotstack.ApiClient(configuration) as api_client:
        api_instance = edit_api.EditApi(api_client)
        api_response = api_instance.get_render(sys.argv[1], data=False, merged=True)

        status = api_response['response']['status']

        print(f"Status: {status}")

        if status == "done":
            url = api_response['response']['url']
            print(f">> Asset URL: {url}")
Then run the script using the command line:
python status.py {renderId}
Replace {renderId} with the ID returned from the trim-video.py script. Re-run the status.py script every 4-5 seconds until the status is done and a URL is returned. If something goes wrong the status will show as failed. If everything ran successfully you should now have the URL of the final video, just like the one at the start of the tutorial.
You can also use Webhooks by setting up a webhook callback using a URL pointing to your server or application that will receive notifications when the render completes. If you are building a scalable and robust application, then this will be the right and efficient method.
Trimmed video example
You can see the trimmed video below:
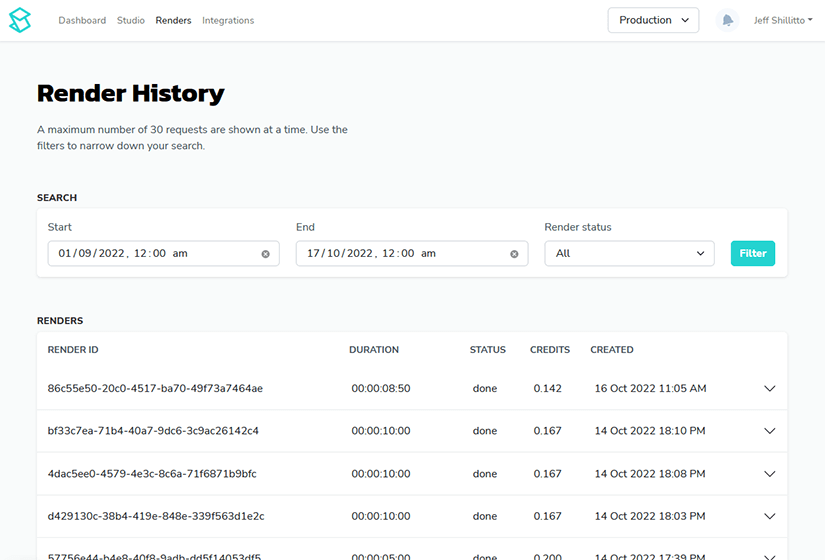
Access your rendered videos using the dashboard
You can view your rendered videos inside the Shotstack dashboard under Renders. Videos are deleted after 24 hours and need to be transferred to your own storage provider. All files are however copied to Shotstack hosting by default. You can configure other destinations including AWS S3 and Mux.
How to trim multiple videos from a list of videos using Python?
This should give you an idea of how easily you can trim videos using code. However, the best part of the programmatic approach is the scalability and automation. The Shotstack API lets you concurrently trim and edit hundreds of videos which normally isn’t possible using your personal computer.
To demonstrate scalability, let’s trim the following list of videos.
https://cdn.shotstack.io/au/v1/msgtwx8iw6/d724e03c-1c4f-4ffa-805a-a47aab70a28f.mp4
https://cdn.shotstack.io/au/v1/msgtwx8iw6/b03c7b50-07f3-4463-992b-f5241ea15c18.mp4
https://cdn.shotstack.io/au/stage/c9npc4w5c4/d2552fc9-f05a-4e89-9749-a87d9a1ae9aa.mp4
https://cdn.shotstack.io/au/v1/msgtwx8iw6/c900a02f-e008-4c37-969f-7c9578279100.mp4
The following Python script will trim all the videos to start from 3.0 to 9.0 seconds. To follow along, create a new Python file called trim-videos.py and paste the following script:
import shotstack_sdk as shotstack
import os
import sys

from shotstack_sdk.api import edit_api
from shotstack_sdk.model.clip import Clip
from shotstack_sdk.model.track import Track
from shotstack_sdk.model.timeline import Timeline
from shotstack_sdk.model.output import Output
from shotstack_sdk.model.edit import Edit
from shotstack_sdk.model.video_asset import VideoAsset

video_links = [
    'https://cdn.shotstack.io/au/v1/msgtwx8iw6/d724e03c-1c4f-4ffa-805a-a47aab70a28f.mp4',
    'https://cdn.shotstack.io/au/v1/msgtwx8iw6/b03c7b50-07f3-4463-992b-f5241ea15c18.mp4',
    'https://cdn.shotstack.io/au/stage/c9npc4w5c4/d2552fc9-f05a-4e89-9749-a87d9a1ae9aa.mp4',
    'https://cdn.shotstack.io/au/v1/msgtwx8iw6/c900a02f-e008-4c37-969f-7c9578279100.mp4'
]

if __name__ == "__main__":
    host = "https://api.shotstack.io/stage"

    configuration = shotstack.Configuration(host = host)

    configuration.api_key['DeveloperKey'] = os.getenv("SHOTSTACK_KEY")

    with shotstack.ApiClient(configuration) as api_client:
        for link in video_links:

            api_instance = edit_api.EditApi(api_client)

            video_asset = VideoAsset(
                src = link,
                trim = 3.0
            )

            video_clip = Clip(
                asset = video_asset,
                start = 0.0,
                length = 6.0
            )

            track = Track(clips=[video_clip])

            timeline = Timeline(
                background = "#000000",
                tracks = [track]
            )

            output = Output(
                format = "mp4",
                resolution  = "hd"
            )

            edit = Edit(
                timeline = timeline,
                output = output
            )

            try:
                api_response = api_instance.post_render(edit)

                message = api_response['response']['message']
                id = api_response['response']['id']

                print(f"{message}\n")
                print(f">> render id: {id}")
            except Exception as e:
                print(f"Unable to resolve API call: {e}")
Run the file using the following Python command in your command line:
python trim-videos.py
You may need to use python-3 depending on your configuration.
To check the render status of the videos, run the status.py file you created above in the command line:
python status.py {renderId}
Replace {renderId} with the IDs returned from the trim-videos.py script.
Conclusion
This tutorial should have given you a basic understanding of how you can programmatically trim and edit videos using the Shotstack Python SDK and the Shotstack video editing API. You could learn how to add other assets like text and images to build a simple media application. This is just an introductory tutorial to programmatically work with media but you can do so much more. You can use this for many use cases like:
- video automation
- video personalization
- develop media applications and more.
You can check out our other Python tutorials and YouTube videos to learn programmatic media and build video apps faster.
Get started with Shotstack's video editing API in two steps:
- Sign up for free to get your API key.
- Send an API request to create your video:
curl --request POST 'https://api.shotstack.io/v1/render' \
--header 'x-api-key: YOUR_API_KEY' \
--data-raw '{
  "timeline": {
    "tracks": [
      {
        "clips": [
          {
            "asset": {
              "type": "video",
              "src": "https://shotstack-assets.s3.amazonaws.com/footage/beach-overhead.mp4"
            },
            "start": 0,
            "length": "auto"
          }
        ]
      }
    ]
  },
  "output": {
    "format": "mp4",
    "size": {
      "width": 1280,
      "height": 720
    }
  }
}'


Experience Shotstack for yourself.
- Seamless integration
- Dependable high-volume scaling
- Blazing fast rendering
- Save thousands