Video personalization is the process of tailoring videos with personalized messaging for each viewer. Placeholders such as the viewer’s name and other detail are automatically replaced using a template and a personalization workflow. This creates a unique personalized experience that makes viewers feel special. It creates a memorable experience that improves brand loyalty.
A recent survey shows that over about 80% of customers are likely to purchase when they receive a personalized experience. With the rise of video automation and APIs, video personalization will only be adopted by more companies.
Examples of video personalization
Personalized video birthday cards for CRM integration
IKEA’s personalized interactive video website
Outdo you with Nike+ campaign
Source: Nike - Outdo you with Nike+ - Halfmarathon from Goodbye Kansas Studios on Vimeo.
How to generate personalized videos?
There are a couple of ways to generate personalized videos. One of them is of course to manually add user details for each video or hire an editor to do it for you. But we’re not going to be doing that. Instead, we’re going to leverage the power of video automation using no-code and low-code processes.
To generate personalized videos, we can divide the process into 3 steps:
- Fetching user data from the database
- Choosing the right video editing platform
- Creating an automated workflow using templates
1. Fetching user data
As personalized video use customer data like names, ages, product usage metrics, etc., it needs to connect with a data source that stores this user information and sends it to the video editor. Mostly it’s the CRM, but it can be social media, CSV, forms, SQL databases, Google Sheets, etc.
The first option to configure this automation is to develop a custom program. The program needs to fetch user data from the database. Here is how we automatically generated 1,000 birthday videos using Node.js and CSV.
The second option is to use a data integration platform like Make/Integromat or Zapier. Integration tools easily integrate with the most popular CRMs like HubSpot, Salesforce, etc. making it easier to create a custom workflow. Learn how to automatically create videos using Zapier and Shotstack.
2. Choosing the right video platform
Choosing the right video editing platform for automation is an essential step for a smooth workflow. With most desktop video editors, you can only edit one video at a time. There are limited solutions to creating an automated workflow to produce personalized videos.
Key criteria to look at when deciding the right platform to choose are:
- Personalization capabilities: If the platform allows merging asset fields such as text, audio, images, and videos. Depending on the parameters and how deeply you want to personalize, choosing a platform that is simple to create this workflow is important.
- Integration: If the platform can easily integrate with data ingestion tools like CRM, Zapier, and other databases. Similarly, what export integrations are available? Depending on where you want to send your rendered videos, how easy it is to integrate destinations should be considered as well. Some popular export destinations are CRMs to send automated emails, social media platforms like Instagram, YouTube, and Facebook, video platforms like Vimeo, Dailymotion etc.
- Rendering capacity: Video rendering is a resource-intensive process. As the goal of the automated video personalization workflow is to make customers feel special, you want to make sure the platform can handle concurrent rendering and is reliable.
There can be scenarios where multiple videos need to be rendered simultaneously, for example: when sending a 1-year anniversary celebration email to a customer. A company may have thousands of customers on the same day. Making sure the platform can handle all those requests is crucial.
Shotstack is a platform that is designed to perform in all the criteria listed above. Its combination of a video editing API and a browser-based video editor that makes it seamless to design video templates, integrate with databases, and build a reliable automated personalized video generation system. Due to its API-first approach, it makes it simple to integrate with any application.
3. Creating an automated workflow using templates
Once you have picked the platform, the next step is to create video templates you want to use. Designs will vary depending on the occasion and messaging you want to use.
Once you create a template, you can integrate it with your database using the methods listed in step 1. The workflow can be run on a schedule or based on triggers and sequences.
Create an automated personalized video generator using Shotstack and Make (Integromat)
This mini-tutorial will teach you to design a workflow that automatically generates personalized videos using Shotstack and Make. At the end of this tutorial, you will be able to generate personalized videos for your customers using Make (previously known as Integromat) and Google Sheets.
Sign up for a free Shotstack account to get started.
Designing your template
For this tutorial, we will use the following birthday card template to create personalized birthday videos for every customer.
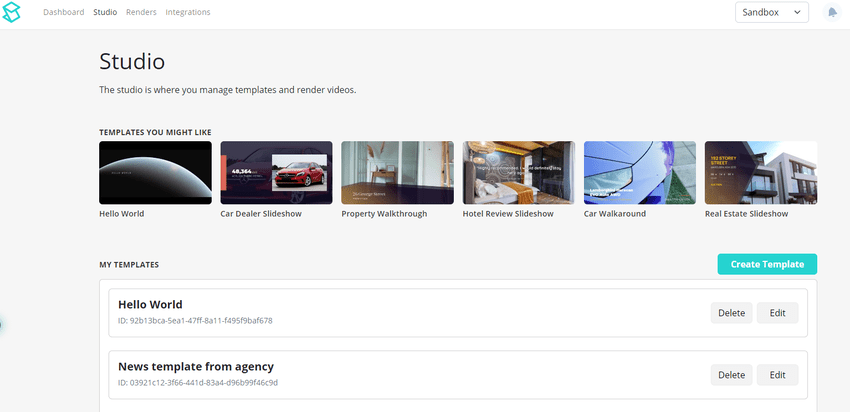
You can create your own template in Shotstack Studio or use this template. To use this template go to your Shotstack dashboard, then Studio, and click on the Create Template button.
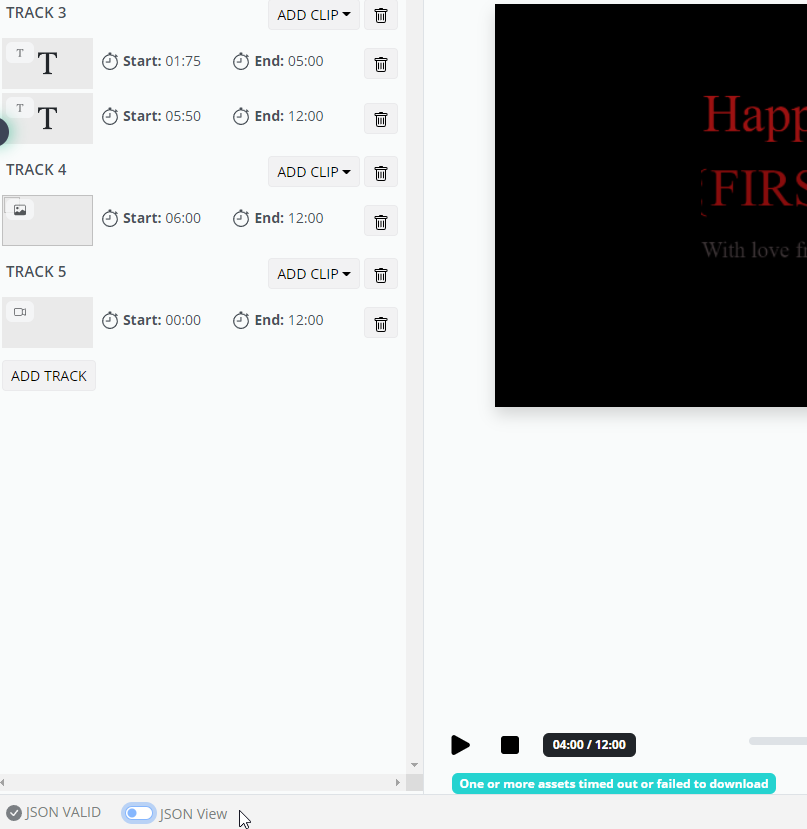
Once inside your template. Open the JSON view by clicking the toggle button on the left bottom corner.
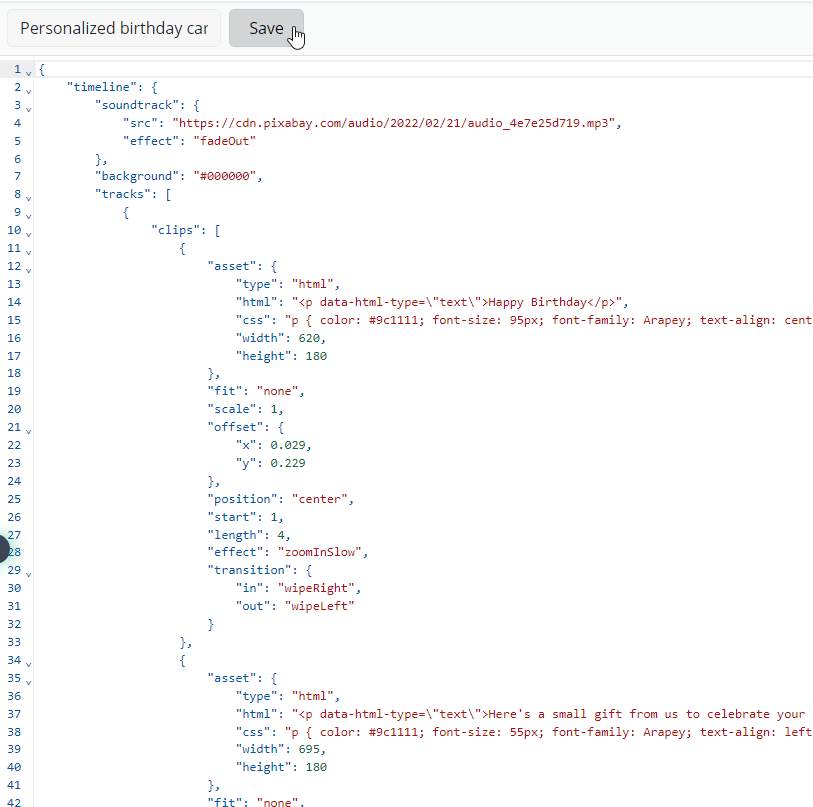
Copy the JSON video template below and paste it into JSON editor:
{
    "timeline": {
        "soundtrack": {
            "src": "https://cdn.pixabay.com/audio/2022/02/21/audio_4e7e25d719.mp3",
            "effect": "fadeOut"
        },
        "background": "#000000",
        "tracks": [
            {
                "clips": [
                    {
                        "asset": {
                            "type": "html",
                            "html": "<p data-html-type=\"text\">Happy Birthday</p>",
                            "css": "p { color: #9c1111; font-size: 95px; font-family: Arapey; text-align: center }",
                            "width": 620,
                            "height": 180
                        },
                        "fit": "none",
                        "scale": 1,
                        "offset": {
                            "x": 0.029,
                            "y": 0.229
                        },
                        "position": "center",
                        "start": 1,
                        "length": 4,
                        "effect": "zoomInSlow",
                        "transition": {
                            "in": "wipeRight",
                            "out": "wipeLeft"
                        }
                    },
                    {
                        "asset": {
                            "type": "html",
                            "html": "<p data-html-type=\"text\">Here's a small gift from us to celebrate your special day</p>",
                            "css": "p { color: #9c1111; font-size: 55px; font-family: Arapey; text-align: left }",
                            "width": 695,
                            "height": 180
                        },
                        "fit": "none",
                        "scale": 1,
                        "offset": {
                            "x": -0.096,
                            "y": 0.264
                        },
                        "position": "center",
                        "length": 7,
                        "start": 5,
                        "transition": {
                            "in": "slideRight",
                            "out": "slideLeft"
                        }
                    }
                ]
            },
            {
                "clips": [
                    {
                        "asset": {
                            "type": "html",
                            "html": "<p data-html-type=\"text\">{{FIRST_NAME}}</p>",
                            "css": "p { color: #880c0c; font-size: 95px; font-family: Arapey; text-align: center }",
                            "width": 620,
                            "height": 180
                        },
                        "fit": "none",
                        "scale": 1,
                        "offset": {
                            "x": 0.03,
                            "y": 0.044
                        },
                        "position": "center",
                        "start": 1.5,
                        "length": 3.5,
                        "effect": "zoomInSlow",
                        "transition": {
                            "in": "wipeRight",
                            "out": "wipeLeft"
                        }
                    },
                    {
                        "asset": {
                            "type": "html",
                            "html": "<p data-html-type=\"text\">50% OFF</p>",
                            "css": "p { color: #880c0c; font-size: 140px; font-family: Roboto Black; text-align: center }"
                        },
                        "start": 5.5,
                        "length": 6.5,
                        "fit": "none",
                        "scale": 1,
                        "offset": {
                            "x": -0.157,
                            "y": 0.028
                        },
                        "position": "center",
                        "transition": {
                            "in": "wipeRight",
                            "out": "wipeLeft"
                        }
                    }
                ]
            },
            {
                "clips": [
                    {
                        "asset": {
                            "type": "html",
                            "html": "<p data-html-type=\"text\">With love from  {{Your-Company}}</p>",
                            "css": "p { color: #3c3436; font-size: 40px; font-family: Arapey; text-align: center }",
                            "width": 620,
                            "height": 180
                        },
                        "fit": "none",
                        "scale": 1,
                        "offset": {
                            "x": 0.019,
                            "y": -0.11
                        },
                        "length": 3.25,
                        "transition": {
                            "in": "reveal",
                            "out": "reveal"
                        },
                        "position": "center",
                        "effect": "zoomInSlow",
                        "start": 1.75
                    },
                    {
                        "asset": {
                            "type": "html",
                            "html": "<p data-html-type=\"text\">on your next purchase. Use {{discount-code}} at checkout</p>",
                            "css": "p { color: #424242; font-size: 40px; font-family: Arapey; text-align: left }",
                            "width": 575,
                            "height": 180
                        },
                        "start": 5.5,
                        "fit": "none",
                        "scale": 1,
                        "offset": {
                            "x": -0.139,
                            "y": -0.141
                        },
                        "position": "center",
                        "length": 6.5,
                        "transition": {
                            "in": "wipeRight",
                            "out": "wipeLeft"
                        }
                    }
                ]
            },
            {
                "clips": [
                    {
                        "asset": {
                            "type": "image",
                            "src": "https://static.vecteezy.com/system/resources/previews/001/198/620/original/gift-png.png"
                        },
                        "start": 6,
                        "length": 6,
                        "offset": {
                            "x": 0.275,
                            "y": 0.016
                        },
                        "position": "center",
                        "scale": 0.354,
                        "fit": "crop",
                        "transition": {
                            "in": "slideLeft",
                            "out": "slideRight"
                        }
                    }
                ]
            },
            {
                "clips": [
                    {
                        "asset": {
                            "type": "video",
                            "src": "https://img.freepik.com/free-vector/minimalist-background-with-leaves_23-2148909131.jpg?w=1380&t=st=1662962859~exp=1662963459~hmac=da87b0769077be2be229176b9c80b4d34ea43ddb42a5f884061ba7f1a5ee00c7",
                            "trim": 0
                        },
                        "start": 0,
                        "transition": {
                            "out": "fade",
                            "in": "fade"
                        },
                        "length": 12,
                        "scale": 1.5,
                        "fit": "cover"
                    }
                ]
            }
        ]
    },
    "output": {
        "format": "mp4",
        "size": {
            "width": 1280,
            "height": 720
        },
        "fps": 23.976,
        "poster": {
            "capture": 3
        }
    },
    "merge": [
        {
            "find": "callback",
            "replace": "https://hook.us1.make.com/jppidnapkiehvz29sywpujin8sp567vk"
        }
    ]
}
Rename the template and save when done.
Setting up your Google Sheet
We will use Google Sheets to store and fetch customer details. This sheet includes seven columns: unique_customer_id, first_name, date_of_birth, day_and_month, company_name, coupon_code, and video_url.
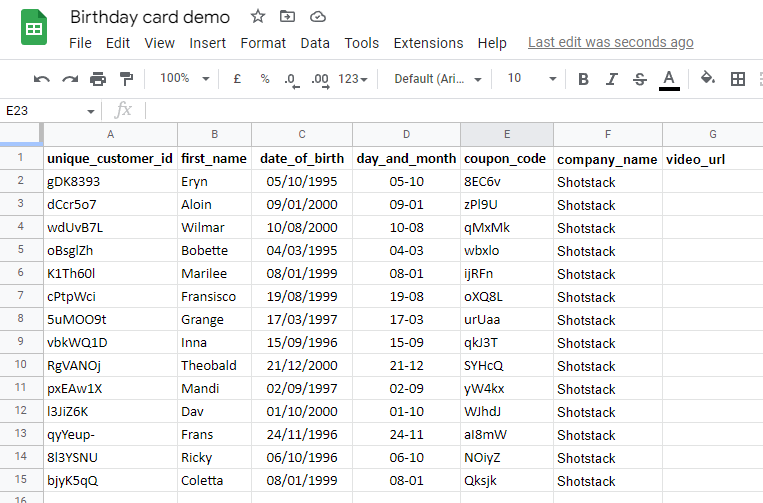
The values in the day_and_month column are reformated from the date_of_birth column. This makes it easier to filter users who have birthdays on that particular day. Duplicate this Google Sheet template to use it.
Setting up your Make connection
You will also need to add your Shotstack API key. You can get this by registering for a Shotstack account and logging into your dashboard.
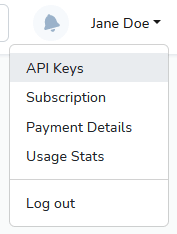
To get your API Keys, click your username in the top right corner of the dashboard and click API keys. Make sure to use your stage key for testing purposes as this key isn’t charged. Once you are happy with your workflow you can switch over to your production key.
Building a Make scenario
A Make scenario is a series of modules that indicate how data should be transferred and transformed between apps/services.
If you don’t want to build the scenario yourself, you can download this video personalization scenario and import it to your Make scenario editor. Learn how to import Make scenarios if you require assistance.
In summary, this Make scenario will:
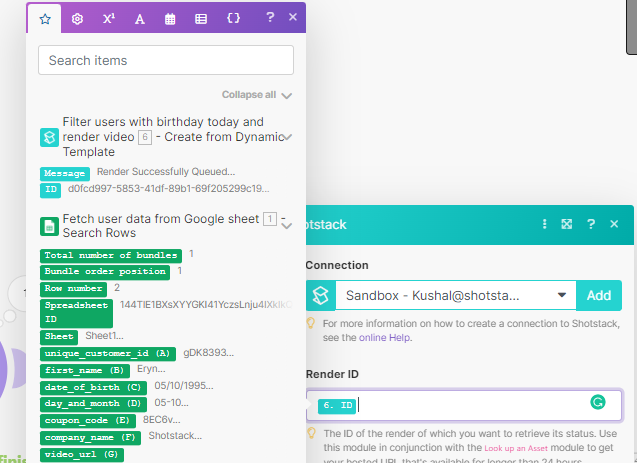
- Fetch user data from the Google Sheet and check if any user has a birthday that day. It uses the Google Sheet
Search_Rowsmodule. - Sends first_name, coupon_code, and company_name of the users who matches the birthday filter. It uses the Shotstack
Create_Video_from_Dynamic_Templatemodule and the birthday card template to render. - Waits for 25 seconds to finish the video using the Make
Sleepmodule. - Gets render status to retrieve rendered video URLs using the Shotstack
Get_Render_Statusmodule. - Adds the
private_video_URLin the video_url column using the Google SheetUpdate_a_Rowmodule.

Fetching user data and filtering birthdays
We need to add a filter that searches through the day_and_month column to filter birthdays. You can see how it has been setup up below.

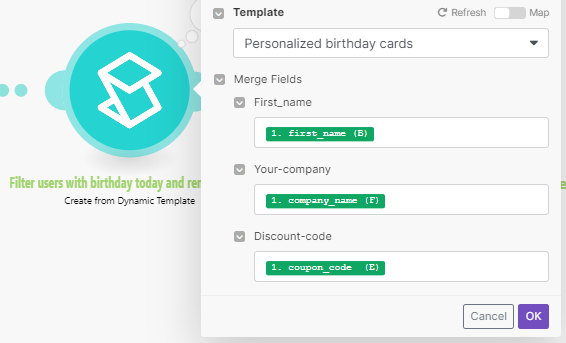
Sending render request to the Shotstack endpoint
As the personalized birthday card template uses 3 merge fields, we need to assign user values. You can see below we have used first_name, company_name, and coupon_code.
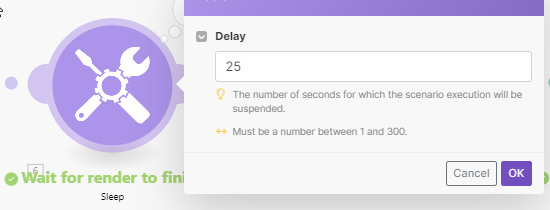
Waiting for renders to complete:
The Wait module waits 25 seconds for the render to finish so we can fetch data in the next step.
Retrieving rendered video URL:
We use the Shotstack Get Render Status module to retrieve the video URL.
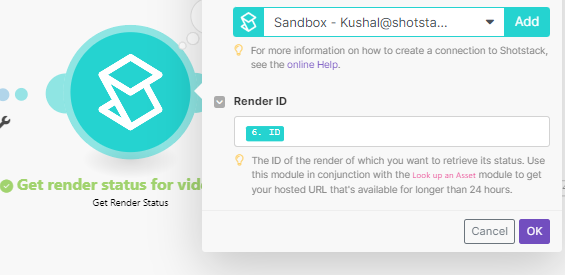
You will see the following options that can be added. Select the ID field.
Adding video URLs in the Google Sheet:
Lastly, we need to add the retrieved URL in the video_url column. See the Update Row module below.
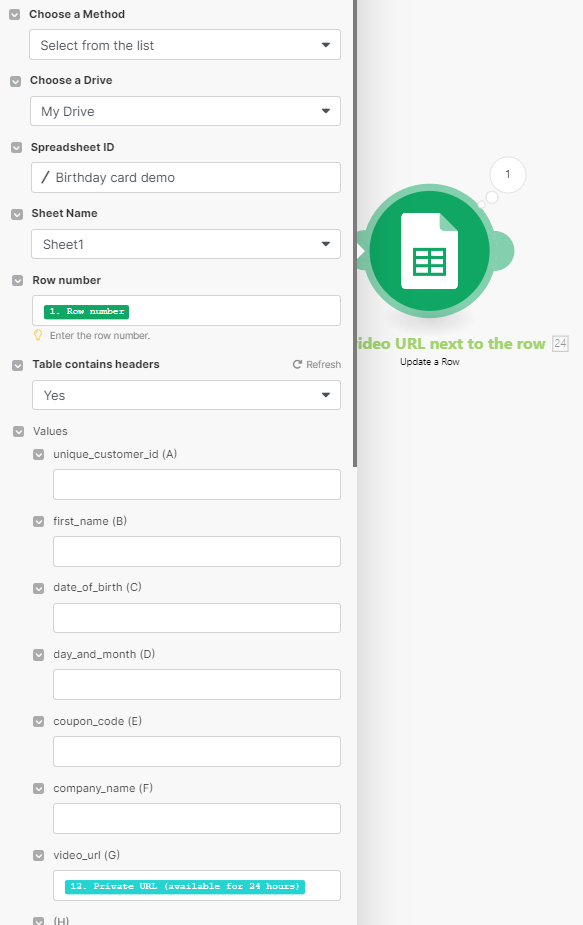
The Row number parameter is fetched from the Search Rows module. The Private URL is fetched from the Get render status module.
We will schedule this to run every morning at 8:00 am Sydney time. You can set up your own scheduling routine.
So there you have a fully automated personalized video generator using the Shotstack API. This is just one example but it can be used for many different use cases.
Final thoughts
This article highlights how powerful automated personalised video workflows can be. Competition for customers’ attention is more fierce than ever before. Companies that make customers feel special and nurture them will have loyal customers. Companies that don’t will lose.
By now, you should have an idea of how powerful your customer communication strategies can be when leveraging personalized videos. If you’re ready to start using personalized video marketing to make your customers feel special, then sign up for Shotstack for free. Check out our learning resources, YouTube videos, and an engaging community of builders to learn to leverage the power of programmatic video generation.
Get started with Shotstack's video editing API in two steps:
- Sign up for free to get your API key.
- Send an API request to create your video:
curl --request POST 'https://api.shotstack.io/v1/render' \
--header 'x-api-key: YOUR_API_KEY' \
--data-raw '{
  "timeline": {
    "tracks": [
      {
        "clips": [
          {
            "asset": {
              "type": "video",
              "src": "https://shotstack-assets.s3.amazonaws.com/footage/beach-overhead.mp4"
            },
            "start": 0,
            "length": "auto"
          }
        ]
      }
    ]
  },
  "output": {
    "format": "mp4",
    "size": {
      "width": 1280,
      "height": 720
    }
  }
}'


Experience Shotstack for yourself.
- Seamless integration
- Dependable high-volume scaling
- Blazing fast rendering
- Save thousands