Shotstack Workflows offers a simpler and more efficient solution to automating content creation and generating videos at scale in minutes. It allows any user to tap into the power of Shotstack’s APIs and advanced generative AI tools to create thousands of unique or personalised videos without having to write a line of code.
Thanks to Workflows, Shotstack users, regardless of their technical expertise, now have the freedom and ability to create and edit videos the way they want to.
Workflows terms and components
Before you dive into creating your Workflows, take some time to learn the essential terms that will help you get started.
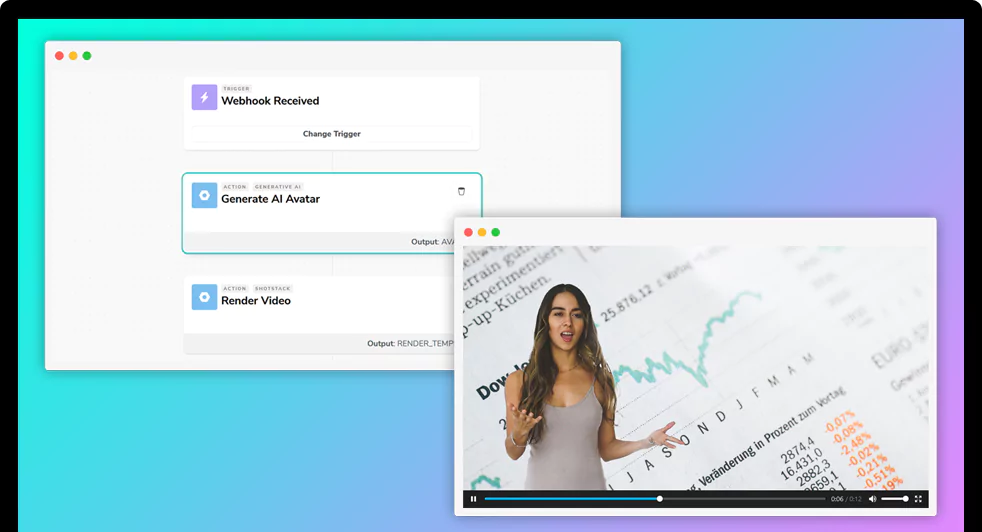
- Trigger: A trigger is the starting point of all workflows, which will set your automated sequence in motion. You can trigger by CSV, which will map data stored in your file with the merge fields in your dynamic template to bulk edit videos. You can also trigger by webhook, which allows you to create a workflow triggered by an event, such as when someone signs up for your newsletter.
- Actions: An action is a specific task or step you need to take to proceed with the rest of the workflow and arrive at your desired result. In Shotstack, Actions include generating voiceover audio files, creating videos from a dynamic template and sending files to a hosting service.
- Output: The output is your desired outcome or result, which would be your final file, like a video or audio file.
- Text-to-Speech: Uses the latest generative AI to convert text to audio. You can create hyper-realistic voiceovers in over 30 different languages for your videos.
- Dynamic template: A video template, designed using our online video editor with elements that can be customised using merge fields.
- Hosting: This is a service that allows you to serve your files online using Shotstack’s CDN video hosting service or a third party like AWS S3, Mux or Google Cloud Storage.
- CSV: CSV is one of the triggers in Shotstack Workflows. It’s a text file format that uses commas to separate values. It contains data that can be used to create different video variations based on a dynamic template.
- Webhook: A webhook is a way of sending or receiving data from an external service or application and is one of the triggers in Shotstack Workflows. A webhook can trigger video creation based on an event, such as a new customer sign-up or purchase.
Bulk video editing using Workflows and CSV
We have prepared a step-by-step guide on how to generate unique videos using data saved in a CSV below. But if you prefer to watch a video demo instead, here’s one for you:
If you’re a developer or have some technical knowledge, we have another tutorial showing you how to automate video creation using Webhook.
Prerequisites:
- A dynamic video template designed and saved using the Shotstack Studio
- A CSV file with data that can be mapped to the merge fields in your dynamic template. Your columns will be your different data sets, such as name, location, video files and voiceover script. Each row is one video. We will be using this CSV for our tutorial:

Step 1: Create your workflow and upload your CSV
From the dashboard, click on Workflows on the main header. Select Create Workflow, give it a name and hit save.
Click on Select Trigger, choose CSV Upload and select your file with all your data. You’ll know that the CSV has been uploaded when the header columns on your CSV appear under Workflow Data. And then, you’re ready to proceed to the next step.

Optional Step: Generate voiceovers
Click the plus sign to add an Action. Choose Generate Text-to-Speech. This option lets you generate your voiceover using Shotstack’s Create API. Select your preferred language, voice and data from your CSV that holds the texts that need to be converted to lifelike speech audio. In this example, it’s the Testimonial. Once you’re done, you can proceed to the next step.
To learn more about the different languages and voices available, check out the options here. If you have an ElevenLabs subscription, you can use our ElevenLabs integration to generate your text-to-speech. You can set up your account in Integrations.
You can use the output from this Action in the next steps, so if you know you need a voiceover in your videos, you need to generate text-to-speech first before you can proceed to build your video.

Step 2: Build your video and map your data
Click the plus sign again to add another Action. This time, click on Build Shotstack video and select a dynamic template saved on Shotstack Studio.
Map the merge fields on your dynamic template to your available data. You can also select data from your CSV or use the output from the previous action.
In this example, we will map the column headers Name, Video and Testimonial from the CSV to the merge fields in the dynamic template. We will also map the text-to-speech file generated in the previous action to the Voiceover merge field in the template.
Once you’ve finished mapping data, you can proceed to the next step. Just like with text-to-speech, you can use the output from this action in the next steps.

Step 3: Choose your preferred hosting service
Click the plus sign to add another Action. Click on Host on Shotstack and choose the Task Output you want to save.
In this example, we chose to save the output from the Build Video action. If you want to save the voiceover audio files, you can add another Action, click on Host on Shotstack and choose the output from the Generate Text to Speech action.

Note: Shotstack’s hosting service is included in your subscription, so you don’t have anything to do to set it up. We have integrations with AWS S3 and Google Cloud Storage if you prefer to use your own hosting service. If you haven’t configured this yet, head to Integrations to set it up.
Step 4: Test your workflow
Hit Save. Then hit Run Once to see a test video. The workflow will choose the first column on your CSV to generate a test video. This will allow you to make any necessary changes before generating all your videos on your CSV.
Once you hit Confirm and Run on the test video, you will land on the Workflows Details page, which is where you will see all the videos you have rendered using the workflow.
If you’re running the workflow for the first time, you may land on a blank page the first time. Don’t worry, just hit the Refresh button when this happens.
Once it’s ready, a Workflow Job will appear. One job is equal to one video. Your Workflow Job will display a Job ID, the time when it’s been generated and the Job Status. We have the following statuses on Workflows.
- Queued: The video is waiting to be processed
- Processing: The video is currently being generated
- Done: The video has been successfully generated without any errors
- Failed: The video has encountered an error during processing
You can click on the Workflow Job to see more details including summary of each task performed with the relevant inputs, preview of the output and link to the final output file. If your job failed, you will also see the errors in this section.
Note: Any link to files you didn’t save to a hosting service will only be available for viewing in the next 24 hours from when it was created.

Step 5: Generate videos
Once you’re happy with the test video. You can select the Upload CSV and Run button to re-upload your CSV and generate all your videos.

And you’re done! You can generate a new set of videos on the Workflows Status page by clicking the Upload and Run Workflow button and uploading a new CSV. The new videos rendered will be added to the top of the page. This means you can build a workflow once and run it as many times as you want.
There are no limits to Workflows. You can add as many actions as you want. There’s also no defined sequence of actions or steps to take. You can build a video, generate text-to-speech, build a video again and generate text-to-speech again.
Keen to get started? Workflows is available to all Shotstack users for a limited time only. You can experience the full benefits and functionality of Workflows, no matter your subscription type, until 31 October 2023. Don’t forget to check out our help articles on the dashboard if you have questions or get stuck.
Not using Shotstack yet? Sign up for free today to give Workflows a try.
Get started with Shotstack's video editing API in two steps:
- Sign up for free to get your API key.
- Send an API request to create your video:
curl --request POST 'https://api.shotstack.io/v1/render' \
--header 'x-api-key: YOUR_API_KEY' \
--data-raw '{
  "timeline": {
    "tracks": [
      {
        "clips": [
          {
            "asset": {
              "type": "video",
              "src": "https://shotstack-assets.s3.amazonaws.com/footage/beach-overhead.mp4"
            },
            "start": 0,
            "length": "auto"
          }
        ]
      }
    ]
  },
  "output": {
    "format": "mp4",
    "size": {
      "width": 1280,
      "height": 720
    }
  }
}'


Experience Shotstack for yourself.
- Seamless integration
- Dependable high-volume scaling
- Blazing fast rendering
- Save thousands