Looking to create engaging videos without spending too much time or resources? Maybe you want to send personalised videos to your customers or produce a large number of videos with different content to highlight various products or services. This is where dynamic videos come in.
Dynamic videos have elements that can change based on the input data. For example, you can create a video template for a product promotion, and change the product name, image and price based on the data you provide. This way, you can create multiple versions of the same video with different content, without having to edit each one manually.
Creating dynamic videos
The key to creating dynamic videos is picking a video editing tool with an intuitive user interface and functionality that allows you to create video templates with merge fields and automate video generation.
For example, Shotstack, a video editing API, lets users generate videos at scale. This means being able to create thousands of different videos from a single video template in minutes, not days.
Shotstack is used and loved by both developers and no-code users. Technical customers are able to create personalised videos using code and with the help of our robust and reliable APIs.
Meanwhile, no-code users can create or customise video templates using the Shotstack Studio, a web-based video editor that looks and feels familiar to anyone who has previously used a video editing tool, and automate their video editing workflow through the integration of no-code tools such as Zapier and Make.
Building videos at scale
We’ll take you through a step-by-step guide on creating a dynamic video template using Shotstack Studio, our web-based video editor, and using your template to build personalised and multi-version videos.
If you prefer to use code, head over to our documentation or explore our get started articles. Make sure you’ve also signed up for your FREE Shotstack account before following the steps below.
Designing your video template
- Create a template
- To create a new template, go to Studio and click on Create Template. Then, choose the output you want. Name it and click save. You can click on advanced settings to modify resolution, frame rate, file type and other parameters.
- To use one of our pre-built templates, go to the dashboard and scroll down to our collection of templates, which you can filter based on industry. Once you’ve chosen one, click it, and the template will open in the Studio.
- Add tracks, clips and assets
- Click Add Track to be able to import your assets. A track runs for the entire duration of the timeline, and you can add multiple tracks on top of each other to create complex compositions.
- A clip is a placeholder for an asset. To add your clips, click on the icons below the track number. You can add images, videos, texts, audio clips, luma masks, and animation files.
- Once you have added your clips, you can add your assets by uploading the files. For images and videos, you also have the option to fetch files from a public URL.
- Edit your assets
- You can trim your assets by specifying the start point and the length. For example, if you want to cut the beginning of your video file, start at the 10-second mark and trim the length to 20 seconds, you can put 10 in the start point and 20 in the length parameters.
- You can also edit the scale and opacity of an asset by clicking on it and updating the settings section.
- Edit the position of your asset by updating the vertical and horizontal offset settings. You can also drag the assets around the frame to adjust positioning.
- Add transitions, animations and filters
- To apply them, click on an asset and select from our pre-set animations, transitions and filters on the settings in the top right-hand corner.
- Add merge fields
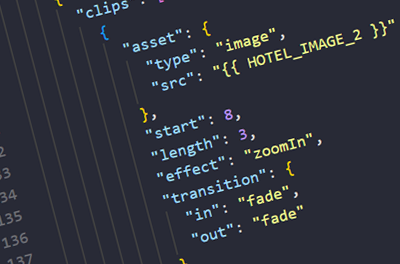
- Click the merge field button at the top to add a merge field. Enter key and value. The key refers to the property you want to personalise, and the value is a test value for the key. For example, if you want the users’ names to appear on the video, you can add a key called “customer_name,” and a value could be a real customer’s name, such as “Michelle.” Meanwhile, suppose you want to add a video or image file merge field. In that case, you must paste a publicly accessible URL where an example video or image is hosted onto the value parameter.
- You can add as many merge fields as you want. This doesn’t have to be limited to text. You can have merge fields for images, texts, videos, audio clips, and animations.
- To add the merge fields to the video template, simply select the asset you want to personalise. Once clicked, you will see the curly bracket icon {} next to the file. Click on that and select the merge field you want from your list.
- Preview your video template
- You can preview part of the entire video to see how your edits look and sound in real time through the preview screen in the Studio video editor. Simply hit play to preview.
- You can also drag the red slider along the timeline to preview certain parts of the video.
- To return to the template’s beginning, hit the stop button.
- Render your video template
- Once you’re happy with the video, click the Render button in the top right-hand corner. The render time varies depending on how big the files are, how long the video is, and the transitions and animations used.
- Once done, you can access your rendered video template by clicking the video icon next to the Render button. This will display all the video versions you have generated, with the latest video at the top.
Integrate your data source
Now that you have your newly designed video template, it’s time to match the merge fields with your data to generate personalised videos or different video versions automatically.
You can connect to any data source. Common examples include your CRM, CSV files or spreadsheets.
For example, if you want to automate the creation of videos from your real estate listings, you may need a spreadsheet that contains data that matches the merge fields of your video templates. These could be addresses, number of bedrooms, bathrooms and parking spaces, photos of the different amenities and descriptions.
Here’s an example spreadsheet.
Developers can use their favourite programming language to generate hundreds or thousands of videos. We have SDKs available for Node.js, PHP, Ruby and Python.
As for no-code users, you can connect your data source to Shotstack using no-code tools. We have pre-built templates on Zapier and Make that can get you started quickly. For example, you can use these workflow templates to automatically generate videos from data records on Airtable or responses on Google Forms.
Render and deliver your videos to your audience
Render the different video variations, share them on your dynamic landing page or app or send them directly to your audience via email.
When using Shotstack, all videos rendered using the API are automatically transferred to Shotstack’s own hosting service so you can serve your files directly to users without manually setting up a hosting service or copying files. But you also have the option to use your own hosting service, store them on AWS S3 or Google Cloud Storage or stream directly via Mux.
You can also use Make or Zapier to send your rendered videos directly to your email marketing provider, preferred social media channel or website.
And you’re done! Keen to build more videos? Why not convert your text to video or build Spotify Wrapped style videos or create personalised customer videos. There’s so much you can do with Shotstack so dig into your creative side.
Get started with Shotstack's video editing API in two steps:
- Sign up for free to get your API key.
- Send an API request to create your video:
curl --request POST 'https://api.shotstack.io/v1/render' \
--header 'x-api-key: YOUR_API_KEY' \
--data-raw '{
  "timeline": {
    "tracks": [
      {
        "clips": [
          {
            "asset": {
              "type": "video",
              "src": "https://shotstack-assets.s3.amazonaws.com/footage/beach-overhead.mp4"
            },
            "start": 0,
            "length": "auto"
          }
        ]
      }
    ]
  },
  "output": {
    "format": "mp4",
    "size": {
      "width": 1280,
      "height": 720
    }
  }
}'


Experience Shotstack for yourself.
- Seamless integration
- Dependable high-volume scaling
- Blazing fast rendering
- Save thousands