A common technique in video editing is creating a transparency animation between two clips. To create this effect with Shotstack, we use a luma matte.
A luma matte is a grey scale image or video clip. When applied to another image or video clip the white areas become transparent. Using this technique you can create transition effects like this:
But how do you create the luma matte animation to begin with? The easiest way is to use motion graphics animation software. One of the most popular tools in Adobe After Effects.
In this tutorial we will show you how to use After Effects to create a simple black and white animation. We’ll then show how to use the animation to create a luma matte transition.
Start a new project
If you don’t already own a copy of After Effects, you can sign up for a free trial at Adobe. Otherwise open the software and create a new project and composition.
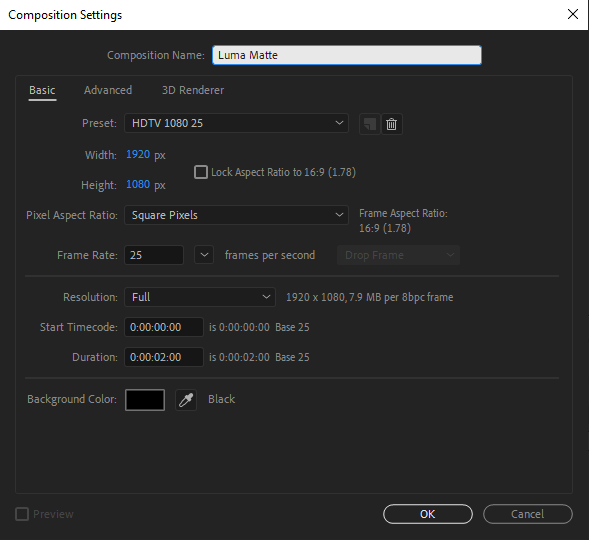
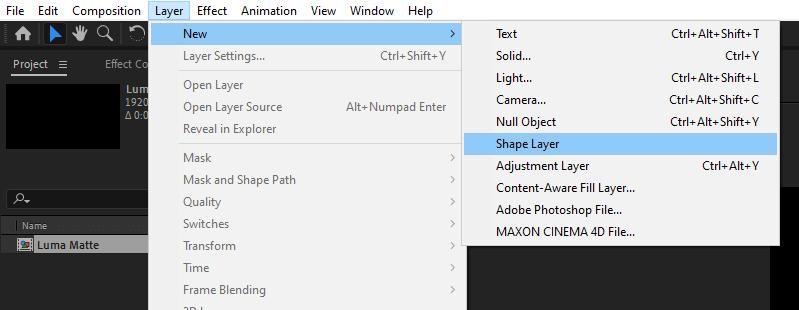
Click on File > New > New Project, then click the New Composition panel to launch the New Composition settings window.
Give the composition a name, like Luma Matte and click OK, set the duration to 0:00:02:00 (2 seconds) and leave the other settings as shown below:
Create and animate a shape
Once the new composition is set up, in the main navigation bar, click on Layer > New > Shape Layer to create an empty layer. We will draw a shape on this layer that can be animated.
Select the pen tool and and draw a shape similar to below - a rectangle with an arrow on the right hand side.
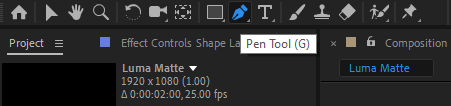
The color picker should be set with a white fill. Don’t worry about the shape extending past the edges of the viewport.
![]()
Next, expand the Shape Layer until you can see Position under Transform. Move the play head to 1 second, the end of our animation. Click on the stop watch icon to insert a keyframe at 1 second:
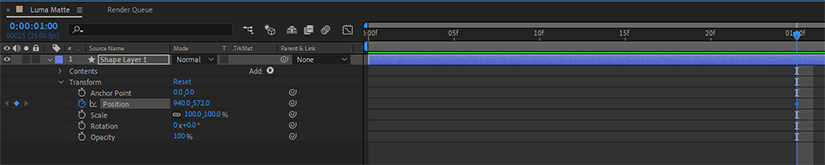
Then move the play head to second 0, the start of the animation. Click on the keyframe icon on the left of the Position parameter to insert a keyframe. Now adjust the position on the X axis to around -1600 so that the shape is moved out of the viewport to the left.

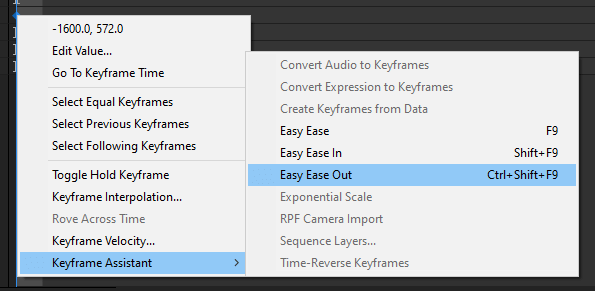
To give the animation a more natural motion we will add easing. Right click on the first keyframe at second 0 and in the menu click Keyframe Assistant > Easy Ease Out.
Our animation is now complete. Press the space bar to preview the animation. The white arrow shape should move across the screen from left to right. When used as a luma matte the white area will create a transparency effect.
It is important to add an extra half to one second to the end of the animation. This will allow for dropped frames and working with different frame rates. Without the extra second, the luma matte, when applied, will appear to freeze at the end.
Export the animation to a video file
To use the animation as a luma matte we first need to export it as a video file, we recommend exporting as an mp4 file due to it’s much higher compression. You can export as an mp4 file using Adobe Media Encoder but in this example we will use After Effects built in render queue and convert the file afterwards using FFmpeg.
From the main menu, click on File > Export > Add to Render Queue:
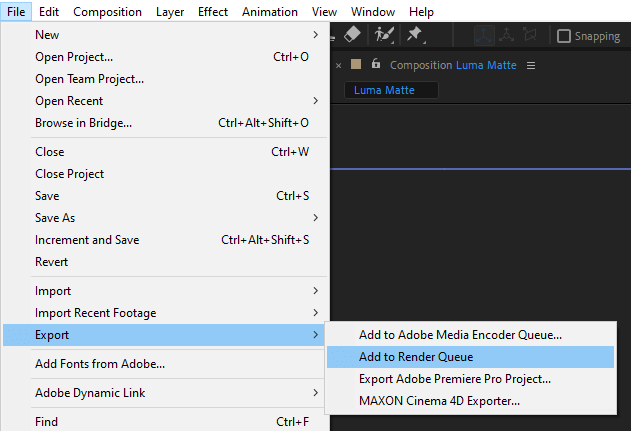
In the render queue listing, click on the Output Module (Lossless by default) and choose QuickTime as the Format. Leave the other settings as they are.
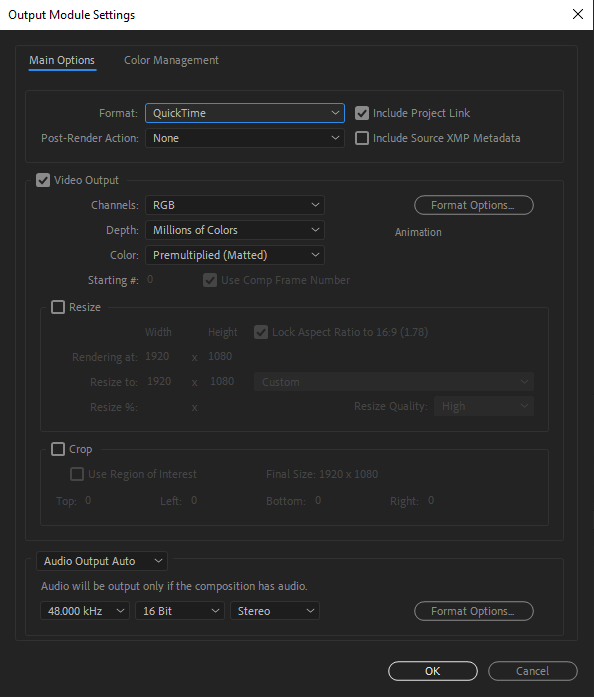
Under Output To, you can rename the file and choose where to save it to. We rename the file to single-arrow-right.mov.
Then click Render in the top right corner of the render queue panel and the animation should render in a few seconds.
You should now have a video file with the animation saved to disk. You can open the file and play it in your favorite media player.
Compressing the file
We rendered the video as a QuickTime mov file. We recommend creating luma mattes as mp4 files. You will end up with a much smaller file size with no noticeable loss in quality.
You can use Adobe Media Encoder, Handbrake or an FFmpeg command to transcode the file to an mp4.
The FFmpeg command to convert the file is:
ffmpeg -i single-arrow-right.mov -c:v libx264 -vf format=yuv420p -movflags +faststart single-arrow-right.mp4
The output mp4 file is now 18kb instead of 4.37Mb.
Applying the luma matte transition effect to an edit
Finally, we want to use the luma matte in a Shotstack video edit to create a transition between two video clips.
The first thing you need to do is upload the luma matte video to a publicly accessible storage location. We use AWS S3 and have gone ahead and uploaded the file here:
https://shotstack-assets.s3.ap-southeast-2.amazonaws.com/luma-mattes/single-arrow-right.mp4
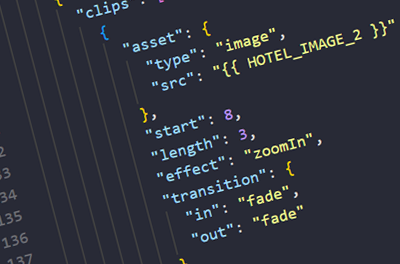
The JSON below, applies the luma matte to the end of our first video clip. The first video clip overlaps our second video clip by one second. When the luma matte plays, it creates a transparency effect.
{
    "timeline": {
        "soundtrack": {
            "src": "https://shotstack-assets.s3-ap-southeast-2.amazonaws.com/music/unminus/palmtrees.mp3",
            "effect": "fadeOut"
        },
        "background": "#000000",
        "tracks": [
            {
                "clips": [
                	{
                        "asset": {
                            "type": "luma",
                            "src": "https://shotstack-assets.s3.ap-southeast-2.amazonaws.com/luma-mattes/single-arrow-right.mp4"
                        },
                        "start": 3,
                        "length": 2
                    },
                    {
                        "asset": {
                            "type": "video",
                            "src": "https://shotstack-assets.s3-ap-southeast-2.amazonaws.com/footage/table-mountain.mp4"
                        },
                        "start": 0,
                        "length": 4,
                        "transition": {
                            "in": "fade"
                        }
                    }
                ]
            },
            {
                "clips": [
                    {
                        "asset": {
                            "type": "video",
                            "src": "https://shotstack-assets.s3-ap-southeast-2.amazonaws.com/footage/road.mp4"
                        },
                        "start": 3,
                        "length": 4
                    }
                ]
            }
        ]
    },
    "output": {
        "format": "mp4",
        "resolution": "sd"
    }
}
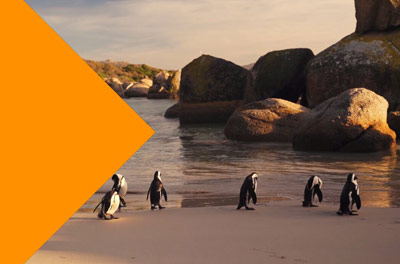
Here is the resulting video with our arrow shaped luma matte revealing the second video clip:
Next steps
In this guide we showed you how to animate a simple shape. After Effects is a sophisticated motion graphics editor that can create advanced animations. By combining black, white and grey elements in to your animations, you can create more elaborate transitions.
In the video below we took the arrow animation a step further by adding an additional grey arrow and created it in four different directions:
You can check out the JSON details here in our public Postman Collection.
Get started with Shotstack's video editing API in two steps:
- Sign up for free to get your API key.
- Send an API request to create your video:
curl --request POST 'https://api.shotstack.io/v1/render' \
--header 'x-api-key: YOUR_API_KEY' \
--data-raw '{
  "timeline": {
    "tracks": [
      {
        "clips": [
          {
            "asset": {
              "type": "video",
              "src": "https://shotstack-assets.s3.amazonaws.com/footage/beach-overhead.mp4"
            },
            "start": 0,
            "length": "auto"
          }
        ]
      }
    ]
  },
  "output": {
    "format": "mp4",
    "size": {
      "width": 1280,
      "height": 720
    }
  }
}'


Experience Shotstack for yourself.
- Seamless integration
- Dependable high-volume scaling
- Blazing fast rendering
- Save thousands