If you want to add style to your transitions you can use an overlay animation. An overlay animation uses graphics and transparency to create transitions like below:
The trick to the transition is to have at least one frame in the animation that covers the entire viewport. While the animation covers the viewport, cut from the current clip to the next. When the transition continues playing, it reveals the next clip.
The transition graphic in this example used After Effects to create the animation. In this tutorial, we’ll learn how to create a simple transition animation in After Effects. Then we will use the animation as a transition in a Shotstack edit.
Start a new project
You will need a copy of After Effects. If you don’t already own it, you can sign up for a free trial at Adobe. Once installed, open the software and create a new project and composition.
To start a new project click File > New > New Project. Click the New Composition panel to launch the New Composition settings window.
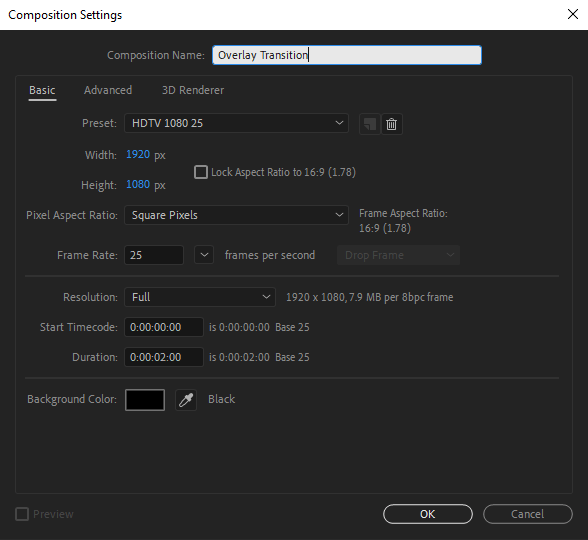
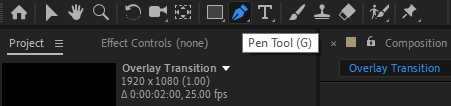
In the Composition Name field, enter a name; Overlay Transition and click OK. Set the duration to 0:00:02:00 (2 seconds) and leave the other settings as shown below:
Create and animate the overlay
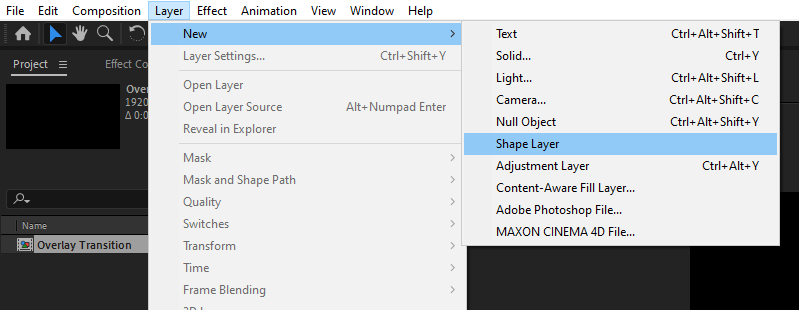
With the composition set up, we want to create an empty layer to draw a shape. Click on Layer > New > Shape Layer in the main navigation to create an empty layer.
Below the main navigation select the pen tool and and draw a shape that covers the entire viewport.
In this example we create an orange chevron arrow shape. The color picker should be set with an orange fill (or colour of your choice). The shape can extend past the edges of the viewport, it is important that the entire viewport is covered.
![]()
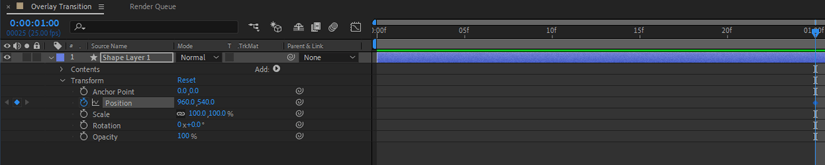
Now, expand the Shape Layer until you can see Position under Transform. Move the play head to 1 second (01:00f), the end of our animation. Click on the stop watch icon to insert a keyframe at the play head. Set the position for the X axis to 3480 so that it is moved off the right side of the viewport. You can also drag the shape so long as it ends outside the viewport, on the right.
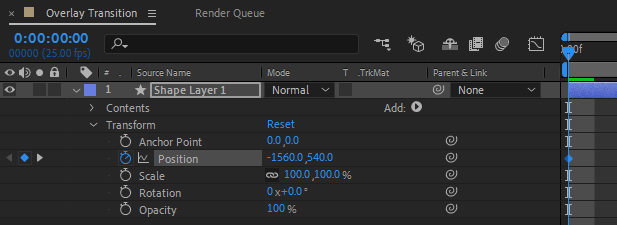
Next, move the play head to second 0, the start of the animation. Click on the keyframe icon on the left of the Position parameter to insert a keyframe. Now adjust the position on the X axis to around -1560 so that the shape is moved out of the viewport to the left.
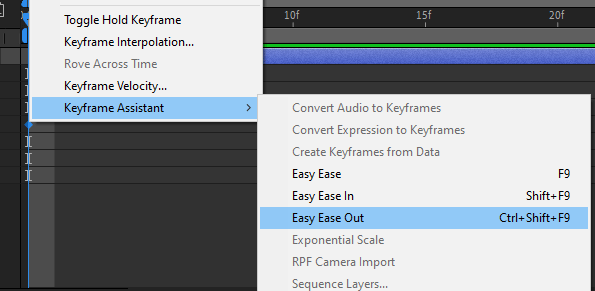
To give the animation a more natural motion we will add easing. Right click on the first keyframe at second 0 and in the menu click Keyframe Assistant > Easy Ease Out.
Our animation is now complete. Press the space bar to preview the animation. The orange arrow shape should move in to the viewport from the left and fill the viewport. After a fraction of a second (1 frame), it moves out of view to the right.
It is important to add an extra half to one second to the end of the animation. This will allow for dropped frames and working with different frame rates. Without the extra second, the animation might freeze half way through playing.
Export the animation with transparency
To use the animation as an overlay we need to export it as a QuickTime mov file using the Animation codec. We need to make sure that the background of the video is transparent. We can not use an mp4 or AVI file as these do not support transparency.
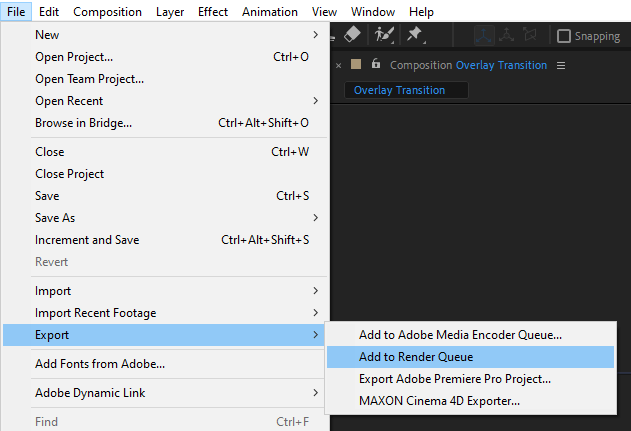
From the main menu, click on File > Export > Add to Render Queue:
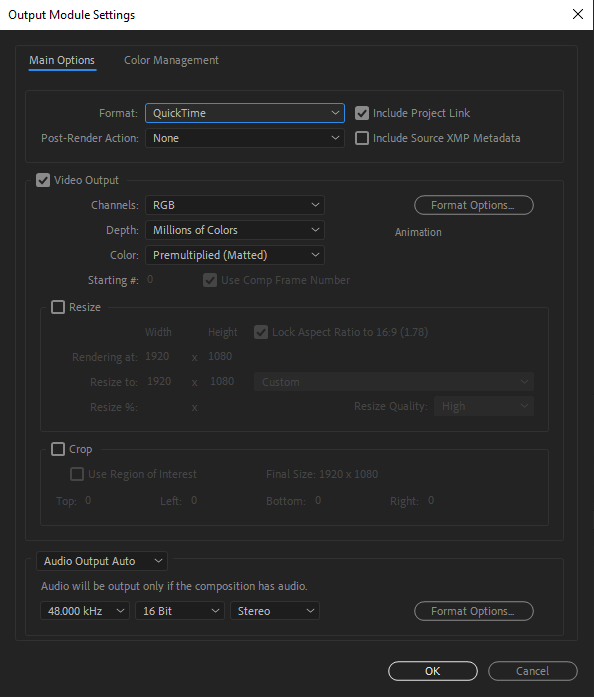
In the render queue listing, click on the Output Module (Lossless by default) and choose QuickTime as the Format.
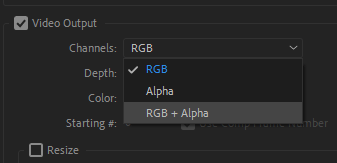
To ensure the output has a transparent background, under Video Output > Channels, select RGB + Alpha.
Back in the main render queue window, Under Output To, rename the file and choose where to save it. We rename the file to arrow-overlay-orange.mov.
Then click Render in the top right corner of the render queue panel. The animation should render in a few seconds.
You should now have a video file with the animation saved to disk. You can open the file and play it in a media player like QuickTime Player or VLC. Note that some players might not support mov files.
Create the transition from the overlay animation
To create the transition effect we need to layer the mov file animation over two clips. The overlay needs to play from the correct point on the timeline.
First, you need to do is upload the transition video to a public storage location. For convenience the file has been uploaded to our S3 account:
https://shotstack-assets.s3.ap-southeast-2.amazonaws.com/overlays/arrow-overlay-orange.mov
To work out when to start the overlay animation, we need to know when the animation covers the whole viewport. If we look in After Effects we can see the animation fills the screen at frame 13 (13f).

At 25 frames per second, the viewport is covered at 0.52 seconds (0.04 seconds per frame x 13 frames). The transition needs to start 0.52 seconds before the second clips starts.
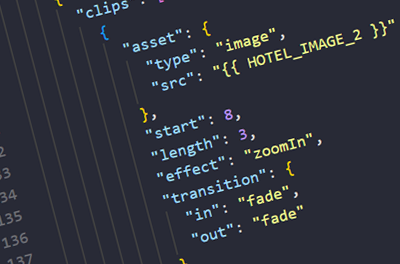
The JSON below will play two clips, the first clip ends at second 5 and the next clip starts at second 5. The transition is added to a track, above both clips, starting at 4.48 seconds (5s - 0.52s). The viewport will be covered by the transition at second 5, when the second clips starts.
{
    "timeline": {
        "soundtrack": {
            "src": "https://shotstack-assets.s3-ap-southeast-2.amazonaws.com/music/unminus/lit.mp3",
            "effect": "fadeOut"
        },
        "background": "#000000",
        "tracks": [
            {
                "clips": [
                    {
                        "asset": {
                            "type": "video",
                            "src": "https://shotstack-assets.s3.ap-southeast-2.amazonaws.com/overlays/arrow-overlay-orange.mov"
                        },
                        "start": 4.48,
                        "length": 2
                    }
                ]
            },
            {
                "clips": [
                	{
                        "asset": {
                            "type": "video",
                            "src": "https://shotstack-assets.s3.ap-southeast-2.amazonaws.com/footage/penguins-1.mp4"
                        },
                        "start": 0,
                        "length": 5,
                        "transition": {
                            "in": "fade"
                        }
                    },
                    {
                        "asset": {
                            "type": "video",
                            "src": "https://shotstack-assets.s3.ap-southeast-2.amazonaws.com/footage/penguins-2.mp4"
                        },
                        "start": 5,
                        "length": 5,
                        "transition": {
                            "out": "fade"
                        }
                    }
                ]
            }
        ]
    },
    "output": {
        "format": "mp4",
        "resolution": "hd"
    }
}
The output below shows the final transition effect. The orange arrow covers the viewport as the second clip starts:
Next steps
As well as transitions, After Effects can be used to create all sorts of overlay animations. These can include lower thirds and animated backgrounds for text. You can also create animated stickers, emojis or badges and animated watermarks.
This tutorial provided a very simple example using a single layer. After Effects can be used to create intricate animations to bring your videos to life.
Get started with Shotstack's video editing API in two steps:
- Sign up for free to get your API key.
- Send an API request to create your video:
curl --request POST 'https://api.shotstack.io/v1/render' \
--header 'x-api-key: YOUR_API_KEY' \
--data-raw '{
  "timeline": {
    "tracks": [
      {
        "clips": [
          {
            "asset": {
              "type": "video",
              "src": "https://shotstack-assets.s3.amazonaws.com/footage/beach-overhead.mp4"
            },
            "start": 0,
            "length": "auto"
          }
        ]
      }
    ]
  },
  "output": {
    "format": "mp4",
    "size": {
      "width": 1280,
      "height": 720
    }
  }
}'


Experience Shotstack for yourself.
- Seamless integration
- Dependable high-volume scaling
- Blazing fast rendering
- Save thousands