In this tutorial we will explain what a luma matte is, what the Shotstack Luma asset type is, and how to make transition videos using it.
This tutorial assumes you have signed up to the Shotstack API and are familiar with POSTing JSON to the API. If you are not familiar wth how to create a simple video please take a look at our Hello World tutorial first.
What is a luma matte?
In video editing, a matte is used to apply transparency to areas of a video clip or image. Mattes can be a still image or an animated video.
There are two types of mattes; alpha and luma mattes. Shotstack only supports luma mattes so we will focus on how they work.
Luma is short for luminance, and in the context of a luma matte, means that the brightest areas of an image or frame will apply 100% transparency and the darkest areas will be opaque, or not transparent.
Luma mattes are created from grey-scale images or animations where white is fully transparent, black is opaque, and everything in between is a varying degree of transparency.
The video below is an example of a luma matte, it is an mp4 video file with a black and white animation.
how to make transition videos using luma mattes
By applying a luma matte to a video you can reveal another video clip underneath it and create interesting transitions and effects.
Shotstack ships with a luma matte asset type that lets you assign a matte to any clip in the same track.
To better understand this concept it helps to visualise how this would look on a timeline.
Applying a luma matte to a clip
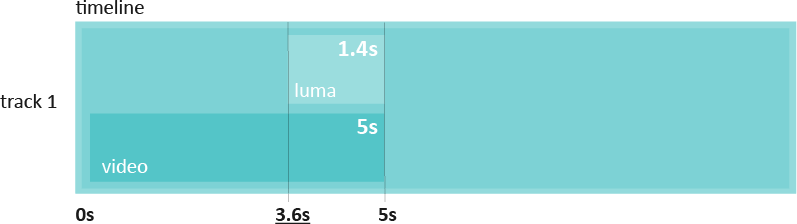
The diagram below shows a a timeline and a track containing a video clip with a luma matte at the end.
The video clip will be cut to 5 seconds in length and the luma matte video animation is 1.4 seconds exactly. The luma matte needs to start playing at 3.6 seconds (5s - 1.4s).
The JSON for this would look like the following:
{
    "timeline": {
        "tracks": [
            {
                "clips": [
                	{
                        "asset": {
                            "type": "luma",
                            "src": "https://shotstack-assets.s3-ap-southeast-2.amazonaws.com/examples/luma-mattes/paint-left.mp4"
                        },
                        "start": 3.6,
                        "length": 1.4
                    },
                    {
                        "asset": {
                            "type": "video",
                            "src": "https://shotstack-assets.s3-ap-southeast-2.amazonaws.com/footage/table-mountain.mp4"
                        },
                        "start": 0,
                        "length": 5,
                        "transition": {
                            "in": "fade"
                        }
                    }
                ]
            }
        ]
    },
    "output": {
        "format": "mp4",
        "resolution": "sd"
    }
}
If you POST this to the Shotstack API you will end up with the video below:
Transitioning to a new clip
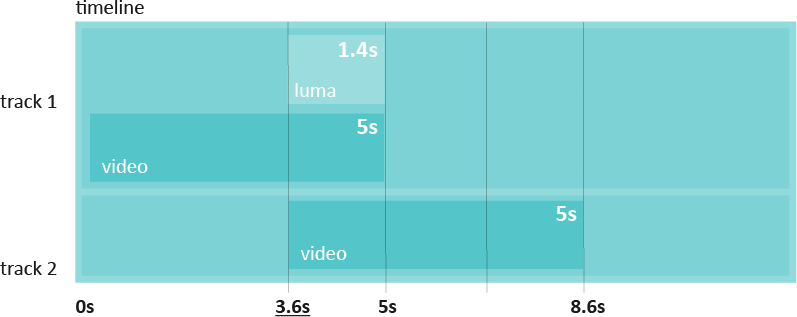
To create a transition effect we can simply add a new clip to a new track below our exiting track.
The new video clip just needs to start playing from when the luma matte starts (3.6s) so that it is revealed as the luma matte transparency is animated.
The timeline would look like this:
And the JSON would be:
{
    "timeline": {
        "tracks": [
            {
                "clips": [
                    {
                        "asset": {
                            "type": "luma",
                            "src": "https://shotstack-assets.s3-ap-southeast-2.amazonaws.com/examples/luma-mattes/paint-left.mp4"
                        },
                        "start": 3.6,
                        "length": 1.4
                    },
                    {
                        "asset": {
                            "type": "video",
                            "src": "https://shotstack-assets.s3-ap-southeast-2.amazonaws.com/footage/table-mountain.mp4"
                        },
                        "start": 0,
                        "length": 5,
                        "transition": {
                            "in": "fade"
                        }
                    }
                ]
            },
            {
                "clips": [
                    {
                        "asset": {
                            "type": "video",
                            "src": "https://shotstack-assets.s3-ap-southeast-2.amazonaws.com/footage/road.mp4"
                        },
                        "start": 3.6,
                        "length": 5
                    }
                ]
            }
        ]
    },
    "output": {
        "format": "mp4",
        "resolution": "sd"
    }
}
The video looks like this:
Adding more transitions
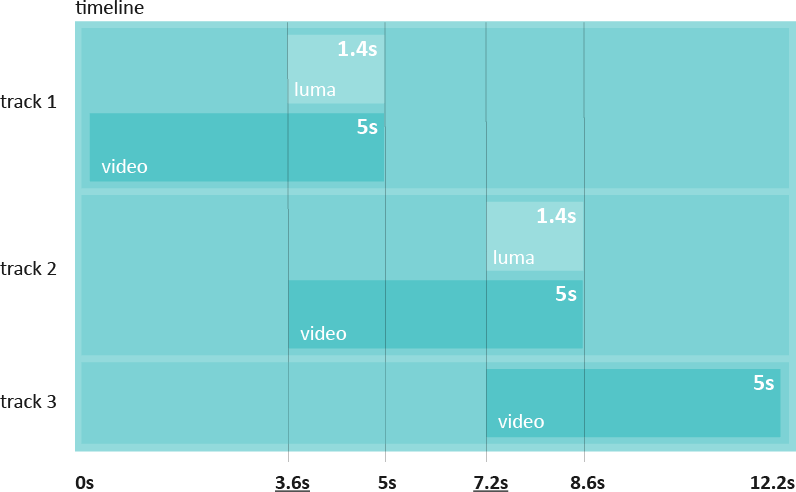
You can continue applying luma mattes to consecutive clips to create a series of transitions. To keep track of when to start the luma matte and video you want to reveal which is why it can help to plan and sketch out the timeline before writing any code.
For the final version of our video we will add another luma matte and reveal a third video clip, our timeline will look like the following:
We’ll add in a soundtrack to finish off our video and the final JSON will be:
{
    "timeline": {
        "soundtrack": {
            "src": "https://shotstack-assets.s3-ap-southeast-2.amazonaws.com/music/unminus/palmtrees.mp3",
            "effect": "fadeOut"
        },
        "background": "#000000",
        "tracks": [
            {
                "clips": [
                	{
                        "asset": {
                            "type": "luma",
                            "src": "https://shotstack-assets.s3-ap-southeast-2.amazonaws.com/examples/luma-mattes/paint-left.mp4"
                        },
                        "start": 3.6,
                        "length": 1.4
                    },
                    {
                        "asset": {
                            "type": "video",
                            "src": "https://shotstack-assets.s3-ap-southeast-2.amazonaws.com/footage/table-mountain.mp4"
                        },
                        "start": 0,
                        "length": 5,
                        "transition": {
                            "in": "fade"
                        }
                    }
                ]
            },
            {
                "clips": [
                	{
                        "asset": {
                            "type": "luma",
                            "src": "https://shotstack-assets.s3-ap-southeast-2.amazonaws.com/examples/luma-mattes/paint-right.mp4"
                        },
                        "start": 7.2,
                        "length": 1.4
                    },
                    {
                        "asset": {
                            "type": "video",
                            "src": "https://shotstack-assets.s3-ap-southeast-2.amazonaws.com/footage/road.mp4"
                        },
                        "start": 3.6,
                        "length": 5
                    }
                ]
            },
            {
                "clips": [
                    {
                        "asset": {
                            "type": "video",
                            "src": "https://shotstack-assets.s3-ap-southeast-2.amazonaws.com/footage/lake.mp4"
                        },
                        "start": 7.2,
                        "length": 5,
                        "transition": {
                            "out": "fade"
                        }
                    }
                ]
            }
        ]
    },
    "output": {
        "format": "mp4",
        "resolution": "sd"
    }
}
Our final video looks like the following:
Luma mattes will open a whole new landscape of creative possibilities for your videos. You can create any kind of transition from basic fades and wipes to more sophisticated animated patterns and shapes. Transitions are only one use for luma mattes, you can also remove backgrounds similar to a green screen or create interesting window or transparent text effects.
Get started with Shotstack's video editing API in two steps:
- Sign up for free to get your API key.
- Send an API request to create your video:
curl --request POST 'https://api.shotstack.io/v1/render' \
--header 'x-api-key: YOUR_API_KEY' \
--data-raw '{
  "timeline": {
    "tracks": [
      {
        "clips": [
          {
            "asset": {
              "type": "video",
              "src": "https://shotstack-assets.s3.amazonaws.com/footage/beach-overhead.mp4"
            },
            "start": 0,
            "length": "auto"
          }
        ]
      }
    ]
  },
  "output": {
    "format": "mp4",
    "size": {
      "width": 1280,
      "height": 720
    }
  }
}'


Experience Shotstack for yourself.
- Seamless integration
- Dependable high-volume scaling
- Blazing fast rendering
- Save thousands