Onboarding can make or break a new customer’s experience. Organisations focus on helping new users realise the value of their products and lead them through the activation point by asking them to perform tasks or follow tutorials and sending them emails and notifications.
But onboarding users is not a one-size-fits-all process. Customers may have different roles, come from different industries and have different ways of learning or digesting information. You might also notice that some audience segments may be easier to reach and engage with one content format, such as video, over another.
A recent survey shows that 97% of people think video is an effective tool to welcome and educate new customers and that 74% of people have watched a video to understand how to use a new app or website.
At Shotstack, we help anyone create amazing onboarding experiences and build data-driven and tailored videos. Because using the same onboarding strategy for every customer doesn’t bring the results you want.
Personalising onboarding videos
It’s important to collect first-party data and ask questions during the signup process so you can get to know your customers more, customise their experience and create relevant content. Here are different ways you can personalise your onboarding videos:
- By role or industry: Knowing what they do and their industry provides insights about their goals and how they plan to use your product. You can tailor their onboarding experience by giving them a walkthrough of relevant tools and features that can help them solve their challenges.
- By location: If you have customers worldwide, you can provide a unique onboarding experience by localising the voiceovers on your videos in the customer’s native language. This shows that you care about their needs and lets you avoid confusion by providing clear and relevant instructions.
- By experience: When you know a customer’s experience level, you can point them to the right resources. For instance, you don’t want to send beginners and advanced users the same tutorial videos. You’ll either lose the beginners because they would think your product is too complicated, or you’ll bore the experts and cause them to leave.
- By learning style: Some users want to dive right into a product and learn as they use it. When they get stuck, these people prefer to watch bite-sized videos that address specific problems. However, others prefer to watch a series of in-depth guides and tutorials before getting started.
Transform your onboarding videos with Shotstack
Create thousands of unique onboarding videos, one for every customer, with just one dynamic video template and save time and money. With Shotstack, you can build videos the way you want them. From simplified no-code solutions to more complex and bespoke experiences, we have the perfect toolkit for your vision.
- Shotstack APIs: Perfect for developers or technical users looking to create onboarding videos at scale and complex automations
- Workflows: The simplest and fastest way to generate thousands of unique or personalised videos and leverage advanced generative AI tools using CSV or webhook and without having to write a line of code
- Third-party no-code tools: Leverage tools such as Make and Zapier to generate videos on Shotstack and connect to other third-party apps
Create onboarding videos that work with Workflows
Whether you’re a developer or a marketer, technical or not, you can generate thousands of bespoke onboarding videos in minutes with Workflows that are sure to capture your customers’ attention.
You can create workflows in Shotstack using a CSV file or a webhook. We’ll focus on the first one in this blog.
To create unique onboarding videos on Workflows, you will need:
- A dynamic video template
- A CSV file with data that matches the merge fields on your dynamic template
If you prefer to watch a video tutorial, here’s one for you:
You can also follow along our step-by-step guide:
Step 1: Upload your CSV
Create your workflow by selecting CSV Upload as your trigger and choosing the file from your computer. Each of your column headers will appear under Workflow Data at the bottom and will be available for you to use in the next Actions.

Optional Step: Generate text-to-speech
Proceed to the next step if your videos don’t need a voiceover.
Click the plus sign to add a new Action. Choose Generate Text to Speech using Shotstack API. Select your preferred language and voice and map the data from your CSV that holds your script to the text parameter to produce audio files. Once done, you will be able to use the output from this action in the next tasks or steps.
You can also use the Elevenlabs integration to generate text-to-speech. Make sure you’ve set up your account in Integrations before using it.

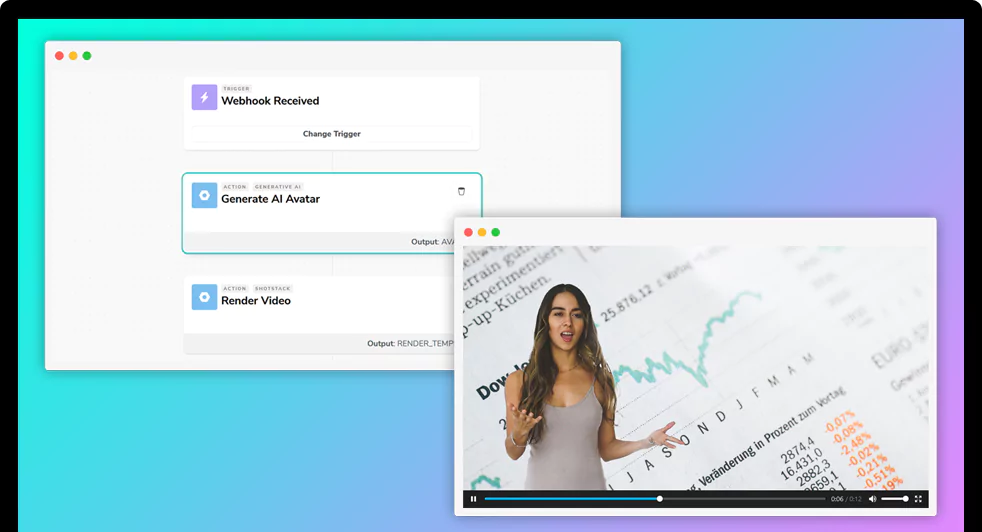
Step 2: Build your video
Add another Action and this time, choose Build Shotstack video. Choose a dynamic template built using the Shotstack Studio online video editor. Map the merge fields on your template with the right data. You can choose data from your CSV or an output from a previous action.
And just like previously, the output from this action is available to use in the subsequent steps.

Step 3: Choose your hosting service
Next, choose where you host and save your files. You can choose from AWS S3, Google Cloud Storage or Shotstack’s video hosting service, which is included in your subscription.
If you have outputs from various actions that you want to store on different hosting services, you’ll need to add an action for each of them.
For example, you can choose to host your voiceover files on your AWS S3 account and save your final rendered videos on Shotstack’s hosting service.
Step 4: Generate your videos
Once you’re happy with your workflow, click on Save and Run Once to test and preview your workflow using the data in the first row in your CSV. Once you click Confirm and Run, you will land on your Workflows Details page, where you can see all the videos rendered using this specific workflow.
A job with a job ID, time and status will appear on the page. You can click on the job to view the summary of the tasks performed, including the input and output files. If your job returns a failed status, you will see the errors in the job details.
When you’re happy with the test video, you can click Upload CSV and Run to upload your CSV and create all your videos. Each job will include a link to a video that you can download to send to your new customers to be onboarded.
The advantage of Workflows is that you can set it up and run it as often as you need. You can generate a new set of videos by clicking on the Upload CSV and Run button and using a new CSV file.
Ready to create your own onboarding videos? Log in to your account now or sign up for a free to use Shotstack account.
Get started with Shotstack's video editing API in two steps:
- Sign up for free to get your API key.
- Send an API request to create your video:
curl --request POST 'https://api.shotstack.io/v1/render' \
--header 'x-api-key: YOUR_API_KEY' \
--data-raw '{
  "timeline": {
    "tracks": [
      {
        "clips": [
          {
            "asset": {
              "type": "video",
              "src": "https://shotstack-assets.s3.amazonaws.com/footage/beach-overhead.mp4"
            },
            "start": 0,
            "length": "auto"
          }
        ]
      }
    ]
  },
  "output": {
    "format": "mp4",
    "size": {
      "width": 1280,
      "height": 720
    }
  }
}'


Experience Shotstack for yourself.
- Seamless integration
- Dependable high-volume scaling
- Blazing fast rendering
- Save thousands