Contents
 Claude
  ChatGPT
  Perplexity
  Google AI
 Contents
There are three ways to let users create videos inside your app, and none of them involves building an editor. Shotstack includes an embeddable, white-label video editor (the Studio SDK, installed from npm and running in your own frontend) and a rendering API for editor-less automation.
So you can embed a full editor, build your own interface and render headlessly, or hand users a form and never show them a timeline. The right one depends on how much of the video your users need to change.
TL;DR
- Embed the editor: mount the Studio SDK, a white-label video editor, in your own frontend. Best for creator tools, media platforms and client portals.
- Go headless: build your own interface and assemble Edit JSON server-side. Best when video is one output of your product among many.
- Form-to-video: a template plus a form that fills its placeholders. Fastest to ship and most consistent output. Best when users personalize a fixed layout rather than compose.
- All three produce the same Edit JSON and render through the same API, so you can ship a form now and expose more of the editor later.
This guide covers the case where your users make the videos. If your pipeline should produce them behind the scenes and clients just receive finished files, that’s the other half of this pair: our guide to automating video content production for multiple clients.
What you’ll build
The same promo video three ways: composed by hand in an embedded editor, generated from a form, and produced by a single button with no interface at all. Each option is shown with working code, and the companion example app in the Shotstack cookbook runs all three so you can compare them side by side.
Prerequisites
You need Node 18 or later, npm, and a free Shotstack API key. Sign up at dashboard.shotstack.io, then find your keys under API Keys. Shotstack issues separate keys for the sandbox and production environments.
We’ll use the sandbox throughout. Store the key in an environment variable and keep it server-side; anything in browser code is readable by anyone who opens devtools:
export SHOTSTACK_API_KEY="your_sandbox_api_key"
Three things to know about the sandbox before your first render: output carries a watermark, videos are capped at 10 minutes, and your account needs at least one credit available to use the environment even though ordinary sandbox renders don’t consume any.
Every asset used here (footage, music, images) comes from Shotstack’s public library, and the fonts are built in, so there’s nothing to source or host.
Three ways to add video creation to your app
| Embed the editor | Go headless | Form-to-video | |
|---|---|---|---|
| What the user sees | Timeline, canvas, drag-and-drop | Your own UI, no editor | A form with a few fields |
| What you build | Mount the SDK, hide what you don’t want | Your entire interface | A form and a submit handler |
| Shotstack piece | Studio SDK | Edit API | Template + merge fields |
| Creative freedom | High: users restructure the video | Whatever you expose | Fixed layout, variable content |
| Typical build | Days | Days | Hours |
| Best for | Creator tools, media platforms, client portals | Products where video is one output among many | Personalizing a fixed layout at volume |
The way to choose is to ask what your users are actually doing, and how much of the video they need to change.
If they’re producing a listing video for a property, a social cut for a product, or a personalized welcome clip, a form with a few fields and a Generate button may be all they need, and the fixed layout keeps the output consistent. If they need to cut, rearrange and restyle, the editor is the piece that gives them that, and it’s the part you can’t build in an afternoon. If video is one output among many and you already own the interface, headless keeps everything inside your own UI.
Video editor SDK vs video API: what each term means
People search for a “video editor API” as though it were one product. It’s two, they get used interchangeably, and the difference decides your architecture.
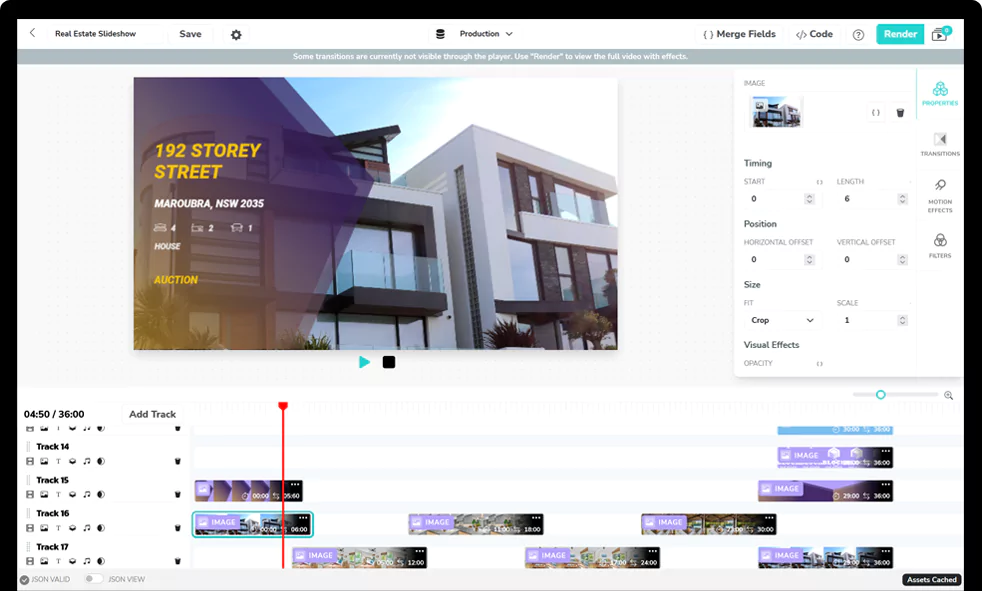
A video editor SDK is a client-side library that runs in your user’s browser. It renders an interactive editing surface (canvas, timeline, playhead, drag handles) and its output is a document describing an edit. It doesn’t produce an MP4 on its own.
A video API is a server-side rendering service. You send it a document describing an edit and it returns a finished video file. It has no interface at all.
The distinction matters because they’re two halves of one system, not competing products. The editor produces the document; the API renders it. With Shotstack they’re literally the same document: the JSON the Studio SDK edits in the browser is the same Edit JSON the render API accepts.
Design something in the browser, save the JSON, render it from a server months later. Or the reverse: load a server-side template into the editor for a user to adjust.
So “SDK or API?” is the wrong question. The real one is how much of the editing surface you expose, which is the three-way choice above. All three use the render API underneath.
Option 1: embed a white-label editor
The Studio SDK is an npm package that mounts a full video editor inside your application. It’s source-available under the PolyForm Shield License, which permits commercial and non-commercial use in any application provided you’re not building something that directly competes with Shotstack. In practice: read the source, restyle it, ship it in a paid product.
Step 1: scaffold a working editor
npm create video-editor@latest
That generates a complete app (canvas, timeline, controls, a starter edit) in React, Vue, Next.js, Angular or vanilla TypeScript. Pick a framework when prompted, then:
npm run dev
You’ll have a running editor at localhost:5173. That’s the fastest way to see what the SDK gives you before deciding whether you want it.
To add it to an app you already have instead:
npm install @shotstack/shotstack-studio
Step 2: mount it
The scaffold does this for you. What follows is the same mount written out, for when you’re adding the SDK to an existing app. It goes wherever your app boots; the scaffold puts it in src/main.ts.
Your markup needs two containers:
<div data-shotstack-studio></div>
<div data-shotstack-timeline></div>
Then roughly fifteen lines:
import {
  Edit,
  Canvas,
  Controls,
  Timeline,
  UIController,
} from '@shotstack/shotstack-studio';

const template = await (await fetch('/promo.json')).json();

const edit = new Edit(template);
const canvas = new Canvas(edit);
const ui = UIController.create(edit, canvas);

await canvas.load();
await edit.load();

const timeline = new Timeline(
  edit,
  document.querySelector('[data-shotstack-timeline]')!,
);
await timeline.load();

const controls = new Controls(edit);
await controls.load();
That’s playback, clip selection, drag-and-drop, undo/redo and keyboard shortcuts.
One thing to wire up before you ship: the SDK renders through WebGL and throws WebGLUnsupportedError where it isn’t available. Locked-down corporate browsers and some virtualized environments will hit it, so wrap the mount in a try/catch and fall back, usually to Option 3.
Step 3: render what the user made
edit.getEdit() returns the edit as JSON, the same shape the render API accepts, which is the whole reason these compose:
const res = await fetch('/api/render', {
  method: 'POST',
  headers: { 'Content-Type': 'application/json' },
  body: JSON.stringify({ edit: edit.getEdit() }),
});
Note that this posts to /api/render on your server, not to Shotstack. A Shotstack key in browser code exposes your entire render budget to anyone who opens devtools, so the key stays server-side and a small proxy makes the actual call:
// server.js - the browser never sees SHOTSTACK_API_KEY
const res = await fetch('https://api.shotstack.io/edit/stage/render', {
  method: 'POST',
  headers: {
    'Content-Type': 'application/json',
    'x-api-key': process.env.SHOTSTACK_API_KEY,
  },
  body: JSON.stringify(payload.edit),
});

const { response } = await res.json();
// response.id -> store it against the user before responding.
That proxy is the one piece every option here shares, and it’s where the rest of this article’s server-side concerns end up living: render ownership, URL validation, and the per-user rate limit.
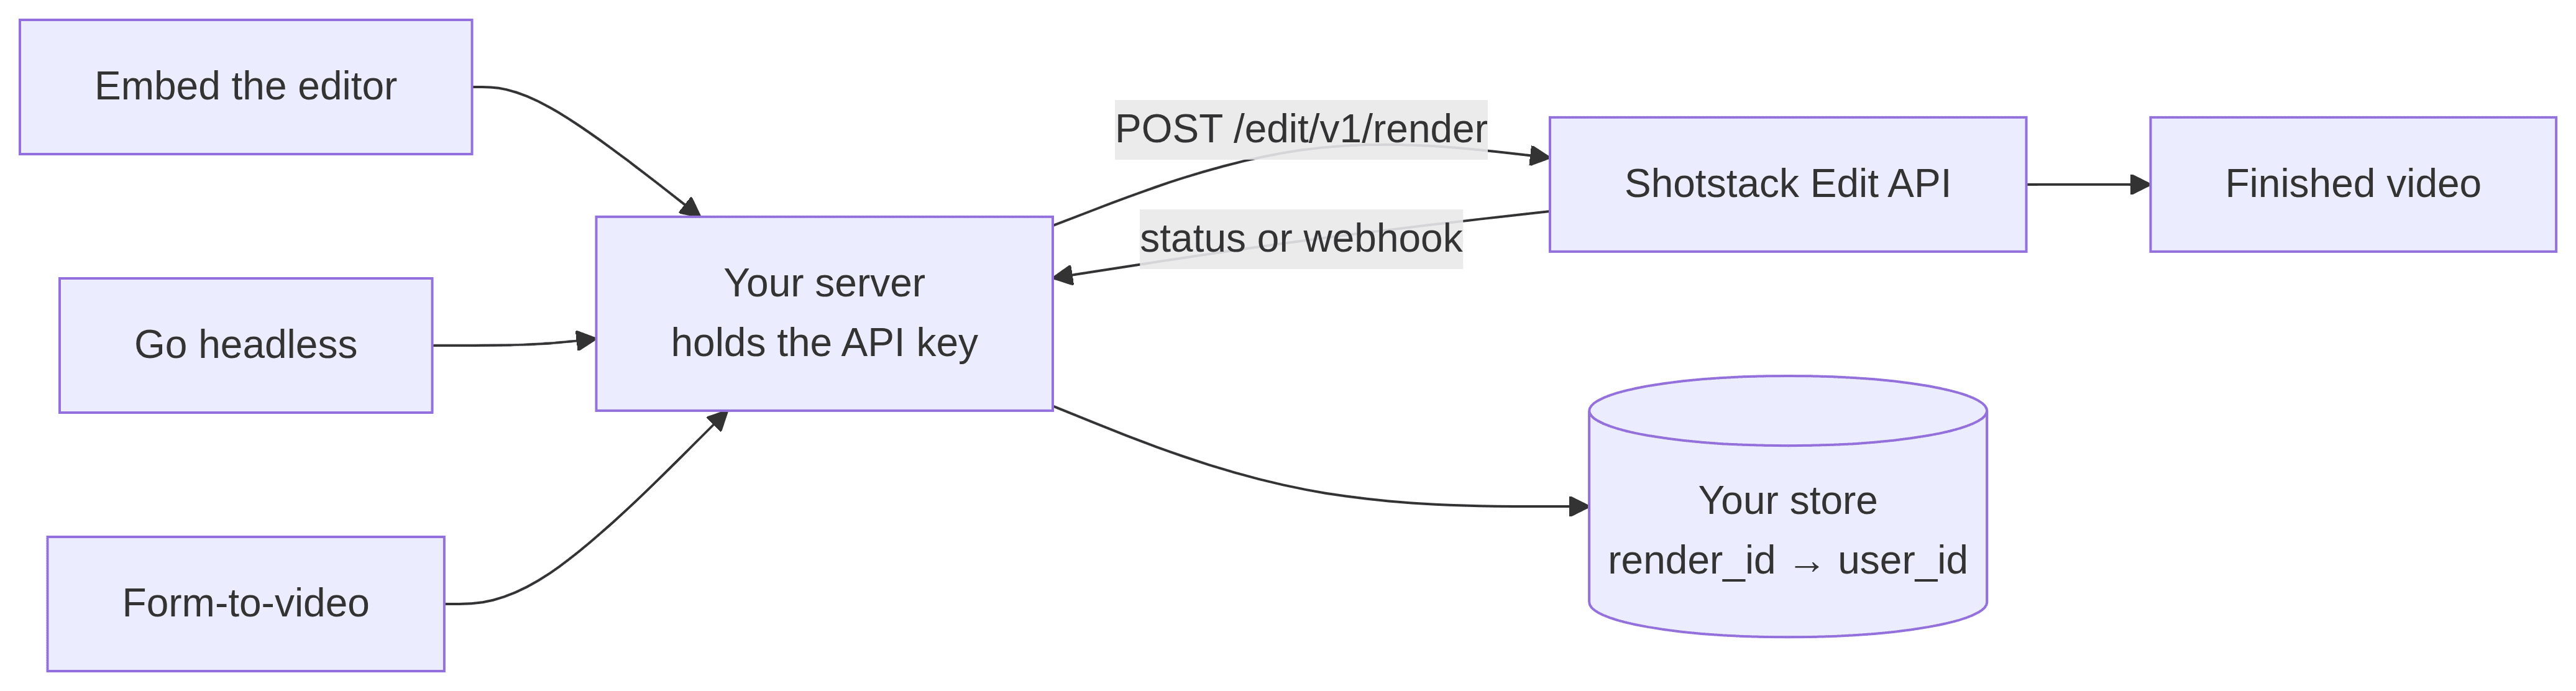
getEdit() is also your answer to drafts. The SDK holds edit state in memory and persists nothing on its own. If users expect to return to unfinished work, save its output against the user and pass that back to new Edit() or edit.loadEdit() when they return.
Two things the SDK does that you might not expect
The SDK also runs as a standalone preview player. There’s no configuration flag; you get it by composition. Instantiate Edit and Canvas and stop; omit Timeline, Controls and UIController, and you have something that renders and plays an edit with no editing surface.
That’s the right tool for showing a user what their video will look like before committing a render, and it costs nothing because nothing renders server-side.
Canvas can capture stills. captureFrame() returns the full-bleed output frame at the edit’s output resolution as a base64 data URL; captureViewport() captures what the user currently sees, zoom and pan included. The first is how you generate a thumbnail without spending a render credit.
Option 2: go headless
Headless means your users never see an editor, because you built the interface and it doesn’t look like editing software. A real-estate product shows a property with a “Generate listing video” button; an e-commerce tool exposes four thumbnails and a music toggle. Behind it, you assemble Edit JSON and post it.
Step 1: collect what varies
Whatever your UI already knows: the property, the product, the user’s chosen music. No new concepts.
Step 2: assemble the edit and submit it
// server-side - the browser never sees SHOTSTACK_API_KEY
const res = await fetch('https://api.shotstack.io/edit/stage/render', {
  method: 'POST',
  headers: {
    'Content-Type': 'application/json',
    'x-api-key': process.env.SHOTSTACK_API_KEY,
  },
  body: JSON.stringify({
    timeline: {
      background: '#000000',
      tracks: [
        {
          clips: [
            {
              asset: {
                type: 'rich-text',
                text: listing.headline,
                font: {
                  family: 'Montserrat',
                  size: 48,
                  weight: 700,
                  color: '#ffffff',
                },
                align: { horizontal: 'center', vertical: 'middle' },
              },
              start: 0.5,
              length: 4.5,
              width: 1000,
              height: 260,
            },
          ],
        },
        {
          clips: [
            {
              asset: { type: 'video', src: listing.footageUrl },
              start: 0,
              length: 5,
              fit: 'crop',
            },
          ],
        },
      ],
    },
    output: { format: 'mp4', size: { width: 1280, height: 720 } },
    callback: `https://your-app.com/hooks/render?user=${userId}`,
  }),
});

const { response } = await res.json();
// response.id -> store it against the user. See "From edit to finished video".
Two details that trip people up. tracks[0] is the top layer, not the bottom: text first, background last. And fit: "crop" fills the frame while preserving aspect ratio; Shotstack’s cover stretches and will visibly distort footage, which is the opposite of the CSS meaning.
Go headless when video is an output of your product rather than its purpose. If the user’s mental model is “I’m listing a property” and video is one artifact that falls out of that, an editor is a detour. You also guarantee the video always looks right, because you control every parameter that isn’t user content.
The cost is that you own the interface, including every state an editor would have given you free: progress, preview, error handling, retry.
Option 3: form-to-video
Form-to-video is a template with placeholders plus a form that fills them. Users personalize; they don’t compose. It’s the fastest of the three to ship, and the right fit when the layout stays fixed and only the content changes.
Step 1: build the template
Same Edit JSON as Option 2, with {{ PLACEHOLDER }} values wherever the user supplies something. Save it as template.json and post it:
curl --fail-with-body --silent --show-error \
  --request POST \
  --url https://api.shotstack.io/edit/stage/templates \
  --header "Content-Type: application/json" \
  --header "x-api-key: ${SHOTSTACK_API_KEY}" \
  --data @template.json
Keep the response.id it returns; that’s the template ID:
export SHOTSTACK_TEMPLATE_ID="your_template_id"
Step 2: build the form and validate it
One field per merge field, labeled in your users’ language rather than the template’s: {{ HEADLINE }} becomes “What’s the main message?” Keep it under about six fields; past that, completion drops and you’re building an editor with extra steps.
Validation is where form-to-video products succeed or fail. Renders cost credits and take time, so catch problems while the user is still looking at the form: cap text length against what the layout holds, and check any URL you’ll pass to the API.
That last check needs more than a reachability test, because it’s the point where a user hands you a URL your infrastructure will fetch. Enforce three rules server-side, where users can’t skip them:
- Reject anything that isn’t
https://on a public host. Private ranges,localhostand cloud metadata endpoints should never reach an edit. Shotstack doing the fetching doesn’t move the responsibility. HEADthe URL and checkcontent-lengthandcontent-typefirst. A 2 GB “logo” wastes credits and fails late.- Prefer uploads you control. Accept the file, store it, pass your own URL, and the category disappears.
Step 3: submit the render
// server-side - the browser never sees SHOTSTACK_API_KEY
await fetch('https://api.shotstack.io/edit/stage/templates/render', {
  method: 'POST',
  headers: {
    'Content-Type': 'application/json',
    'x-api-key': process.env.SHOTSTACK_API_KEY,
  },
  body: JSON.stringify({
    id: process.env.SHOTSTACK_TEMPLATE_ID,
    merge: [
      { find: 'HEADLINE', replace: form.headline },
      { find: 'FOOTAGE', replace: form.footageUrl },
    ],
  }),
});
Worth knowing: this isn’t necessarily a separate build from Option 1. UIController.create(edit, canvas, { mergeFields: true }) adds a Merge Fields panel to the editor, off by default. And the SDK resolves a merge array client-side: load an edit that carries one and the canvas previews the replaced text rather than the raw {{ HEADLINE }}, so a user can see the real result before you spend a render on it.
That means you can ship a form now and expose more of the editor later to the users who ask, without changing your rendering pipeline at all.
Brand it and lock down what users can change
Three levers control how much of the editor your users can reach.
What’s on the toolbar. UIController adds and removes buttons at runtime:
ui.registerButton({
  id: 'add-title',
  icon: `<svg viewBox="0 0 16 16">...</svg>`,
  tooltip: 'Add title',
});

ui.on('button:add-title', ({ position, selectedClip }) => {
  edit.addClip(0, {
    asset: {
      type: 'rich-text',
      text: 'Title',
      font: { family: 'Work Sans', size: 72, color: '#ffffff' },
    },
    start: position,
    length: 5,
    width: 800,
    height: 200,
  });
});
The handler receives the current playhead position and selectedClip. The latter is null when nothing is selected, and it’s what you’d branch on for a button that acts on the user’s selection rather than inserting at the playhead.
What’s interactive. UIController.create() takes options: selectionHandles: false removes the drag, resize and rotate handles, so users can play and use your buttons but can’t reposition anything. maxPixels sets a ceiling on the resolutions the picker will accept, which is a direct control on what a user can spend.
What exists at all. The strongest restriction is omitting components. No Timeline means no timeline editing; no Controls means no keyboard shortcuts. Same composition idea as preview-player mode: you’re choosing a surface area, not toggling features off.
For visual branding, the source is available under PolyForm Shield, so restyling means overriding the SDK’s styles in your own build. There’s no theming API at the time of writing.
From edit to finished video
Once a user has made something, there are two ways to turn it into a file, and they are not interchangeable.
Browser export uses VideoExporter, which renders on the user’s machine:
import { VideoExporter } from '@shotstack/shotstack-studio';

const exporter = new VideoExporter(edit, canvas);
await exporter.export('my-video.mp4', 25);
Note the signature: export() returns Promise<void>. It triggers a download in the user’s browser. It does not hand the file back to your application. That single fact usually decides the architecture.
If your product needs to keep the video (store it, post it to a social account, email it, show it in a gallery) browser export can’t help, because your server never sees the file. It’s right when the user’s goal genuinely ends at “I have the file now,” and it costs no render credits.
It can also fail outright, and that’s the bigger constraint. Export encodes through the browser’s WebCodecs implementation, so it depends on the codecs that browser actually has. An edit containing audio needs an AAC encoder, and where the browser can’t provide one, export() throws rather than producing a file:
ExportError: Export failed: Error: This specific encoder configuration
(aac, 192000 bps, 2 channels, 48000 Hz) is not supported in this environment.
Consider using another codec or changing your audio parameters.
The same edit with its audio track removed exports fine on the same browser. So browser export isn’t a feature you can simply offer; it’s one you have to detect support for, catch failures from, and fall back out of. Cloud rendering has none of that variance.
Cloud rendering posts the edit to the API and gives you a URL. The render is asynchronous, so rather than polling, set callback and handle the webhook. Two things to build in: respond within 10 seconds or it’s retried, and branch on status rather than assuming a url, because failures fire the same hook.
| Browser export | Cloud render | |
|---|---|---|
| Where it runs | User’s machine | Shotstack |
| Your app gets the file | No | Yes, via webhook |
| Cost | Free | Credits per minute rendered |
| Audio | Needs an AAC encoder the browser may not have | Always works |
| Reliability | Varies by browser and device | Identical every time |
| Needs WebGL | Yes | No |
A useful default: cloud rendering for anything your product is responsible for, browser export as a convenience on top.
One constraint that applies here too: there is no endpoint that lists your renders. You get an ID on submit, and GET /edit/{version}/render/{id} looks up exactly one. Write render_id -> user_id to your own store the moment you submit, before anything else can throw.
A callback query string carries context back to your webhook, but your database is the source of truth. It’s also the only way to build “show me my videos” at all.
Who pays for the renders
Worth settling before you ship, because it’s the part of this decision that never shows up in code review. Every render your users trigger lands on your Shotstack bill, and credits are account-level; there’s no per-user metering built in.
Shotstack charges per rendered minute, so a 30-second video costs cents. That’s comfortable until a user discovers they can hold down a button.
Three models, matching how you already charge:
- Absorb it. Bundle a render allowance into each plan tier and count against it in your own database. Simplest, and fine when video is one feature among many.
- Meter it. Track renders per user per period and stop them at the cap. Uses the tracking you’re already doing, plus a check before submit.
- Pass it through. Charge per video. Cleanest economics, but it makes users think about cost every time they click, which suppresses exactly the usage you want early on.
Whichever you pick, put a hard per-user rate limit in front of the render call from day one. It’s a few lines, and it’s the difference between a surprising invoice and an unpayable one.
Worked example: one app, all three paths
The companion example app in the Shotstack cookbook runs everything above: three tabs over one template. A user either opens it in the embedded editor and adjusts freely, fills in a three-field form and skips the editor entirely, or presses a single button that renders with no interface at all. All three land in the same render proxy, the same ownership record and the same gallery.
Two processes, because the key stays server-side. This needs two terminals, both of which keep running:
# terminal 1 - the render proxy, and the only one that needs the key
npm install
export SHOTSTACK_API_KEY="your_sandbox_api_key"
npm run server
# terminal 2 - the app
npm run dev
Start the proxy first. If Vite is up and the proxy isn’t, the app loads normally and every render fails with a confusing error.
Open localhost:5173. The form template is created automatically the first time you use that tab.
Each path prints its progress and drops the finished video into the gallery at the bottom:
Submitting…
queued…
rendering…
Done.
The thing worth doing with a demo like this is instrumenting it. If you ship more than one path, which one people actually reach for is the most useful signal you’ll get about what they wanted. It’s worth answering with data rather than assumption.
Ship video creation without shipping an editor
You’ve now seen the same video produced three ways: composed in an embedded Studio SDK editor, assembled headlessly behind your own UI, and generated from a three-field form. They all emit the same Edit JSON and land on the same render API, so the choice isn’t an architecture bet. It’s a decision about how much editing surface your users need, and you can change your answer later without changing your pipeline.
Ready to try it? Create a free API key: the sandbox is free for development, and npm create video-editor@latest gets you a running editor in about a minute.
Frequently asked questions (FAQs)
Do I need the Studio SDK to use the Edit API?
No. The Edit API accepts Edit JSON from any source: your own server code, a saved template with merge fields, or the SDK. You only need the SDK when users edit or preview a video in the browser.
How long does Shotstack host finished videos?
The URL a render returns expires after 24 hours. Transfer the file to your own storage inside that window, or add a Shotstack hosting destination to the render, which keeps the asset served from Shotstack’s CDN indefinitely.
Can I generate a thumbnail for each video automatically?
Yes, two ways. In the browser, captureFrame() produces a still at output resolution without spending a render credit. Server-side, set output.poster on the render request and Shotstack returns a poster image alongside the video.
Get started with Shotstack's video editing API in two steps:
- Sign up for free to get your API key.
- Send an API request to create your video:
curl --request POST 'https://api.shotstack.io/v1/render' \
--header 'x-api-key: YOUR_API_KEY' \
--data-raw '{
  "timeline": {
    "tracks": [
      {
        "clips": [
          {
            "asset": {
              "type": "video",
              "src": "https://shotstack-assets.s3.amazonaws.com/footage/beach-overhead.mp4"
            },
            "start": 0,
            "length": "auto"
          }
        ]
      }
    ]
  },
  "output": {
    "format": "mp4",
    "size": {
      "width": 1280,
      "height": 720
    }
  }
}'

Published August 26, 2026
Jesus Rojas is a Growth Engineer at Shotstack, combining engineering and experimentation to help developers adopt video APIs. He builds onboarding experiences, lifecycle automation and analytics. Outside work, he enjoys making music and plays several instruments. More from Jesus
Experience Shotstack for yourself.
- Seamless integration
- Dependable high-volume scaling
- Blazing fast rendering
- Save thousands